
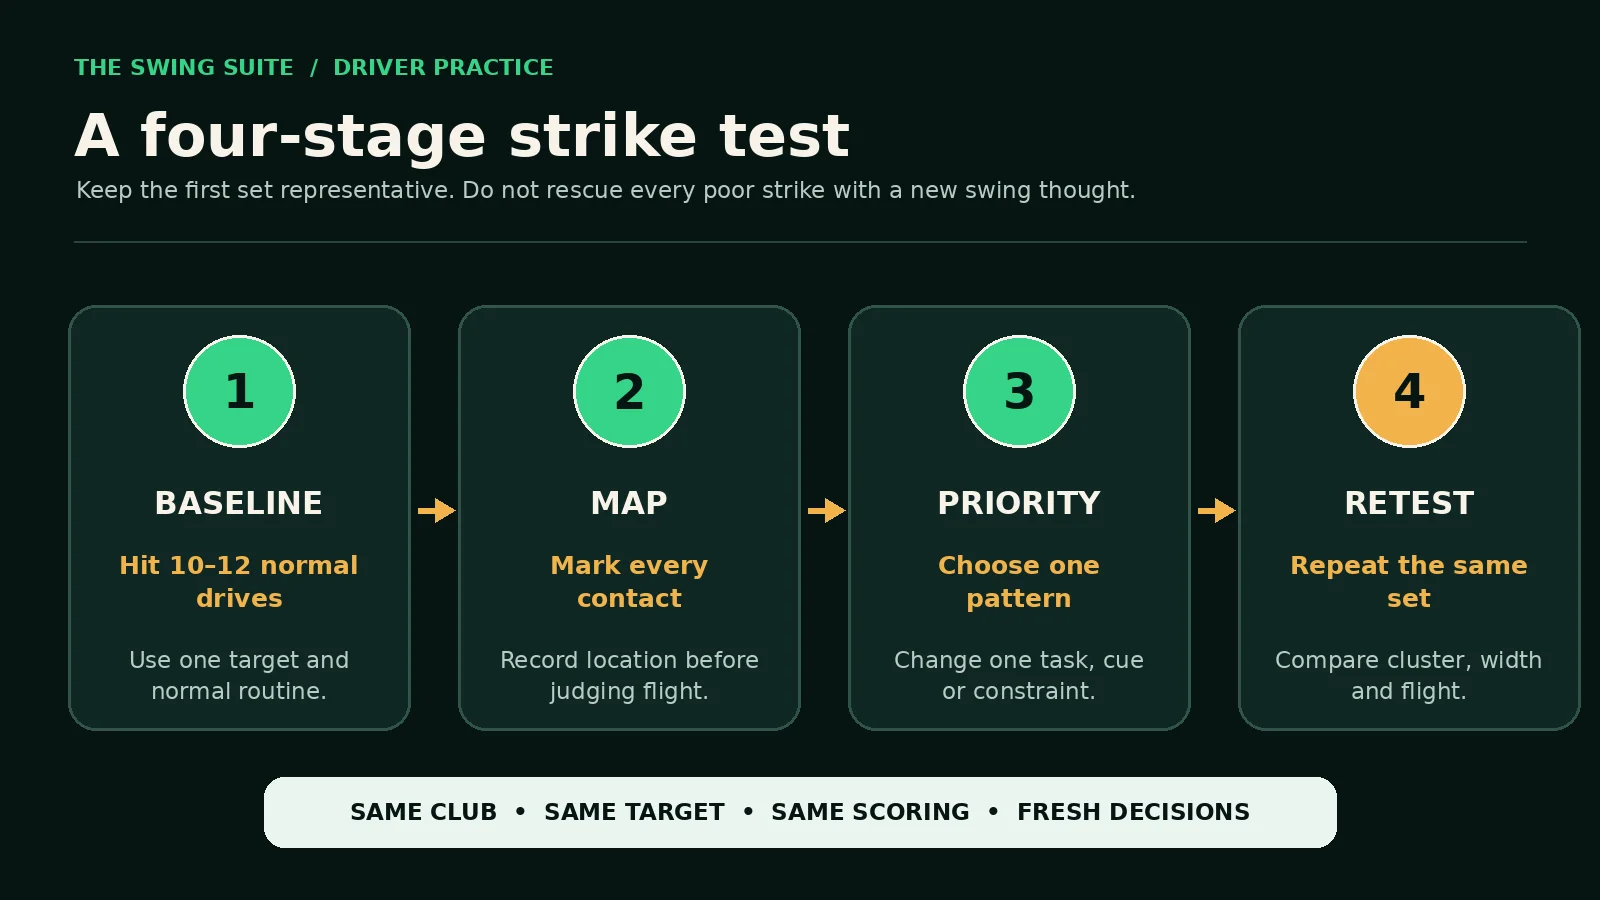
Driver strike consistency improves when you stop treating each ball as a separate mystery and map where a representative set actually meets the face. Use impact spray, face tape or another safe temporary marking method. Hit ten to twelve normal drives to one clear target, mark the centre of every contact, then look for the cluster. Choose one practice priority from that pattern, keep the rest of the task stable and repeat the same test.
The map is not a verdict on your swing and it is not a complete diagnosis. It tells you where contact occurred and how tightly those contacts grouped. Ball flight, club delivery and strike location still need to be considered together. A toe mark does not prove one universal swing fault; a heel mark does not justify an automatic opposite correction. The first job is to see the pattern accurately enough to ask a better question.
This guide gives you a simple baseline test, a nine-zone face map, ways to interpret common clusters without overclaiming, and a 40-minute practice session. Every shot count, zone and score is illustrative. Adapt the set to your safety, fatigue, practice space and equipment. Follow the manufacturer’s guidance for any impact product and never use a substance that can damage the face or affect another player.
The direct answer: map ten to twelve representative strikes
Warm up before you score anything. Then choose one driver, one teeing area and one target corridor. Hit ten to twelve drives with the routine and intent you would normally use on the course. After every shot, record the impact location before you make a technical judgement. Number the marks if the product makes that practical, or copy each location onto a paper grid.
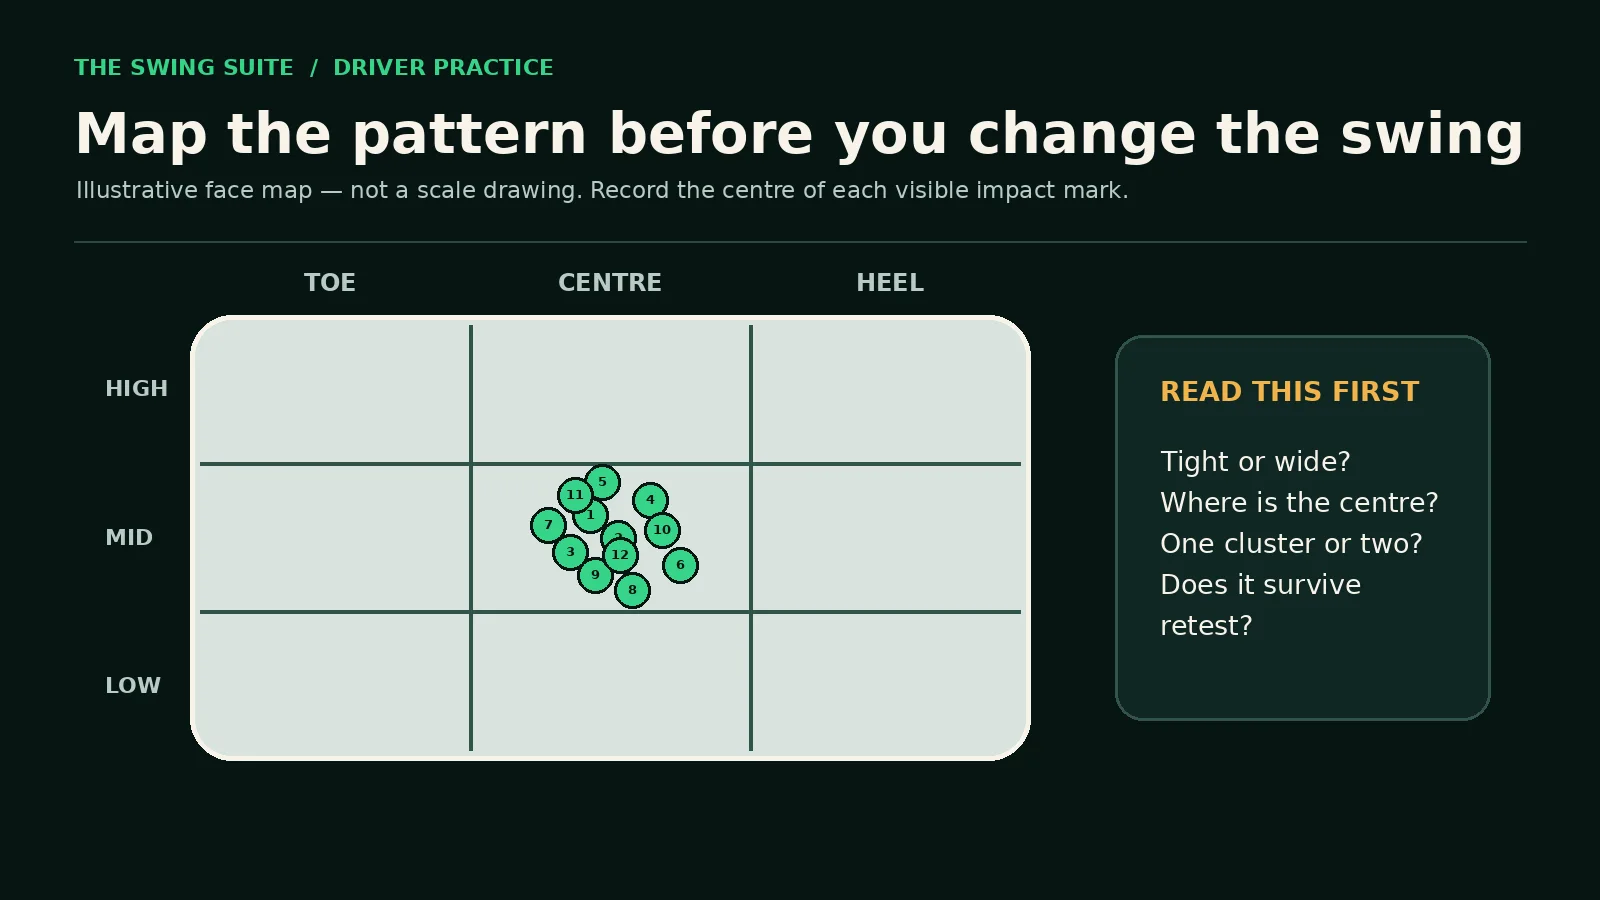
When the set is complete, draw the smallest practical area that contains the main group. Note whether the group is compact, broad, vertical, horizontal or split into two clusters. Identify its centre rather than selecting the worst-looking mark. A pattern centred slightly high and towards the toe is a different practice problem from a wide group spread across the entire face, even if both sets contain one heel strike.
Choose one priority. It might be reducing the width of the group, moving a repeated low cluster towards the middle, or preserving a good cluster while adding a more realistic target. Use one task or cue for the next block. Then hit the same number of shots under the same scoring rules. Compare the two patterns, not the single best ball from each set.
If the second set is tighter, more centred and produces a more useful flight, the change has earned another test. If contact improves while start direction, curve or balance deteriorates, the change may be incomplete. If nothing improves, return to the baseline rather than layering on more instructions. The map is valuable because it makes the next decision visible.
What a face-contact map can tell you
A strike map gives direct evidence about contact location. It can show whether the ball repeatedly meets the high, middle or low part of the face and whether the group sits towards the toe, centre or heel. It can show variability: a compact group, a broad smear, a diagonal pattern or two distinct families of contact. Those observations are useful because contact location affects the collision and can influence launch, spin, speed and curvature.
TrackMan’s club-data definitions describe impact location as the horizontal and vertical position of the golf ball on the club face at impact. The same official material explains that ball flight is influenced by the club’s delivered impact conditions, including the face, path and strike. That supports a layered approach: record contact accurately, then relate it to measured delivery and observed flight rather than pretending one mark explains the whole shot.
A map can also tell you whether your practice task is representative. If the first six warm-up swings form a compact group but the scored set spreads dramatically when you introduce a fairway target, the difficulty may involve the decision or intention as well as the movement. If the pattern holds under a target but breaks when you alternate shapes, the added demand has exposed a useful limit.
The map is particularly good at revealing what memory hides. Golfers often remember the loudest heel strike, the longest drive or the ball that curved furthest. A numbered set gives every attempt a place. The ordinary contacts between the extremes become visible, and those ordinary contacts usually define the pattern you should practise.
Review TrackMan’s official club-data definitions ↗
What the map cannot prove on its own
Impact location does not prove why the club arrived there. Similar heel patterns can arise from different combinations of address distance, posture, balance, handle movement, swing direction, face orientation, tee position or an attempt to steer the ball. The face mark is the result of the collision. It narrows the investigation, but it does not supply one universal cause.
The map also cannot replace ball-flight information. A centred strike that starts far from the intended line still needs a face-and-path conversation. A toe strike that finishes near the target may have been helped or hurt by the delivered face, path, curvature and target choice. If you score only contact, you can train a neater mark while losing the shot you actually need.
TrackMan defines face-to-path as the difference between face angle and club path and notes that its relationship to spin axis assumes centred contact. That qualification matters. Off-centre contact can change the resulting flight through impact effects, so a golfer should not use curvature alone to infer face-to-path when strike is moving around the face. Measure both layers when technology is available; observe both when it is not.
Nor can one small set establish a permanent identity. Ten to twelve shots are enough for a practical baseline, not a scientific declaration about every drive you hit. Fatigue, surface, tee height, footwear, target, weather and attention can change the pattern. Retest on another day before turning one session into a permanent swing label.
See TrackMan’s definition and centred-contact caveat for face-to-path ↗
Create a map that is simple enough to use
Divide the face into nine broad zones: high toe, high centre, high heel; middle toe, middle centre, middle heel; low toe, low centre and low heel. The zones are not a promise that every point within one box behaves identically. They are a practical language for grouping strikes. Use the centre of the visible mark, not the edge of a powder ring or a scuff that may be larger than the ball’s actual contact patch.
Keep the drawing abstract. You do not need to reproduce grooves, bulge, roll or the exact shape of your driver. A rectangle or rounded grid is sufficient for recording. If you want more detail, add a small centre point and note approximate distance from it, but do not let measurement become so slow that your routine disappears between shots.
Number the shots in order. Sequence can reveal a pattern that a final cloud cannot. The first three may sit low while you are still organising tee height. The middle set may cluster well. The last three may move towards the heel as speed or fatigue changes. If all marks are plotted without order, those transitions vanish.
Add one short flight note beside each number: start left, start centre or start right; curve left, straight or curve right; useful height, low or high. Keep the words observational. Avoid writing causes such as “came over it” unless delivery data actually supports that description. The purpose is to preserve evidence for the review, not to diagnose while the ball is still in the air.
Set up a fair baseline before testing a fix
Use a normal warm-up. Begin with shorter clubs or controlled driver swings if that is your usual preparation, but do not include those strikes in the scored set. Start the baseline when you can make a balanced swing and identify the target. A cold first ball and an exhausted final ball should not be treated as equally representative if the session itself created those conditions.
Use the driver and ball type you actually want to test. Changing heads, loft settings, shaft, tee design or ball model inside a short baseline introduces another variable. Equipment comparison can be a separate session. For strike practice, stability makes the pattern easier to understand.
Choose a target corridor rather than “somewhere down the range”. The corridor can be an imagined fairway between two landmarks. It should be wide enough to encourage a committed drive but clear enough that start and curve matter. If the target is unrealistically narrow, a defensive intention may distort the baseline. If it is meaningless, the test loses its course connection.
Place the tee consistently for the baseline. You may mark the ground with a safe visual reference if the facility permits it. Do not chase millimetres. The aim is to remove obvious variation in ball position and tee location while preserving a natural routine. The retest should use the same reference so the two sets are comparable.
Decide the shot count before the first scored drive. Ten or twelve is usually manageable. Six may be enough if fatigue, cost or time is limited; a larger set may be useful for an experienced golfer who can maintain attention. Stop if safety, pain or fatigue changes the movement. A completed spreadsheet is not worth practising through discomfort.
Score the pattern without worshipping the centre
The centre of the face is a useful reference, but the best practical strike pattern is not defined by a perfect dot on every ball. Driver faces are designed with three-dimensional geometry, and the delivered launch conditions matter. Your useful pattern is the area that repeatedly produces playable speed, launch, curvature and control for the shot you intend.
Start with three scores. First, group width: how much of the face does the main cluster cover? Second, group centre: where is the middle of that cluster? Third, outliers: how many contacts sit clearly outside it? This prevents one beautiful centre strike from outweighing a set that otherwise covers the face.
Then add flight. Count how many balls began inside the chosen start window and how many finished inside the target corridor. These are illustrative measures, not universal standards. A practice change earns confidence when the strike group and the useful flight improve together. If one improves while the other becomes worse, keep investigating.
Avoid turning the nine zones into a simple green-versus-red judgement. A slightly high cluster may be functional for one delivered strike and unhelpful for another. A small toe bias may produce playable shots in one pattern and excessive curvature in another. The map should organise the evidence, not replace coaching judgement with coloured boxes.
Read cluster shape before choosing a correction
A tight cluster away from the centre
A tight off-centre cluster shows repeatability. That is useful because the golfer is not searching across the whole face. The first question is whether the resulting flight is playable and whether moving the pattern is worth the trade-off. If the shots are consistently low, curved or inefficient, use a small set-up or task change and retest. Do not rebuild a repeatable motion merely because the marks are not visually perfect.
Choose a constraint that addresses the pattern without prescribing a hidden cause. For example, change the tee reference or the intention for where the club should meet the ball, then watch what happens. If the cluster moves and the flight improves, retain the change for another set. If contact moves but balance or direction worsens, return to the original baseline and seek a better solution.
A wide horizontal pattern
A horizontal spread from heel to toe means the radius and relationship between golfer, ball and club are varying across the set. That observation does not identify which body part is responsible. Begin by checking the obvious: stable tee position, consistent distance from the ball, balanced finish and a target that permits commitment. Then use a slower or shorter set to see whether the width reduces.
If a controlled-speed set becomes tight, speed or intent may be exposing the variability. Build speed back gradually while preserving the strike task. If the group remains wide at lower effort, a coach may need to inspect the movement and set-up more directly. Do not alternate “stand closer” and “stand farther” after every mark; that turns the baseline into a moving target.
A wide vertical pattern
A vertical spread from low to high can involve changes in tee relationship, strike height, delivered loft, attack, posture or low-point behaviour. Keep the first response simple. Confirm the ball is teed consistently and the ground is level enough for the test. Then hit a short set with the same intended strike height. Compare the group before adding a mechanical cue.
Vertical contact should be reviewed with launch and spin information when available. TrackMan’s parameter framework separates impact location from launch, spin and club delivery, which is why a mark alone should not dictate an ideal. A high mark that produces useful launch is different from one that creates unstable flight or a damaged crown. Use safe, normal contact only.
Two separate clusters
A split pattern often means the golfer is alternating between two solutions. The change may follow a miss: heel contact produces an immediate attempt to reach, then the next ball moves sharply towards the toe. It may follow target choice, speed or a rehearsal. Numbered marks are especially useful because they reveal the sequence.
Do not average two clusters into a fictional centre. Treat them as two behaviours. Identify what happens immediately before each family: a particular thought, a change in tempo, a different ball position or an emotional reaction to the previous shot. Practise a reset that returns to one clear task after every drive. The goal is to remove the oscillation before fine-tuning the centre.
A compact first set that widens under pressure
If the group is compact in a low-consequence warm-up and broadens when a fairway, score or challenge is introduced, the movement may be sensitive to the decision environment. Keep the technical task stable and train the target routine. Use one ball, step away between shots and score the corridor. The strike map remains active, but the intervention belongs partly in the pre-shot process.
This is where a reliable routine can protect the strike. Decide the target and shot, rehearse with one purpose, step in and execute. After impact, record the evidence and leave the previous ball behind. Reopening the entire swing over every shot adds noise to the next attempt.
Separate strike, delivery and flight
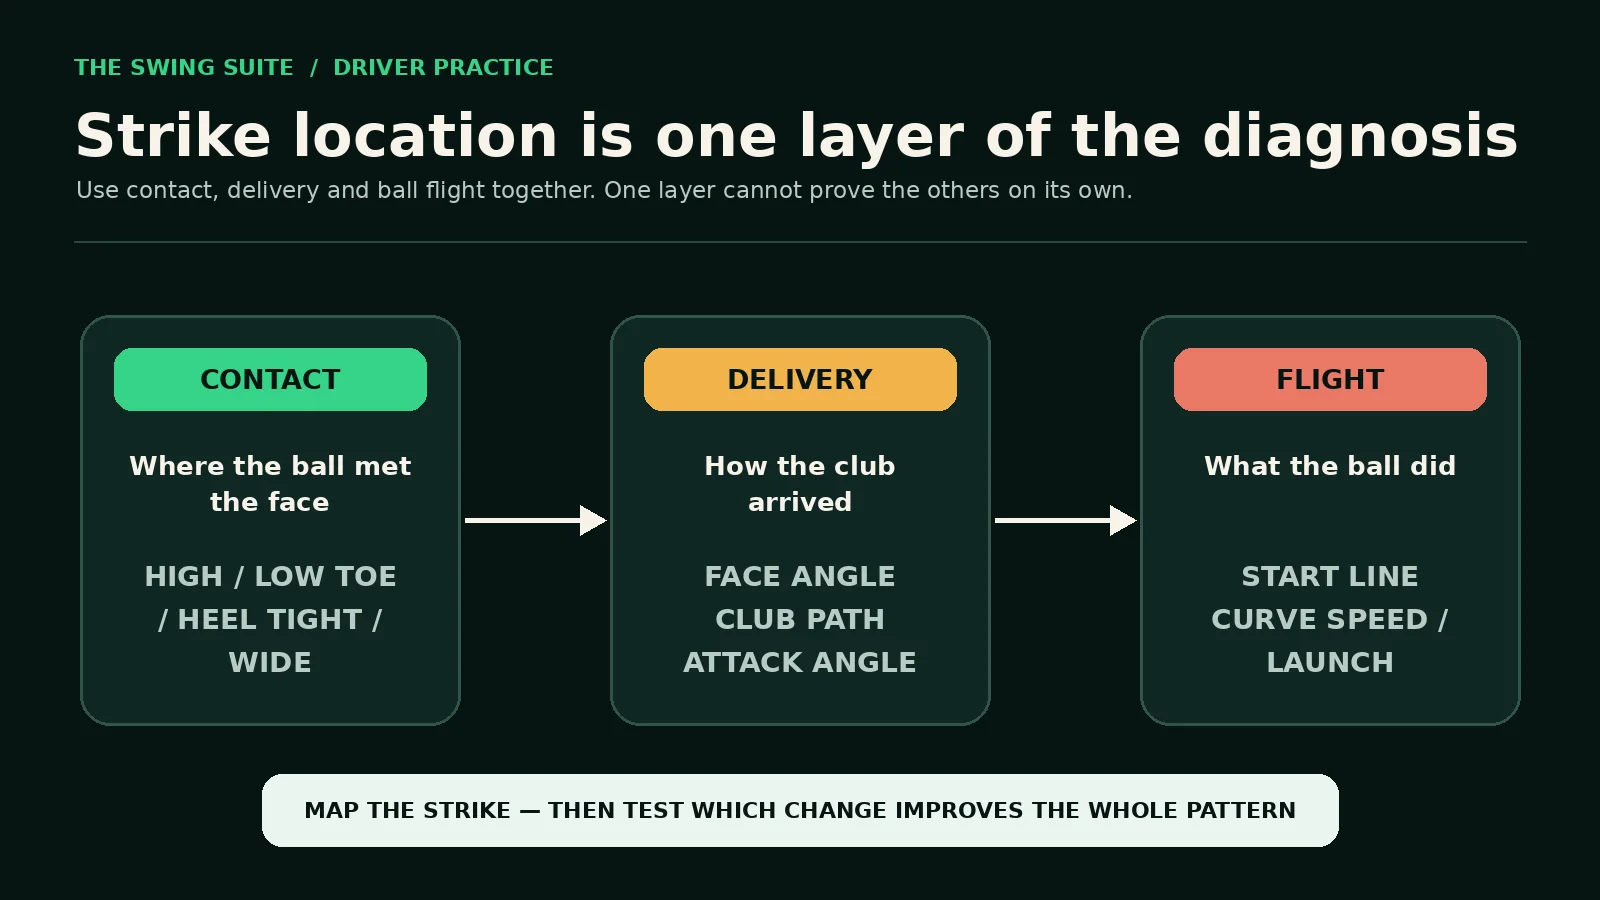
Use three columns in your review. Contact records where the ball met the face. Delivery records how the club arrived: face angle, path, attack angle, speed and related parameters when measured. Flight records start direction, curvature, launch, peak and landing behaviour. These layers interact, but they are not interchangeable.
TrackMan’s forty-parameter overview groups ball, club and impact information so golfers and coaches can connect cause and outcome. The practical lesson is not to chase every number. It is to keep the categories straight. If contact becomes centred but the face remains open to the target, start direction may still be unsuitable. If face and path look organised but contact is moving, speed and curvature can still vary.
Smash factor is the ratio of ball speed to club speed. It can be useful when comparing strike outcomes, but one ratio should not become a universal target divorced from club delivery, loft, ball and measured context. Use it as part of the pattern. If a tighter contact group produces more stable ball speed at similar club speed, that supports the change without requiring a heroic single maximum.
When technology is unavailable, keep the same logic in simpler language. Mark the face. Watch where the ball starts. Watch how it curves. Note the height and whether the strike felt stable. A phone video can add context if used safely and permitted, but it does not replace the impact mark. The evidence should make the next task clearer, not create a library you never review.
Explore TrackMan’s overview of ball, club and impact parameters ↗
Choose one practice priority from the baseline
A priority should describe the pattern you want to change, not your entire swing. “Reduce the heel-to-toe spread” is a workable priority. “Move the repeated low cluster towards the middle while keeping the start window” is better still. “Fix my driver” is too broad to test. The narrower statement tells you what the retest must show.
Choose the earliest important failure. If contact is spread across the face, reducing variability usually comes before chasing a precise zone. If the group is compact but the flight is repeatedly unplayable, connect strike to face, path and target. If contact and flight are good in a blocked set but disappear under variation, make the practice more representative rather than adding another technical cue.
Use one intervention for one block. It might be a set-up reference, an external strike intention, a tempo constraint, a lower-speed rehearsal or a target routine. The intervention should be safe and understandable. If you cannot state what it is meant to change, do not use the next twelve balls to discover its purpose by accident.
Define success before the retest. For example: keep at least eight of twelve marks inside a smaller main cluster, remove the repeated low-heel outlier and maintain the same target corridor. Those numbers are illustrative and should fit the golfer. Predefining the comparison stops you from declaring victory because one drive travelled farther.
Use contact feedback without becoming ball-bound
Impact spray or tape can make a golfer stare at the face after every swing and forget the shot. Preserve the normal routine. Select the target, rehearse, hit, watch the full flight, then inspect and record the mark. The face is feedback after the task, not the target during the motion.
Do not place so much product on the face that it affects contact, visibility or equipment care. Follow the product and club manufacturer’s instructions. Clean the face when required. If the range or facility restricts sprays, use approved tape, a dry-erase style product designed for golf, or measured impact location from suitable technology. Never improvise with abrasive or permanent substances.
Use the feedback in short blocks. After three or four drives, step back and review the group. Do not make a new change after every ball. A small cluster needs several shots to reveal itself, and immediate correction can create a toe-heel oscillation. The review interval should be long enough for a pattern and short enough to prevent mindless repetition.
When the pattern improves, remove some feedback. Hit three drives without looking at the face until the mini-set is complete, then predict the contacts before checking. This tests whether feel and outcome are becoming connected. Prediction is not a substitute for evidence; it is a way to calibrate internal awareness against evidence.
Progress the task without losing comparability
The first retest should look like the baseline. Use the same club, ball type, tee reference, target corridor, shot count and scoring. This gives the intervention a fair comparison. If you change the target, speed and equipment at the same time, an improved map cannot be attributed to one choice.
After a change survives the matched retest, add one layer. Alternate between two fairway targets. Change the target after every ball. Add a start-line gate or a realistic consequence for missing the corridor. Keep the face map so you can see whether contact survives the more representative decision.
Then change shot intention only if that matters to your game. A golfer who uses one stock driver may benefit more from repeating that shot to changing targets than from manufacturing three shapes. A golfer who deliberately varies launch or curve can map each pattern separately. Do not combine different intended shots into one cluster and then call the spread inconsistency.
Finish with one-ball transfer. Put the driver away between attempts or walk to another station if practical. Choose a new fairway, complete the routine and accept the result. Record the strike only after the flight. Transfer practice should retain evidence while reducing the feeling of a laboratory.
A 40-minute driver strike session
Minutes 0–8: warm up without scoring
Prepare the body and movement gradually. Hit shorter shots, controlled drivers or your normal sequence. Establish a target and confirm that the impact product is safe and readable. Use this phase to settle tee height and ball position. Do not count early marks simply because they are visible.
At the end of the warm-up, clean or replace the impact surface so the baseline starts clearly. State the corridor and the shot intention. Decide the number of drives and the flight notes. Once the set begins, keep those rules unchanged.
Minutes 8–18: baseline set
Hit ten to twelve normal drives. Use the complete routine and one target corridor. After each flight, number the contact and add a brief start-and-curve note. Avoid technical correction. If one shot is clearly interrupted by a slip, broken tee or unsafe distraction, record it as excluded with the reason rather than quietly replacing every poor result.
Review the group only after the set. Describe its width, centre, outliers and sequence. Compare contact with the target corridor. Choose one priority and one intervention. Write both down in a sentence so the next block does not become a collection of experiments.
Minutes 18–28: constrained practice block
Use six to nine drives with the selected task. This block can be slightly slower or simpler than the baseline if that helps the golfer discover the intended contact. Keep the target meaningful. Review after groups of three rather than changing after every swing.
If the intervention moves the pattern in the wrong direction, stop and return to a neutral swing. Do not rescue it with a second cue. If it improves contact but damages flight, note the trade-off. The block has still produced useful information, but the intervention has not yet earned the retest.
Minutes 28–38: matched retest
Reset the face, use the original target and hit the same number of drives as the baseline if fatigue allows. Use normal intent rather than a deliberately slow training swing. Record contact and flight exactly as before. The task is to discover whether the change survives, not to protect a good practice score.
Compare the main cluster area, its centre, the number of clear outliers and the useful target results. Look for a change that is visible across several shots. One perfect strike does not outweigh a broad second set. One poor strike does not erase a tighter group unless it reveals a safety or movement problem.
Minutes 38–40: choose the next session
Write one conclusion. Keep the intervention, modify it, or discard it. If retained, state the condition in which it worked. For example: “A clearer centre-face intention tightened the group at normal speed but needs testing with changing targets.” That sentence is more useful than “driver felt better”.
Choose the next progression before leaving. It may be another matched retest on a different day, a target-change session or measured coaching to connect the pattern to face, path and attack. Stop before fatigue turns the final evidence into a different problem.
Common face-contact practice mistakes
- Judging the session from the best or worst drive instead of the main cluster.
- Changing stance, tee height, target and swing cue inside the same baseline.
- Assuming a toe or heel mark proves one universal technical cause.
- Ignoring start direction and curvature because the contact mark looks centred.
- Combining different intended shot shapes into one strike group.
- Making a new correction after every ball and creating a toe-heel oscillation.
- Using an impact product without checking equipment and facility guidance.
- Continuing after fatigue, pain or safety changes the movement.
- Comparing sets with different clubs, targets or scoring rules.
- Keeping feedback forever instead of testing whether the pattern transfers without it.
The correction is to protect the comparison. Establish one baseline, describe the pattern, choose one priority and retest under the same rules. Complexity belongs after a useful change survives the simple test.
Troubleshoot the pattern you see
The marks are impossible to separate
Clean the face and use a thinner, approved layer or a fresh piece of tape. Number the paper map instead of trying to retain every mark on the club. If the product smears, stop using it. A poor recording method should not be mistaken for a wide strike pattern.
The cluster moves every three shots
Check sequence. The golfer may be reacting to the previous group, changing speed or losing the original target. Return to one sentence of intent and one routine. Use three-shot blocks with a short reset between them. If each block still moves, the pattern may need coaching observation rather than another self-selected cue.
Contact tightens only at very low speed
Treat that as a starting point, not the final answer. Build effort gradually while retaining the task. Use a small ladder of comfortable, medium and normal intent. Map each level separately. If the group widens sharply at one level, practise around that boundary instead of jumping straight from rehearsal to maximum effort.
Contact improves but the ball curves more
Review face, path and strike together. The centred-contact assumption behind a simple face-to-path interpretation may have changed, or the intervention may also have changed delivery. Do not preserve the cue merely because the mark looks better. The useful drive must combine contact with a playable start, curve and speed.
The group is good on the range but poor on the course
The practice may be too blocked or consequence-free. Use changing fairway targets, one ball, a full routine and longer resets. Score the corridor before checking contact. The technical pattern must survive a decision. If it does not, train the decision environment as well as the strike.
Connect the strike map to ball-flight diagnosis
The existing Swing Suite guide on start direction and curve explains how face angle, club path, face-to-path and spin axis contribute to flight. Add the strike map as another layer. Start direction and curve describe what happened to the ball; contact location helps explain why the same delivery can produce different outcomes.
Use the two guides together without forcing certainty. If a ball starts right and curves further right, record that flight. Then record the strike. If several similar flights share a heel cluster, that relationship deserves testing. It still does not prove one movement fault. A measured lesson can examine the delivered club and contact at the same time.
Read Start Direction and Curve: What Your Ball Flight Can Tell You ↗
Questions golfers often ask
How many drives make a useful map?
Ten to twelve is a practical starting set because it can reveal a cluster without exhausting most golfers. Six may be enough for a short session; more may be appropriate for an experienced player with stable attention. The set must remain representative. Stop when fatigue or discomfort changes the task.
Should every drive be in the exact centre?
No. Use the centre as a reference, then judge the repeatable pattern with flight, speed and control. A compact useful cluster matters more than one perfect mark surrounded by large misses. If measured data is available, compare stability rather than chasing a single maximum.
Can I diagnose my swing from a toe mark?
Not reliably from one mark. A repeated toe cluster narrows the investigation, but several set-up, movement and delivery combinations can produce it. Confirm the pattern, check the ball flight and use video or measured coaching if the cause remains unclear.
Should I change tee height during the test?
Keep it stable for the baseline and matched retest. Tee-height experiments can be valuable, but they should be separate labelled sets. Otherwise you cannot tell whether the strike pattern changed because of the intervention or because the ball moved relative to the face.
What if I cannot use spray at my range?
Use a facility-approved alternative such as impact tape, a golf-specific removable marker or measured impact location from suitable technology. Follow club and product guidance. If no safe method is allowed, use flight and measured data with a coach rather than applying an improvised substance.
How often should I retest?
Retest often enough to verify that the pattern survives another day, but do not turn every range visit into a formal exam. A short baseline at the start of a weekly driver session can be useful. Change the test only after you have a stable comparison for the current priority.
A simple driver strike test to use this week
- Warm up normally and prepare one safe, readable impact surface.
- Choose one driver, one target corridor and one stock shot intention.
- Hit ten to twelve drives and number every contact before diagnosing it.
- Describe the main cluster, its centre, width, outliers and sequence.
- Add a short start-direction and curve note for every ball.
- Choose one practice priority and one intervention.
- Repeat the matched set under the same scoring rules.
- Keep, modify or discard the change from the whole pattern — not one ball.
Keep the first test plain. The value comes from disciplined comparison, not from a complicated grid. A clear baseline protects you from the emotional story attached to the last drive. It gives the next change a job and gives the retest a fair standard.
Consistent driver strike is not built by demanding a perfect centre mark on command. It is built by seeing the actual pattern, selecting one useful priority, testing a change and carrying the improved contact into a real target decision. Map the strike, keep the evidence connected to flight and let the cluster—not the story—guide the next practice block.
Build a clearer driver pattern with measured coaching
If your contact map mixes toe and heel strikes, changing launch, inconsistent start direction or curve, measured coaching can separate contact from face, path, attack and speed. A Swing Suite lesson can turn the pattern into one practical training priority. Current lesson options, venues and availability remain on the live booking page rather than being hard-coded here.