

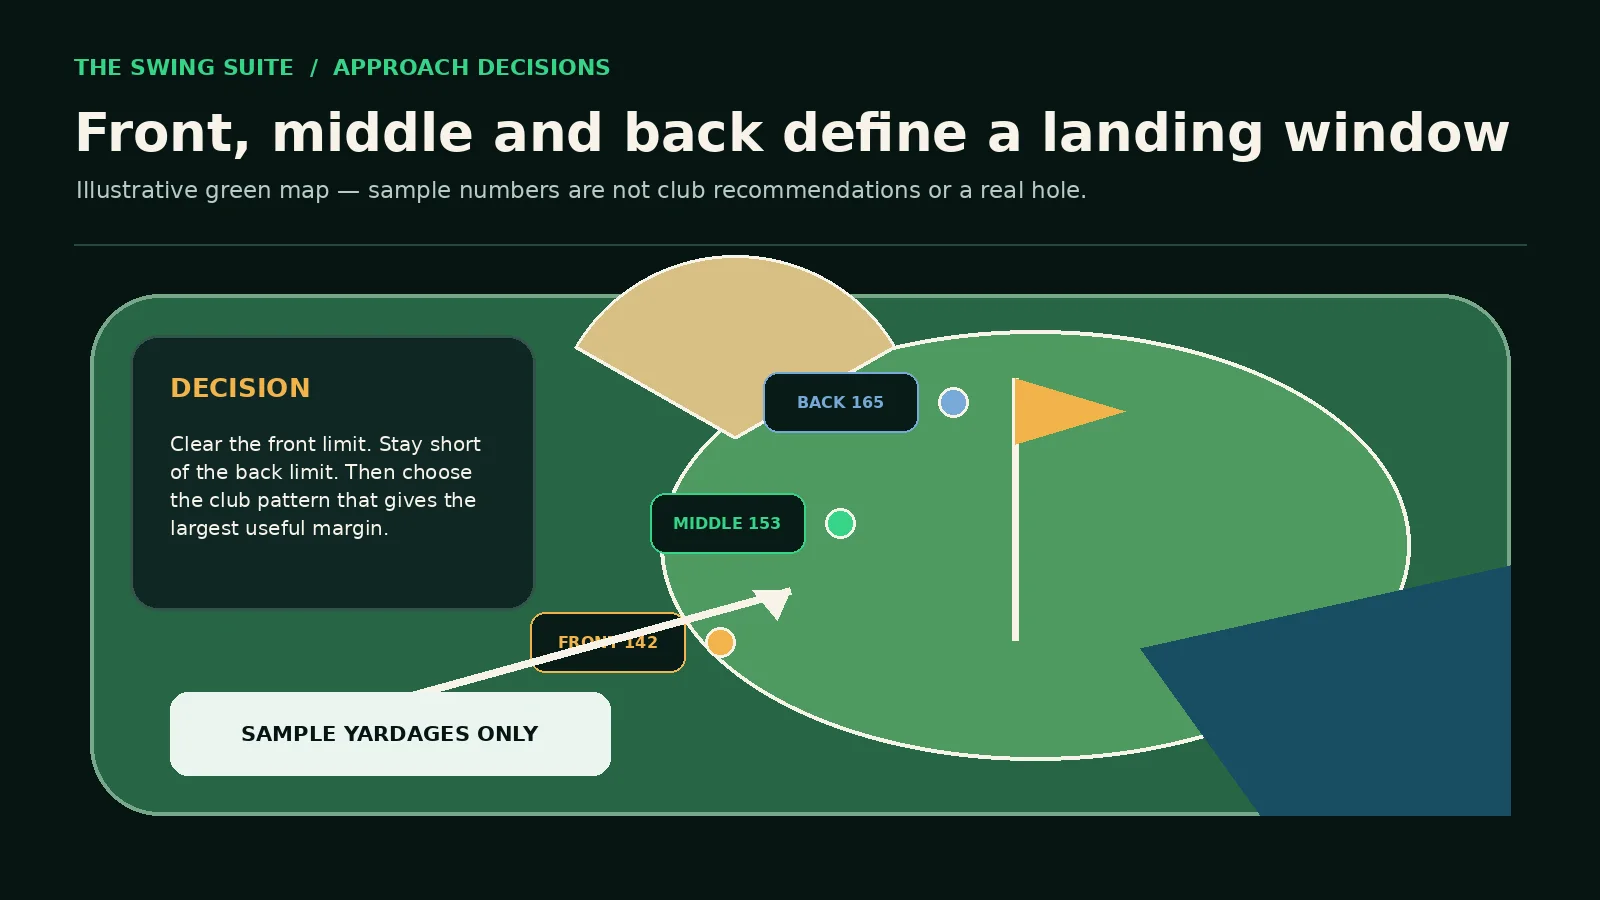
Better approach-shot decisions start with three course references and one honest club pattern. Read the distance to the front, middle and back of the green. Identify the shortest carry that clears the main front problem and the longest carry that stays short of the costly back problem. Then compare that window with the short, typical and long side of your real carry pattern, not one perfect strike.
The pin still matters, but it should not erase the green. A front flag can invite a golfer to choose a club whose normal short-side carry never reaches the putting surface. A back flag can invite a club whose long-side carry brings a bank, bunker, path or out-of-bounds line into play. Front-middle-back numbers restore the shape of the decision before the player commits to a target.
This is a practical framework rather than a universal club chart. Every yardage in the examples is hypothetical. Your carry pattern changes with the club, strike, ball, lie, weather, elevation and current swing. Build the map from your own shots, refresh it when the pattern changes and judge the decision by the whole result rather than the best ball in the group.
The direct answer: choose the club that fits the safest carry window
Start with the green’s front, middle and back references. Convert them into two limits: the minimum useful carry and the maximum acceptable carry. The minimum may be the front edge, or it may be several yards farther when a bunker, false front or upslope must be cleared. The maximum may be the back edge, or shorter when the miss beyond it is severe.
Next, place each realistic club inside that window. Do not ask only whether the club’s average carry reaches the pin. Ask where the club’s common short carries finish, where the centre of the pattern sits and where the long carries can go. A useful club gives enough front margin without making the back miss unnecessarily expensive.
Finally, choose a target that allows for direction as well as distance. Front-middle-back numbers solve only the depth question. Your left-right pattern, the green shape and the location of trouble still matter. The best decision is the club-and-target combination that makes the normal pattern useful, not the combination that requires a perfect strike to look clever.
What front, middle and back numbers actually tell you
The front number is a reference to the nearest part of the mapped green from the player’s position. It is not automatically the carry required to reach a safe putting surface. A bunker may sit in front of the green, a false front may return the ball to the fairway and the first few yards may offer no realistic stopping area. Translate the reference into the actual minimum for the shot in front of you.
The middle number provides scale. It helps you understand the depth of the green and stops a pin yardage from floating without context. If the green is shallow, a small club change may move the whole carry pattern beyond the back. If it is deep, the middle can provide a useful conservative target when the flag sits near a difficult edge.
The back number shows the far boundary, but the usable maximum may be shorter. Downslopes, firm ground, a back bunker or a penalty area can make a ball that carries to the last yard of the green a poor choice. Treat the back reference as information, then decide how much buffer the shot requires. The number does not choose the margin for you.
Different GPS systems, course books and mapped greens may define their points differently, and a temporary green or changed hole can make a stored map less useful. Look at the actual surface, confirm the target with course features and use the available numbers as references rather than unquestionable truth. If the map and the visible hole disagree, slow down and resolve the picture before selecting a club.
Separate the pin number from the green window
A pin number answers where the hole is. The front-middle-back set answers how much landing space surrounds it. Those are related questions, not the same question. A laser can give a precise line to the flag while saying nothing about the front edge behind a bunker or the distance to a dangerous back shelf. A GPS map can provide the green shape while remaining less precise about the exact flag.
Use both forms of information when they are available and allowed. First understand the green, then locate the flag inside it. If the flag is four yards from the front and the shot must carry a bunker, the decision may be built around a safer landing point beyond the flag. If the flag is near the back, the sensible target may be the middle even though the visual temptation is to take enough club to reach the number exactly.
This approach does not mean aiming at the centre on every shot. It means earning the right to move away from the centre. A player can choose a more aggressive target when the lie is clean, the carry pattern is tight, the miss is acceptable and the shot suits the current club. The same flag can demand a different plan when any of those conditions changes.
Build a carry map from representative shots
Carry is the distance from the starting position to where the ball first lands. That makes it the correct starting measurement for a forced carry and for comparing a club pattern with a green’s front and back limits. Total distance can remain useful for the complete result, but it should not replace carry when the ball must clear a bunker, water, rough bank or false front before it can run.
Review TrackMan’s official explanation of carry ↗
Map clubs under conditions that resemble the shots you want to understand. Use the same ball type where possible, a representative lie or hitting surface and a clear target. Warm up before recording. Remove only shots that meet a pre-agreed invalid rule, such as a clear interruption or a measurement failure. Do not erase ordinary misses simply because they make the gapping chart untidy.
TrackMan’s Map My Bag feature describes a flexible process in which players can record multiple shots per club and maintain a rolling set over time. That is useful because a club identity should come from a group rather than one strike. The feature can organise the evidence, but the golfer still needs to recognise whether the recorded set represents the shot they expect to use on the course.
See TrackMan’s Map My Bag overview ↗
Record enough shots to reveal a pattern without turning fatigue into the main finding. Six can be a practical early set because it exposes more than one outcome while keeping attention high, but it is not a scientific threshold. Add shots over later sessions and label major changes. A rolling profile is more useful when it reflects the current swing rather than a mixture of several unrelated techniques.
Use a carry band instead of one average
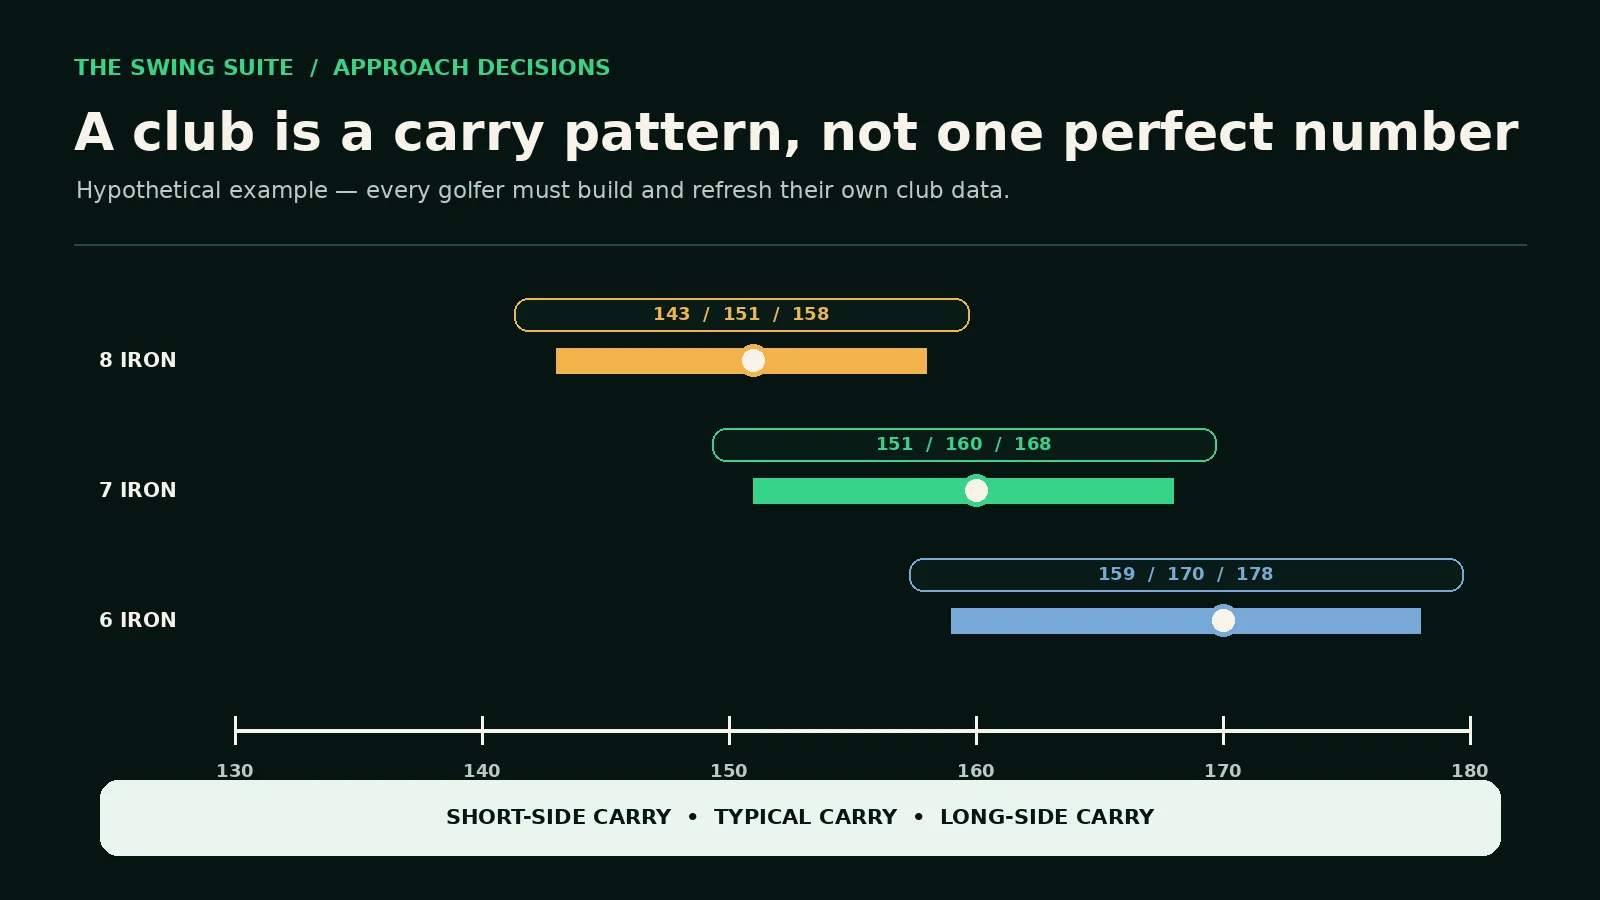
One average compresses different shots into a single clean number. Imagine an illustrative set of 7-iron carries at 151, 156, 158, 160, 163 and 168 yards. The average may look precise, yet the practical decision is that the club has produced a seventeen-yard window in this small set. A front carry of 160 and a back limit of 166 cannot be judged honestly from the average alone.
Use three working references: a short-side carry, a typical carry and a long-side carry. These do not need to be formal statistical percentiles. They are transparent summaries of the current group. The short side protects the front problem. The long side protects the back problem. The typical number helps place the centre of the pattern inside the green.
Do not define the short side as the worst strike you have ever made or the long side as the longest ball of your life. Use representative outcomes from a labelled set. Keep obvious mishits visible in a separate frequency note if they are part of the on-course risk. A plan that assumes the player will never produce their common miss is not a plan for that player.
Refresh the band when the season, technique, speed, ball or environment changes. A club fitting, winter practice block or major swing change can move both the centre and the width. Historical data remains useful as context, but it should not silently become today’s number. Date the map and record whether it came from indoor, outdoor, range-ball or premium-ball conditions.
Read overlap between clubs instead of forcing perfect gaps
Real club patterns overlap. A well-struck 8-iron can carry farther than a shorter 7-iron, and that is not automatically a gapping failure. The useful question is how often each club creates the desired flight and landing window. A decision near the overlap may be based on trajectory, lie, strike confidence and the costly miss rather than a tidy ten-yard arithmetic sequence.
When two clubs both fit the green, compare their margins. The shorter club may protect the back but leave little room over the front hazard. The longer club may clear the front comfortably but bring a back bunker into the long side of the pattern. Neither choice is universally correct. Select the one whose complete pattern best matches the hole and the shot you can produce today.
If no club fits, change the target or shot expectation. A player does not have to attack every flag. Aim towards the widest depth, accept a safe miss, use a lower-risk lay-up where appropriate or choose the club that removes the most costly outcome. The framework is valuable precisely because it reveals when the requested shot does not have a comfortable window.
Set a minimum useful carry
The front edge is only the beginning. Identify the first place where the ball can land and still produce a useful result. On a flat open green, that may be close to the mapped front. Over a bunker, it may be beyond the front fringe. On a false front, it may be far enough onto the surface that a normal release does not roll back to the player.
Add a deliberate buffer instead of planning to the exact blade of grass. The size of that buffer depends on the width of the carry pattern, the severity of the miss and the quality of the lie. A narrow pattern from a clean fairway can use less. A broad pattern from rough, a slope or a poor strike day needs more. The buffer is a decision, not a permanent number.
Compare the minimum with the short side of the club. If the club’s ordinary short carries finish in the hazard or on the false front, reaching the pin with its typical strike is not enough. The plan requires a better club, a safer target or a different expected result. Do not allow one perfect rehearsal swing to erase the measured short side.
Set a maximum acceptable carry
Now inspect the far side. The mapped back may have rough with space, or it may have a path, bunker, steep bank, boundary or difficult short-sided recovery. Decide how much of the club’s long side can be accepted. A shot that finishes five yards long on one hole may be harmless and on another may be the most expensive miss available.
The maximum also depends on likely release. A ball can carry inside the back edge and continue beyond it. Front-middle-back is a carry-decision framework, not permission to ignore total distance. Use the expected flight, landing angle, green firmness and slope to decide whether the back carry limit should be moved forward. Keep the adjustment qualitative unless you have reliable matched evidence.
If the long side repeatedly reaches the danger, move the target or reduce the club. Do not solve every back problem by trying to hit the chosen club softer. A deliberately reduced shot can be valid when it is trained and mapped, but an improvised deceleration is not the same thing. Choose a stock pattern whenever the pressure of the shot makes a special version unnecessary.
Use the middle as a decision anchor
The middle number is valuable because it survives pin movement. It provides a stable anchor for pre-round planning, club mapping and conservative targets. When the flag is not visible or the exact pin is uncertain, the middle can keep the decision connected to the actual green rather than a guessed flag position.
A middle target can also create the largest front and back margin. That does not make it passive. A ball on the putting surface with a long putt may be a strong result when the alternatives are a front bunker and a back boundary. The scorecard records the outcome, not whether the approach looked aggressive enough from the fairway.
Add left-right dispersion to the depth picture
A carry window alone is one-dimensional. The club pattern also has width. Plot the normal left-right outcomes or at least describe them honestly: mainly left, mainly right or two-sided. A club that fits perfectly between front and back can still be a poor choice if its directional pattern crosses a narrow neck or brings a penalty area into play.
Aim so the pattern, not merely the target line, occupies useful ground. If the common miss is right and the right edge is safe, the target can use that space. If the same miss reaches a bunker, move the centre left or choose a shot with a better shape. Avoid aiming directly at trouble and hoping the normal miss starts only after the ball lands.
Do not use a small sample to declare a permanent shot shape. Label the session and keep the conclusion proportionate. “Five of eight shots started or finished right today” is evidence. “My 7-iron always misses right” is a larger claim. The target should respond to the current pattern while remaining open to better evidence.
Build the directional target around your shot pattern ↗
Treat landing angle and rollout as supporting evidence
Two shots can carry the same distance and produce different finishes. Flight, spin, landing angle, surface firmness and slope all influence what happens after the first bounce. TrackMan describes landing angle as the angle at which the ball approaches the ground and notes its relationship with stopping behaviour. That can help explain the result, but it should not become a universal promise that one number always holds every green.
Review TrackMan’s landing-angle parameter guidance ↗
Record rollout beside carry when practising. A club may fit the carry window but repeatedly release beyond the back on a firm surface. Another may land short of a back flag and stop quickly. Use groups of matched shots before changing the target. One high-spin ball or one hard bounce is not enough to build a general rule.
On the course, keep the conclusion practical: likely to release, likely to stop more quickly or uncertain. If the surface is hidden, the lie is poor or the conditions are changing, increase the margin rather than inventing a precise rollout calculation. The decision should become simpler as uncertainty grows.
Account for wind without pretending it is exact
Wind changes the shot in more than one way. It can alter carry, curve, height, landing behaviour and the player’s balance or strike. Begin with direction and strength as observations. Then compare with your own tested shots. A generic “one club for every ten miles per hour” rule may not represent the club, trajectory or player in front of the ball.
Use the front and back limits to test the adjustment. Into the wind, confirm that the short side still clears the minimum. Downwind, confirm that the long side and likely release stay inside the maximum. In a crosswind, add the left-right pattern. The correct target may move more than the club choice because the safest section of green changes.
When gusts make the outcome unstable, choose the shot with the widest acceptable window. That may mean aiming away from the flag, using a different flight or accepting the front half. Do not wait for one calm rehearsal and then swing into a different wind without resetting the decision.
Account for elevation carefully
A target above or below the player can change the effective shot requirement, but the visible slope and the stored distance are not the same thing. Some devices can provide adjusted information in practice modes, while the Rules of Golf restrict certain forms of elevation measurement or interpreted recommendations during a round. Know the device setting, the competition conditions and any Local Rule before relying on an adjusted number.
Check the current R&A equipment and distance-information rule ↗
For practice, build evidence from known elevated shots rather than assuming one universal percentage. Note the measured horizontal distance, the elevation context, club, carry and result. On the course, use a simple tested adjustment and preserve a larger margin when the height change is hard to judge. The framework still applies: clear the front problem, protect the back and fit the club pattern between them.
Remember that elevation can change the view as well as the flight. From below, the player may see only a bunker lip or flag. From above, the whole green may look closer and flatter than it is. Confirm the map, identify the safe landing section and avoid turning visual discomfort into an extra club without checking the limits.
Let the lie change the confidence, not just the number
A fairway lie, light rough, heavy rough, bare lie and slope can produce different strike and launch patterns. Do not transfer a clean indoor carry map to every lie without qualification. The stored numbers describe the measured setup. The course decision must include how confidently the current lie can reproduce it.
From a less predictable lie, widen the expected carry band and choose more margin. If the common risk is a flyer or reduced spin, protect the back and rollout. If the risk is poor contact, protect the minimum carry or choose a route that removes the forced hazard. Avoid claiming a precise flyer calculation from one inspection of the grass.
Slopes can also move direction. A ball above or below the feet may alter strike, start line and balance for that player. Include the directional pattern when choosing the target. The best club for the depth may still be wrong when the stance makes the narrow side of the green difficult to access safely.
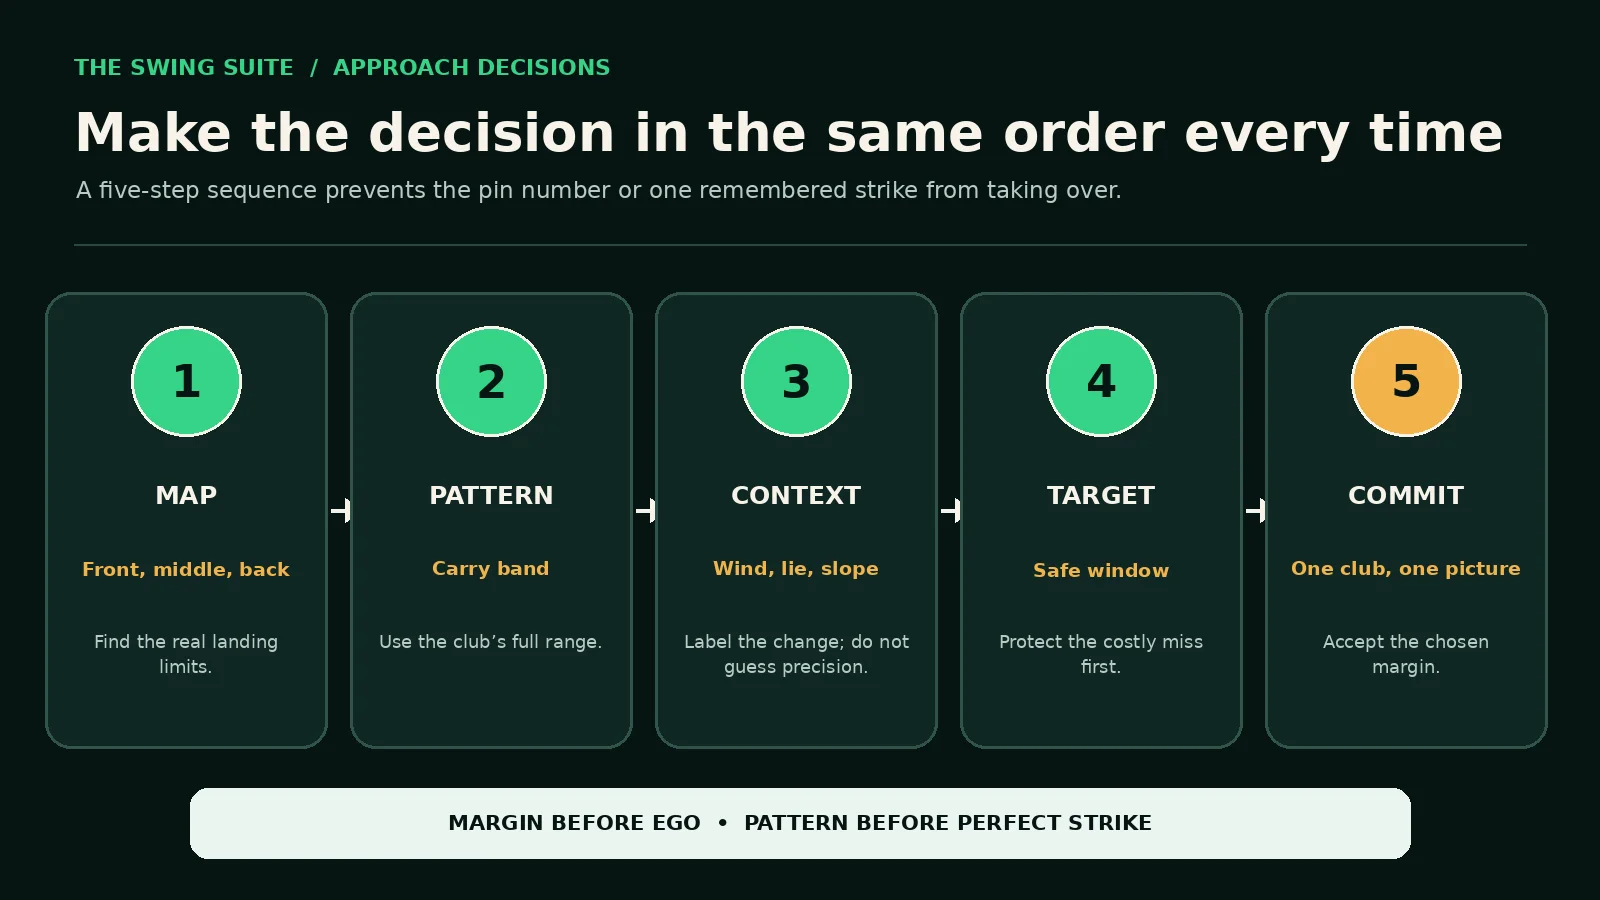
Use a five-step on-course decision sequence
Step one is map: front, middle, back, green shape and the most expensive short and long misses. Step two is pattern: short, typical and long carry for the realistic clubs, plus the directional tendency. Step three is context: lie, wind, elevation, temperature, surface and the quality of the current strike pattern.
Step four is target: choose the landing window that protects the costly miss and gives the pattern useful space. Step five is commit: select one club, one target and one flight picture. If new information appears—a gust, changed lie or wrong yardage—restart. If nothing changes, stop shopping for a different decision during the backswing.
Write the sequence on a small practice card until it becomes familiar. The goal is not to make play slow. It is to make the important questions automatic. A disciplined fifteen-second check is faster than indecision, a late club change and a swing made without a clear target.
Practise the decision, not only the strike
Create simulated greens with a front and back limit. Use cones, range targets or launch-monitor boundaries where the facility allows them. Call the green depth, the flag position and the costly miss before every ball. Choose the club and target from the current carry map, then score whether the complete pattern would have produced a useful result.
Change the problem without changing everything. Keep the lie and club options stable while moving the flag from front to middle to back. Then keep the flag stable and change the front hazard or back danger. This reveals whether the player is reading the green window or merely repeating a favourite number.
TrackMan Performance Studio includes practice and club-profile tools that can support structured distance and dispersion work. Use the technology to answer a defined question rather than collecting every available parameter. The important output is a decision rule the player can repeat outdoors: which reference mattered, which margin was chosen and what pattern followed.
Explore TrackMan Performance Studio practice tools ↗
Run a front-middle-back calibration test
Choose three clubs that cover a common approach range. For each club, hit a short baseline set after warming up. Record carry, total distance and left-right result where available. Mark the representative short, typical and long side. Keep ordinary misses in the record and label obvious invalid measurements separately.
Now create three hypothetical greens: shallow, medium and deep. Give each a front, middle and back number plus one costly miss. For every problem, choose the club and target before hitting. Score the decision separately from the execution. A good decision can produce a poor swing, and a poor decision can be rescued by a fortunate strike. Learning requires those outcomes to remain distinct.
After the set, look for repeated errors. Does the player choose the club whose average reaches the flag but whose short side fails the front? Do they add a club for every back flag even when the back miss is severe? Do they ignore directional space? Select one decision habit for the next block, then repeat matched problems.
A 45-minute approach-decision session
Minutes 0–8: warm-up and current carry check
Hit enough shots to establish balance and strike. Use one mid-iron and confirm that the current carry sits near the stored map. If it is materially different, label the session and widen the band. Do not force the swing to reproduce an old number merely to preserve the chart.
Minutes 8–18: three-club carry bands
Hit a representative set with three adjacent clubs. Record every valid carry and direction. Mark short, typical and long references without deleting normal misses. Note the ball, surface and environment so a later session can understand the context.
Minutes 18–30: front-middle-back problems
Create six approach problems with different green depths and flag positions. State the minimum useful carry, maximum acceptable carry, chosen club and target. Hit one ball to each. Score the decision and strike separately. Use sample yardages only as the current task, not as permanent club recommendations.
Minutes 30–39: pressure the weak decision
Repeat the problem type that exposed the clearest error. If front flags caused under-clubbing, present three new front-pin greens with different hazards. If back limits were ignored, make the long miss more visible. Change the decision demand while keeping the scoring contract stable.
Minutes 39–45: transfer and note
Finish with three random course-style calls. Use the full routine and no rescue ball. Write one rule for the next round, such as “compare the short-side carry with the minimum before looking at the pin” or “protect the back edge when the lie can produce a flyer”. Keep the rule specific enough to use.
Read common patterns without overclaiming
The average fits, but the short side never clears
The club is not providing enough front margin for that problem. Test the next club, a safer target or a different shot that has been practised. Do not keep the original choice because one strike in the set reached the pin. The forced carry is judged by the part of the pattern exposed to the hazard.
Both clubs fit, but one brings the back into play
Compare the severity of the short and long misses. If short is safe and long is costly, the shorter club may be stronger. If short is a penalty and long is rough with space, the longer club may create better expected ground. The pin location alone does not settle the trade.
The carry is stable, but direction is wide
Keep the depth information and move the target towards the widest safe section. If the green is too narrow for the current directional pattern, choose the miss that leaves the simplest next shot. Do not rebuild the carry map simply because the problem is lateral.
The indoor map is consistently longer than the course result
Check ball type, temperature, wind, elevation, turf interaction and whether the indoor set contains more centred strikes. Do not apply one unexplained correction to every club. Collect matched outdoor evidence, label the difference and update the map only when the pattern is repeatable.
The player changes club after every rehearsal
Return to the five-step sequence and make the decision before the rehearsal swing. A rehearsal is for the selected shot, not a fresh yardage test. Restart only when new information appears. Repeated shopping usually signals that the front and back limits were never made clear.
Common front-middle-back mistakes
- Using the pin yardage without reading the depth of the green.
- Treating the mapped front edge as the automatic minimum useful carry.
- Choosing a club from one perfect strike or one clean average.
- Deleting ordinary misses until the carry band looks artificially narrow.
- Ignoring the long side when a back miss is costly.
- Ignoring rollout because the club technically lands on the green.
- Calculating depth but forgetting the left-right pattern.
- Applying an indoor premium-ball map to every outdoor lie without a label.
- Using precise wind or elevation adjustments that have not been tested.
- Changing club during the rehearsal without receiving new information.
The correction is to preserve the order: map the green, map the club, label the context, choose the target and commit. Each step has one job. When the result is poor, identify which step failed before adding more technique or more numbers.
Troubleshoot the framework
I only have a pin distance
Use the visible green shape, course guide, permitted GPS information and known landmarks to estimate the available depth conservatively. If the front or back cannot be established confidently, aim towards the broadest safe section and increase the margin. Do not invent exact edges from a flag number alone.
My carry data is inconsistent
Keep the inconsistency visible. Widen the band, choose larger safety margins and work on one representative strike pattern before creating fine gaps. A broad honest range is more useful than a precise average built by removing the shots most likely to appear on the course.
My clubs overlap too much
Test the clubs under the same conditions and inspect both carry and flight. Overlap may be normal, or it may show a setup, strike or equipment gap worth reviewing. For immediate decisions, choose the club whose pattern and trajectory fit the current green rather than forcing a nominal yardage gap.
The green is very shallow
The front and back limits may be closer than the width of every available club pattern. Aim towards the deepest safe section, consider a trained alternative flight or accept the safest miss. The framework should reveal the narrow window instead of pretending that a perfect number removes it.
The flag is at the back
Check what lies beyond the green before adding club. If the back miss is severe, centre the long side inside the green and accept a putt from below the hole. If the back is safe and the front hazard is costly, more club may be justified. The correct answer depends on the miss, not the flag colour.
Questions golfers often ask
Should I always aim for the middle of the green?
No. The middle is a useful anchor because it often provides depth margin, but the target should reflect the green shape, lie, club pattern and costly miss. Move towards a flag only when the complete pattern still occupies useful ground.
How many shots do I need for a carry number?
Enough to see more than one outcome and few enough to preserve representative attention and speed. A six-shot set can be a practical start, then a rolling record can become more useful over time. Treat small samples as provisional and keep their context.
Do I use carry or total distance?
Use carry to clear front problems and compare the first landing with the green window. Use total distance and rollout to protect the back and understand the complete finish. Neither number should silently do the other’s job.
What if the best strike flies much farther?
Keep it as the long side of the evidence, but do not let one shot define the club. Ask how often that result appears and whether the back of the green can accept it. A rare long strike matters more when the consequence beyond the green is severe.
Can a launch monitor choose the club for me?
It can organise measured distance and dispersion information, but the course decision still needs the actual green, lie, wind, elevation, surface and miss. Technology improves the inputs. It does not remove the need to choose the target and margin.
Should I adjust every club by the same amount in wind?
Not without matched evidence. Different flights and speeds can respond differently, and the player may change strike when the wind is strong. Use tested tendencies, compare the full pattern with the front and back limits and increase the margin when uncertainty remains.
A simple approach checklist for the next round
- Read front, middle and back before focusing on the flag.
- Name the minimum useful carry and maximum acceptable carry.
- Compare both limits with the club’s short, typical and long carry.
- Add the left-right pattern and choose the widest safe section.
- Label wind, elevation and lie without inventing false precision.
- Consider likely rollout before accepting the back margin.
- Choose one club, one target and one flight picture.
- Restart only when genuinely new information appears.
- Record the result as decision plus execution, not execution alone.
- Refresh the carry map when repeated evidence shows it has changed.
The checklist is short because the decision should become repeatable. Front-middle-back numbers are not extra data for their own sake. They create a frame for the club pattern. Once the limits are clear, the player can choose margin instead of hoping the average appears on demand.
Good approach play does not require every ball to finish close. It requires a plan that gives ordinary shots useful ground and keeps the expensive miss out of the normal pattern. Read the window, use the whole carry band and let the course—not the pin alone—choose the risk.
Turn your approach pattern into one coaching priority
If the carry bands overlap unpredictably, the strike pattern changes between environments or the on-course target never matches the measured numbers, a structured lesson can reduce the problem to one useful priority. That may be a cleaner club map, a more representative strike, a better target process or a clearer way to transfer indoor evidence outside.
Current Swing Suite lesson options, venues and availability remain on the live booking page rather than being hard-coded here. Bring your recent carry notes or a front-middle-back decision that caused trouble. The goal is to leave with one map you trust, one decision rule you can repeat and one matched test for the next practice session.