
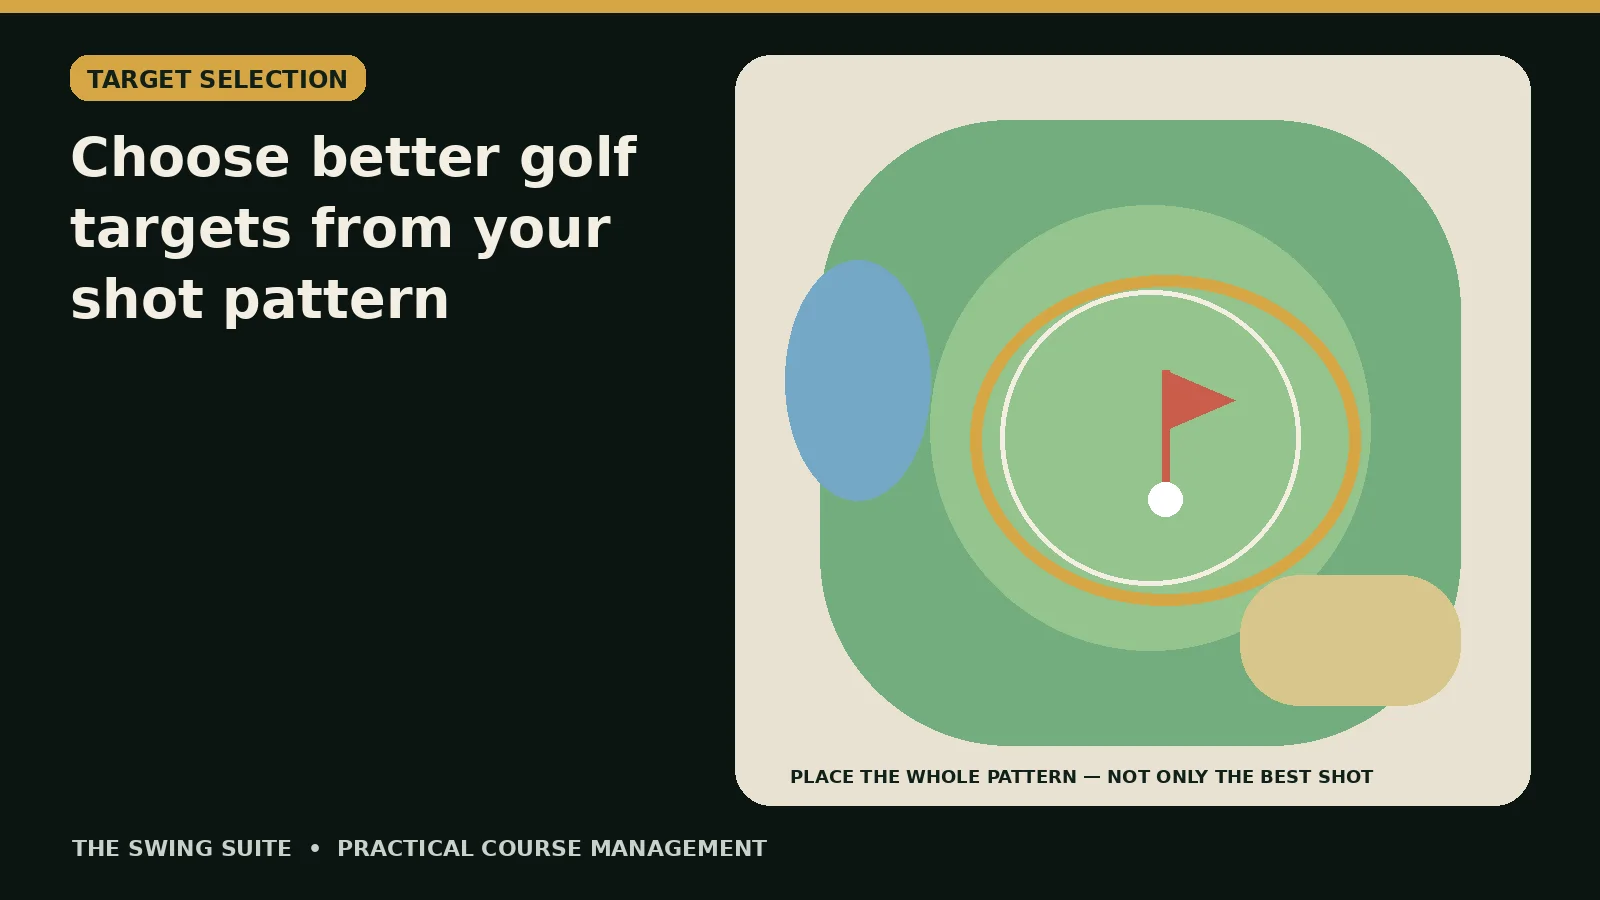
A better golf target is not automatically the flag. It is the point that gives your normal shot pattern the best chance of finishing in a useful place. Start with your real carry and left-to-right spread, place that whole pattern over the hole, then move the centre away from hazards, short sides and boundaries until ordinary misses have room. Choose a club whose normal pattern fits that space, commit to the centre of the adjusted pattern and accept the result.
This approach replaces a perfect-shot plan with a playable-shot plan. It does not ask you to aim vaguely at the middle of every green or to avoid every ambitious shot. It asks a more specific question: where should the centre of my likely group of shots sit on this hole, with this club, from this lie, in these conditions?
The method works for approaches, tee shots and many recovery decisions. This guide concentrates on approach shots because the target area is easy to picture, but the same principle applies when choosing which side of a fairway to favour or deciding whether a narrow gap is genuinely available.
Every yardage and shot pattern in the worked examples is hypothetical. They show the decision process, not a result achieved by Scott Winyard, a client or any particular golfer.
The direct answer: move the pattern, not just the aim point
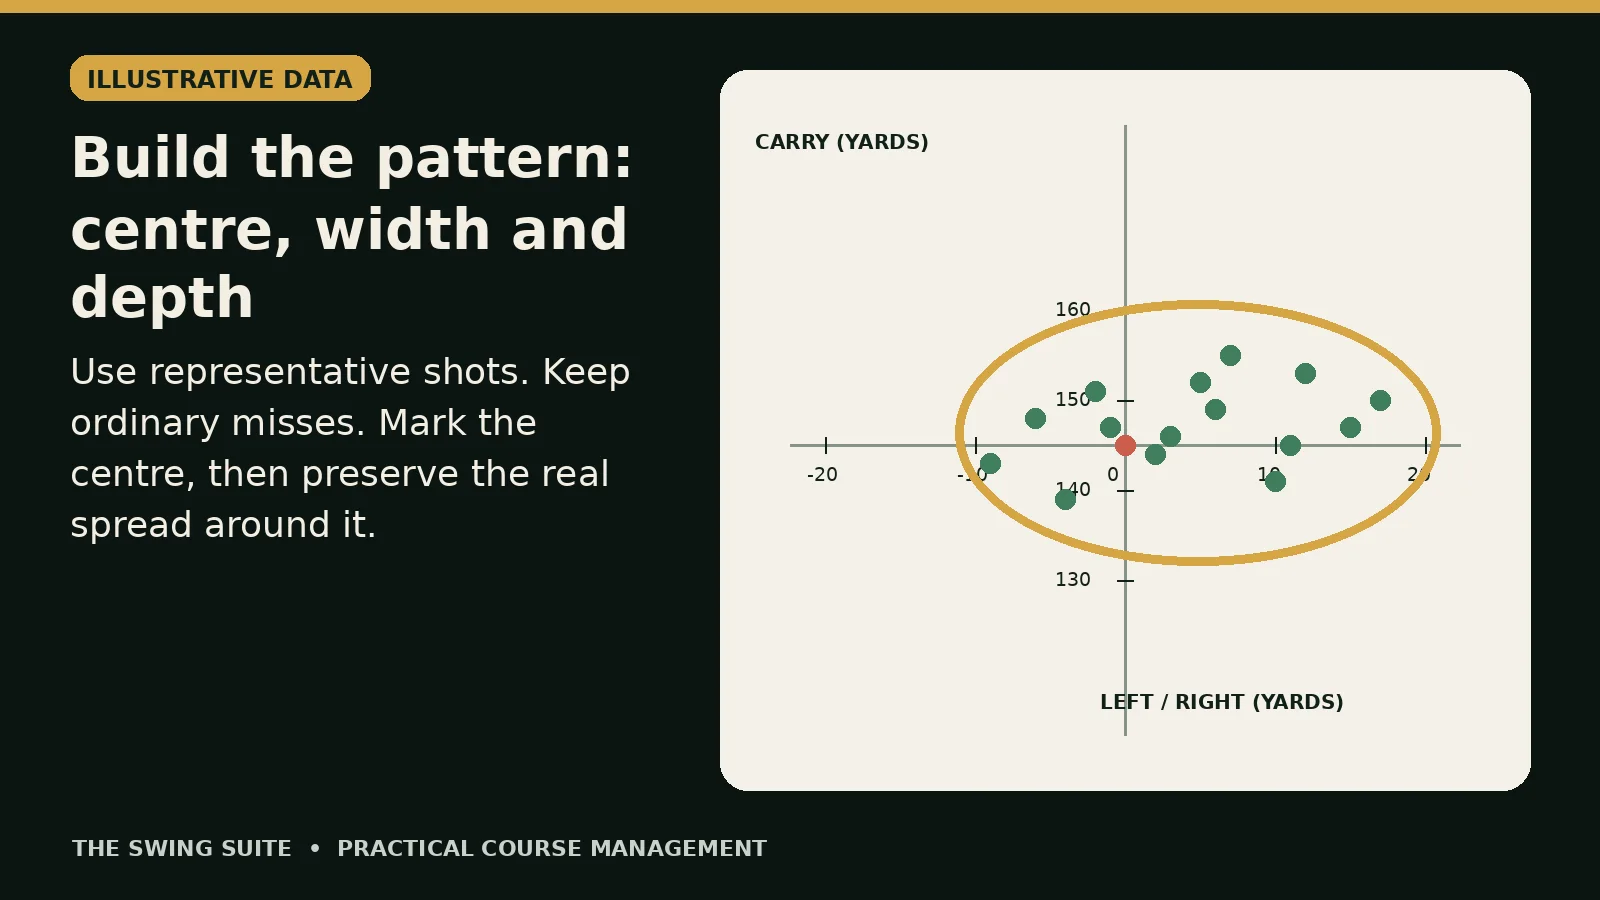
Imagine your next ten or twenty shots with one club landing on a transparent sheet. Some finish left, some right, some short and some long. There is a centre, but there is also a width and depth. Your target decision should place that entire transparent pattern over the hole.
Begin with the straight, calm, level-yardage version of the shot. Mark your typical carry, not your best strike. Add the left-to-right spread and the short-to-long spread that belong to ordinary attempts. Then look at the real landing area: front edge, back edge, bunkers, water, slopes, rough, out of bounds and the position of the flag.
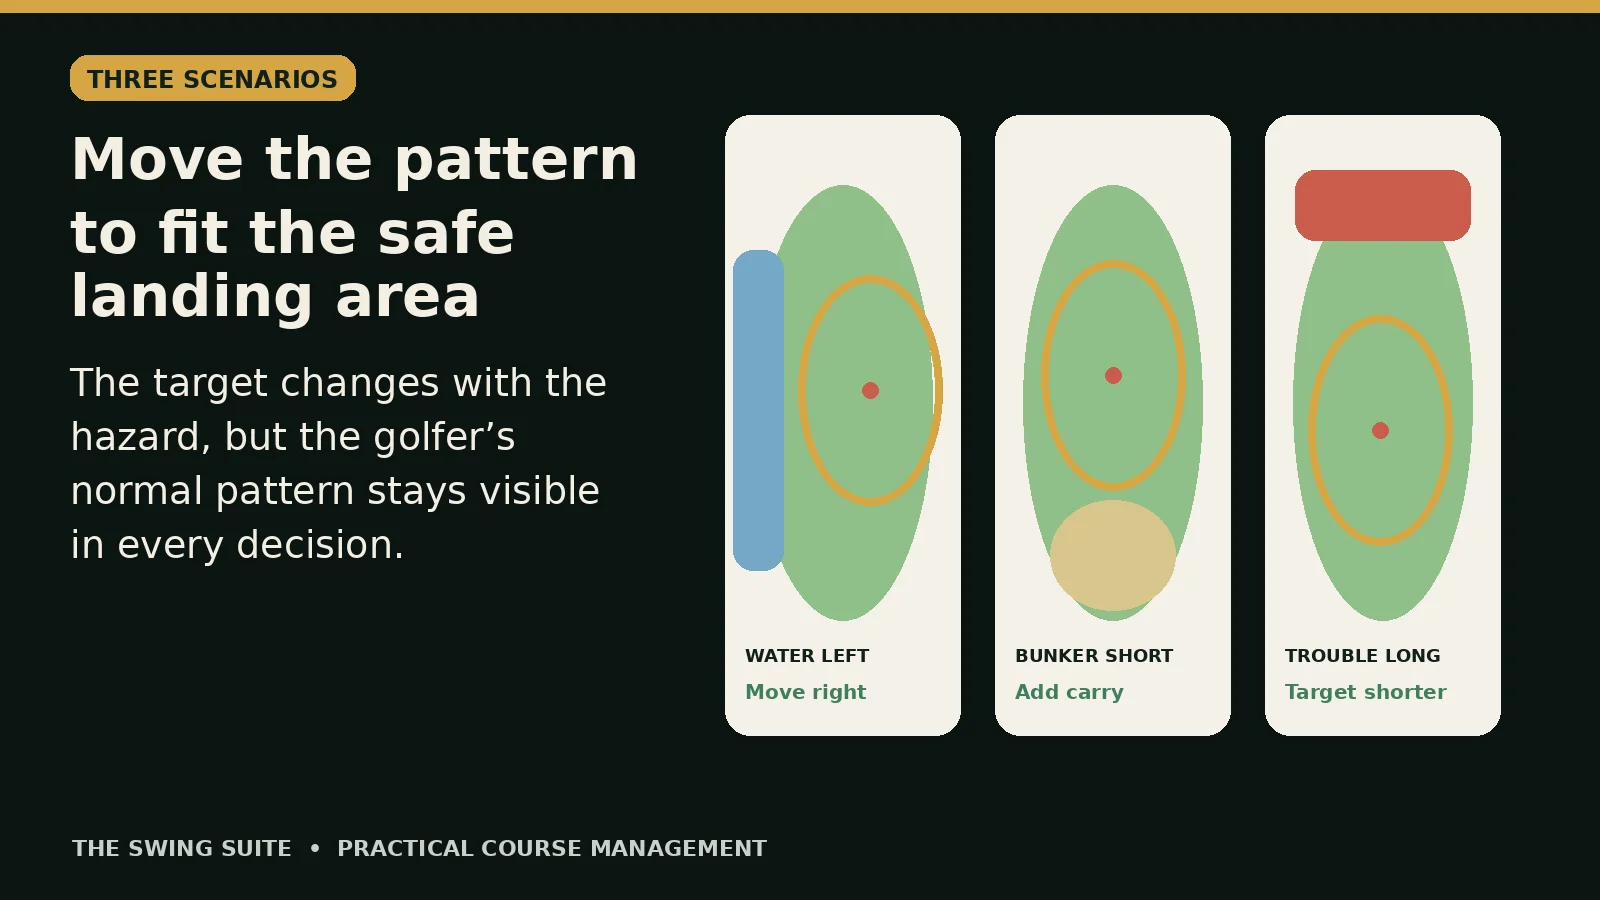
If the pattern overlaps a severe penalty on the left, move its centre right. If the pattern falls short of a front bunker, use more club, choose a different landing area or accept that the shot is not available from that lie. If a back pin leaves no room beyond the flag, do not centre the pattern on the flag and hope every shot finishes short of its normal carry.
The final aim point is the centre of the best available placement, not necessarily the centre of the green. Sometimes it will be close to the flag. Sometimes it will be fifteen yards away. The decision changes with the golfer, club, lie and hole.
Why a single distance is not enough
A golfer often describes a club with one number: “my seven iron goes 150”. That number is useful only if you know what it represents. Is it carry or total? Is it a normal strike or the longest recent shot? Was it measured with the current ball? Does it describe a central result or an optimistic memory?
Target selection needs at least three pieces of information:
- Typical carry: a central airborne distance for a normal attempt.
- Depth: how far ordinary shots finish short or long of that centre.
- Width: how far ordinary shots finish left or right of the intended line.
TrackMan describes carry as the distance to the point where the trajectory returns to the same height as the strike, and it records side as the distance left or right of the target line. Those two measurements help describe where a shot lands, but one shot is not a pattern. You need a group of representative attempts.
Do not remove every poor-looking result. If a slightly heavy strike or a small face-to-path variation is part of your current golf, it belongs in the planning picture. Remove only genuine non-shots under a rule decided before you inspect whether you like the number: a misread by the system, the wrong club selected, a stopped swing or a different shot attempted by mistake.
A pattern built only from flushed shots encourages targets that require flushed contact. A pattern containing every accidental tap or interrupted swing can be equally misleading. The useful sample sits between those extremes: genuine attempts at the named shot, including ordinary misses.
TrackMan — What the measured ball-flight parameters mean ↗
Build a practical shot pattern before changing your strategy
You do not need a perfect statistical model. You need a defensible picture of the shots you are likely to produce. Start with the clubs that create the most important decisions on your course: perhaps a mid-iron approach, a hybrid or fairway wood, and the driver.
For each club, collect shots under controlled conditions. Use the same ball type when practical. Confirm the unit, target line and club selection. Warm up before saving results. Make a normal routine for each shot rather than raking balls and swinging without a target.
A first pattern might use ten to fifteen representative shots. That is enough to reveal obvious width, depth and bias, but it is not a permanent truth. Add observations over time. Compare indoor and outdoor sessions rather than quietly mixing incompatible conditions. Record whether numbers are actual or normalised. Note mat or turf, ball, wind and any unusual setting.
For each shot, save:
- Carry distance.
- Finish side or lateral position.
- Contact note.
- Start direction, if available.
- Curve or finishing tendency.
- Whether the intended stock swing was completed.
The purpose is not to diagnose every swing. It is to learn the shape of the outcome. A golfer may have shots that start close to the intended line but curve right. Another may start right and remain there. Their final patterns can look similar, yet the coaching explanation differs. Strategy can begin with the finish pattern while technique work investigates the cause separately.
TrackMan’s Map My Bag feature is one example of organising carry, total, dispersion and gapping into a usable profile. You can follow the same principle with a simpler launch-monitor export or a paper record: keep the raw shots, identify the centre and preserve the spread.
Measure centre, width and depth without false precision
Plot the shots on a simple top-down grid. Put the intended target at zero. Horizontal position shows left and right; vertical position shows carry. If you do not have plotting software, draw a rectangle or oval that contains the central group and note any regular outliers.
Use a median or a sensible central value for carry when one unusually short or long result would pull the average away from the main group. For lateral position, note whether the group is centred, biased left or biased right. A consistent bias matters. If twelve ordinary shots finish mostly right of the aim line, your planning centre should not pretend the pattern is symmetrical around zero.
Describe the pattern in rounded, usable terms. For example:
- Typical carry: about 145 yards.
- Ordinary depth: roughly 138 to 151 yards.
- Ordinary width: roughly 12 yards left to 18 yards right.
- Tendency: centre sits about 4 yards right of the aim line.
Those numbers are hypothetical. The important feature is the language. “About” and “roughly” are more honest than presenting a small sample to one decimal place. Preserve the raw values for later comparison, but use the on-course summary at a level you can remember.
Do not force the pattern into a neat oval if the shots form two groups. Two clusters may mean that the golfer alternated between different strikes or deliveries. Strategy cannot turn an unstable pattern into a reliable stock shot. Mark the club provisional, choose extra margin and work on the reason before building aggressive targets around an invented centre.
Separate aim, start direction and finish
The aim point is where you intend to start the planning process. Launch direction is where the ball initially starts. Finish position is where the shot ends relative to the target line. These are connected but they are not the same thing.
TrackMan defines launch direction as the ball’s initial horizontal direction relative to the target line: a positive value starts right, a negative value starts left and zero starts on the line. You do not need to turn that into a technical target while choosing a shot. You do need to avoid confusing a repeated right finish with a deliberate right aim.
Suppose a player aims at the centre of a green, launches most shots slightly right and then curves them farther right. Their landing pattern sits right of the intended point. If they simply aim left without understanding the size and stability of that pattern, they may occasionally move the whole group into danger on the left when the curve changes.
A safer process is to map the actual finish pattern, choose a strategic centre that gives the current pattern room, and treat the ball-flight cause as a coaching question. If the player later changes the start line or curve, the pattern must be remeasured. Strategy follows the shot that exists now, not the shot the golfer hopes to own next month.
TrackMan — What is launch direction? ↗
Read the hole as a landing-area map
Before choosing a club, divide the hole into landing zones rather than staring only at the flag. Identify the front, middle and back of the green. Mark severe hazards, bunkers, slopes, rough, run-offs and out-of-bounds edges. Then ask which misses are costly and which remain playable.
A bunker is not automatically the same penalty for every golfer. A confident bunker player may accept that miss more readily than deep rough behind the green. Another golfer may prefer a long putt to any sand shot. The map therefore contains both physical features and personal consequences.
Classify the surrounding areas:
- Green or closely mown area with a straightforward next shot.
- Playable miss that costs distance or leaves a harder chip.
- Difficult miss likely to require a recovery.
- Severe penalty such as water, out of bounds or an unplayable position.
This is not an exact strokes-gained calculation. It is a practical ranking. The most severe area should usually influence the target most. A small chance of a difficult chip may be acceptable if avoiding it creates a much larger chance of water. Equally, aiming twenty yards away from every bunker can create longer putts and different misses without meaningfully reducing the worst risk.
A practical way to test candidate targets is to compare how much of the golfer’s pattern overlaps each part of the hole. The useful answer is not one universal aim point. The target should be tested against the player’s current distribution rather than chosen from the flag alone.
Place the pattern over the hole
Now combine the two pictures. Take the rounded shot pattern for the chosen club and place its centre on an initial target. Count or estimate how much of the pattern overlaps each landing zone.
Start with a neutral option such as the centre of the usable green. Then test alternatives. Move the centre five yards left, right, short or long. Do not move it endlessly to chase a mathematical optimum. Compare a small number of clear targets that you could identify from the ball.
For each option, ask:
- How many ordinary shots would still reach the safe landing area?
- Does the short edge of the pattern clear the front hazard?
- Does the long edge remain below the severe trouble beyond the green?
- Does the lateral bias place more shots towards one boundary?
- Is the intended target visible and easy to commit to?
- Does the club require a forced swing to cover the carry?
A good placement does not guarantee a green in regulation. It improves the relationship between the likely pattern and the available space. The final shot can still miss. The decision should be judged by whether it used the information available before the swing, not only by the single result.
Worked example: a middle pin with water left
Consider a hypothetical approach of 147 yards to the flag. The green begins at 136 and extends to 163. Water runs along the left side, beginning five yards left of the putting surface. The right side has short rough and a relatively simple pitch back towards the centre.
The player’s hypothetical seven-iron pattern has a typical carry of 148 yards. Ordinary carries range from 140 to 154. The group finishes from 10 yards left to 18 yards right of the aim line, with its centre already about 4 yards right.
Aiming at the flag sounds sensible because the distance suits the club. Place the pattern there, however, and the left edge reaches the water line. The player’s existing right bias provides some protection, but several normal left finishes remain in the severe zone.
Move the target eight yards right of the flag. The pattern now places most ordinary shots on the green or in the playable right miss. The left edge is closer to the putting surface rather than the water. A centred strike finishes right of the hole, but that is an acceptable cost for reducing the worst overlap.
The golfer should not then aim eight yards right and try to draw the ball back to the flag unless that curve is already the stock shot represented by the pattern. The selected point is the committed target. The purpose of moving it was to let the normal shot pattern work, not to create a second hidden target.
Worked example: a front bunker and a back pin
Now imagine a 156-yard back flag. The front of the green is 142, a bunker covers the centre from 137 to 146, and the back edge is 164. Beyond the green is a steep downslope into difficult rough.
The player has two hypothetical options. A seven iron carries about 151, with ordinary depth from 143 to 157. A six iron carries about 161, with ordinary depth from 153 to 168. Both patterns are similar in width.
Aiming the seven iron at the flag leaves the short portion around the bunker and front edge. It also requires the player to expect the upper end of the pattern to reach the back flag. Aiming the six iron at the flag moves a meaningful part of the pattern beyond the back edge.
The useful target may be the centre of the green at about 153 to 155 yards, using the seven iron if the lie and conditions support its normal carry. That placement clears more of the bunker without centring the group at the dangerous back boundary. The likely reward is a longer putt. The avoided mistake is choosing a club whose normal centre belongs at the flag but whose long side has no room.
If the lie reduces expected carry, the seven iron may no longer be suitable. The golfer can use the six iron towards a shorter target, change the trajectory if that is a reliable stock option, or accept a lay-up area. The target cannot repair a club whose usable carry pattern does not fit between the front and back penalties.
Worked example: a wide green with a tucked flag
A tucked flag can create the feeling that the shot must be shaped towards it. Often the green provides a simpler option.
Suppose the flag is six yards from the right edge. A bunker sits outside that edge, while the left half of the green is open. The approach is 132 yards to the flag and 129 to the centre. The player’s hypothetical nine-iron carries about 131, with ordinary finishes from 8 yards left to 13 yards right of the aim line.
If the player centres the pattern on the flag, its right side overlaps the bunker. If they aim at the green centre, the existing right side can still finish near the flag, while the centre and left side remain putting shots. The target produces chances without requiring the average shot to finish beside the hole.
This is different from saying “always aim at the centre”. If the player’s pattern were strongly left-biased, the best centre might sit between the middle and the flag. If the left half contained a severe slope or water, another placement could be better. The pattern and consequences decide.
The practical test is simple: would an ordinary shot, not an exceptional one, need to beat the pattern to reach the attractive side? If yes, the flag is probably asking for a performance that the club does not normally deliver.
Adjust carry before you place the pattern
Your baseline pattern was measured in particular conditions. On the course, update the expected centre before comparing it with the hole. Do not apply a collection of memorised adjustments without checking whether they describe your flight.
Consider:
- Lie: rough, wet grass, a bare lie, a slope or a ball sitting high can change contact, launch and spin.
- Wind: direction and strength affect carry and curvature, with different flights responding differently.
- Elevation: an uphill landing area generally requires more effective carry; downhill requires less.
- Temperature and altitude: both can alter flight relative to a baseline.
- Ball and surface: a different ball or range-ball baseline may not transfer directly.
- Adrenaline, fatigue and physical state: your speed and strike pattern may change during a round.
Make the adjustment in two stages. First estimate the new central carry. Then decide whether the spread is also likely to widen. A difficult lie does not merely subtract a fixed number; it can increase uncertainty. When uncertainty increases, choose a larger safe area rather than pretending the same tight oval moved five yards.
Digital strategy tools may model some of these variables, but a model remains an aid. The player still has to decide whether the lie and intended shot match the stored pattern.
Choose the club whose pattern fits, not the club with the nearest number
Golfers often select the club whose remembered distance is closest to the flag. The better question is which club places the most useful part of its pattern in the available landing area.
A shorter club may have the right centre but bring a front hazard into the ordinary short side. A longer club may clear the front but overlap trouble beyond the green. Sometimes the best option is the longer club aimed at a shorter or wider part of the green with a controlled stock swing. Sometimes it is the shorter club because long is the severe miss and the front is open.
Compare complete patterns. If a hybrid carries only five yards farther than a long iron but has a much tighter strike pattern for you, it may be the safer choice. If the hybrid’s long side runs through the back of a firm green, the iron may fit better despite being less consistent in calm indoor testing.
Do not choose a club that requires your personal best strike to cover the minimum carry. If the front edge is 150 and the club’s central carry is 148, saying “I can hit it 154” is not a strategy. Choose enough club for an ordinary attempt, change the target, or accept that the green is not available safely.
Equally, more club is not automatically safer. Safety comes from matching centre and spread to the space. The pattern must fit both the front and back constraints.
Give ordinary misses somewhere to go
A useful target makes room for the misses you actually produce. It does not assume that aiming away from trouble removes the miss. If your pattern is thirty yards wide, moving the aim five yards changes the overlap but does not shrink the pattern.
Identify the likely miss that matters most. If most shots finish right, a right-side penalty deserves more room. If distance control is the larger issue, front and back boundaries may matter more than lateral hazards. If contact is unstable from rough, the whole pattern may need to be treated as wider and shorter.
The phrase “miss on the correct side” can be misleading. You cannot order the ball to miss in one direction after choosing a target. You can position the centre so that more of the existing distribution falls on the acceptable side. That is a probability decision, not a guarantee.
Build a hierarchy:
- Best: green or simple putting area.
- Acceptable: straightforward chip or open fringe.
- Tolerable: bunker or rough from which a normal recovery is available.
- Avoid: penalty area, out of bounds, blocked recovery or severe short-side slope.
Move the pattern primarily to reduce the avoid category. Then compare what happens to the other zones. A target that removes one water ball but creates many difficult recoveries may still be worthwhile; a target that removes almost no water risk while giving away the whole green is probably too defensive.
Use a clear external target
Once you choose the strategic centre, translate it into something you can see. “Eight yards right of the flag” is difficult to execute if there is no reference. Choose a tree, roofline, bunker edge, colour change or section of the green that sits on the intended start line.
The external target should be precise enough to guide alignment but not so tiny that you become tense. Then choose an intermediate target a short distance in front of the ball if that is part of your normal routine. Build the stance to the line and make the stock swing represented by the pattern.
Do not continue recalculating over the ball. Strategy belongs behind the ball. Execution begins after the target and club are chosen. If a new fact appears — a gust, a changed lie or an incorrect yardage — step away and restart. Otherwise commit.
A committed conservative target is usually better than an aggressive target followed by a protective swing. The protective swing is not the stock motion you measured, so the pattern used in the decision no longer applies.
Tee-shot targets use the same principle
For a tee shot, replace the green outline with the fairway and likely second-shot areas. Map the driver or chosen club by carry, total and lateral finish. Then place the pattern so that ordinary shots avoid the most severe boundaries while leaving a useful route forward.
Carry matters when hazards must be flown. Total matters when the ball can run into trouble. A driver pattern that carries a bunker but runs through the fairway may be worse than a shorter club. A fairway wood that cannot carry the first hazard is not made safe by being more accurate.
Consider the shape of the hole. If the fairway narrows at driver distance, place both the driver pattern and a shorter-club pattern over the map. Compare the number of playable outcomes and the length of the next shot. Do not assume that the shorter club is always prudent or that driver is always the mathematically correct choice.
The same discipline applies: use a representative pattern, adjust for current conditions, compare a few clear targets, select one visible line and commit to the stock shot. If the hole demands a curve you cannot produce reliably, choose the widest available landing area rather than aiming for a heroic shape.
Recovery targets should protect the next shot
When the green is not available, the target becomes the best position for the next shot. Golfers often attempt to advance the ball as far as possible through a narrow gap. The pattern method asks whether the width and height of the intended shot fit that gap with room for ordinary variation.
First secure the exit. Identify the minimum carry and trajectory needed to clear the immediate obstruction. Then identify where the shot can finish without bringing another severe problem into play. A shorter sideways target may create a full next shot; a longer diagonal target may leave less distance but require a much narrower pattern.
Do not use the pattern from a clean range lie for a recovery from trees or rough. The shot, setup and contact expectation are different. If you do not have a measured recovery pattern, assume greater uncertainty. Choose more space.
The objective is not to remove all risk. It is to avoid turning one mistake into several. A recovery is successful when it restores a playable route and leaves a clear next decision.
A five-step decision you can use on the course
Use this sequence before an approach:
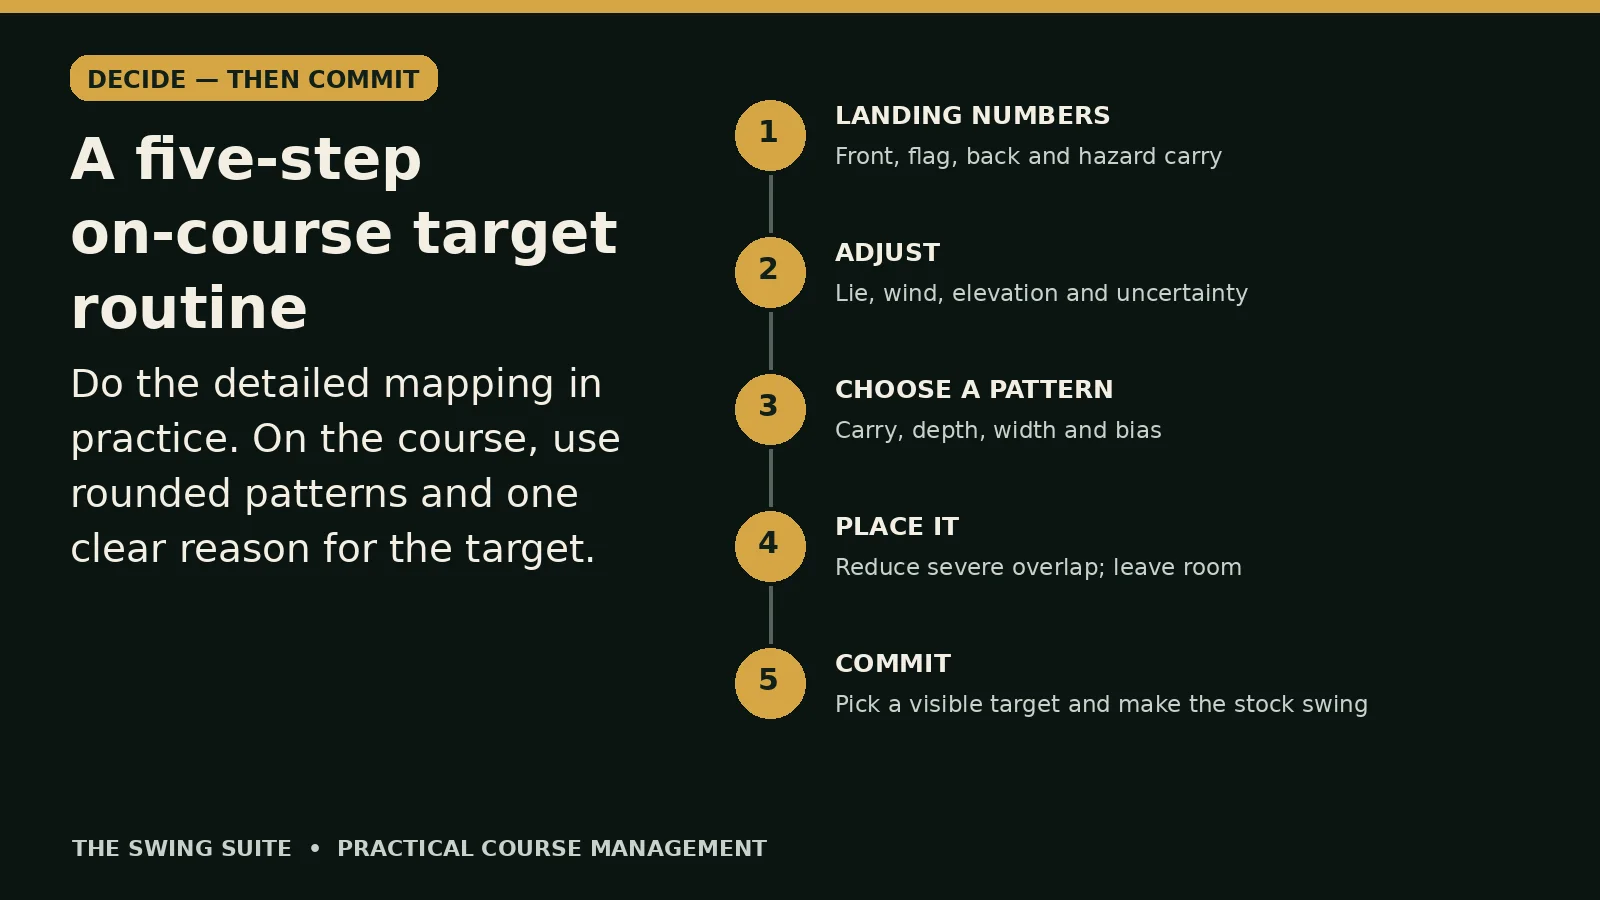
- Find the landing numbers: front, flag, back and the carry over any immediate hazard.
- Adjust for the shot: lie, wind, elevation, ball and the flight you intend to use.
- Choose a club pattern: central carry, depth, width and directional bias.
- Place the pattern: move its centre until severe overlap is reduced and normal misses have room.
- Pick a visible target and commit: make the stock swing represented by the data.
Keep the process brief. You are not drawing a chart during the round. The detailed work happens in practice and preparation. On the course, you recall rounded patterns and compare them with the main boundaries.
A simple card might say:
- Seven iron: 148 carry; ordinary 140–154; 10 left / 18 right; slight right bias.
- Eight iron: 137 carry; ordinary 131–142; 9 left / 14 right; centred.
- Nine iron: 126 carry; ordinary 121–131; 8 left / 11 right; centred.
Again, those figures are hypothetical. Your card should use your measured numbers and a format you can read quickly.
Practise target selection, not only ball striking
Strategy improves when it becomes part of practice. Do not finish a launch-monitor session after mapping clubs. Add decision tasks.
Create a simulated green with front, back and side boundaries. Add one severe hazard and one playable miss. Choose a random flag. For each shot, state the yardage, club, target and reason before you swing. Score the decision separately from the strike.
A simple ten-shot game can award:
- Two points for a result in the intended safe zone.
- One point for a playable miss that matched the planned margin.
- Zero for a poor strike that still had a sound target.
- Minus one for a shot whose pattern clearly did not fit the chosen target.
- Minus two for changing the target or shape during the swing.
The scoring is illustrative. Its purpose is to separate decisions from outcomes. A well-planned shot can finish badly. A reckless target can produce a lucky birdie chance. Over time, reward the process that is repeatable.
Vary the exercise. Move the hazard from left to right. Put the flag near the front and back. Change the wind. Use a lie that widens uncertainty. Ask whether the club still fits before every shot.
Common target-selection mistakes
Aiming at the flag by default
The flag is useful information, not an instruction. Compare it with the green boundaries and your pattern before treating it as the centre.
Using the best shot as the expected shot
A personal-best carry belongs at the edge of the history, not the centre of the plan. Use a stock carry and preserve ordinary short and long results.
Ignoring directional bias
A pattern that sits right of the aim line is not centred because you wanted it to be. Plan with the current bias and investigate the cause separately.
Treating every miss as equal
Five yards into light rough is not the same as five yards into water. Rank the consequences around the landing area.
Adding margin without checking the opposite side
Moving away from water can push the pattern into bunkers, rough or out of bounds on the other side. Place the whole pattern again after every adjustment.
Choosing a protective swing
If the target makes you steer, slow down or manufacture a curve, the measured stock pattern may no longer apply. Choose a target that allows commitment.
Believing one good round rewrites the pattern
A small sample can look tighter than normal. Update the pattern after repeated evidence, equipment changes or a stable technique change.
Making the process too complicated
You need rounded carries, useful spreads and a clear hierarchy of misses. Do not let an elaborate model delay a simple decision.
Review and update your patterns
A shot pattern is a dated description. Recheck it after changing clubs, ball, technique or physical condition. Recheck when repeated on-course shots finish in a different area from the stored pattern.
Do not rebuild the whole bag after one unusual day. First check the setup, ball, environment and quality of the sample. Compare several sessions. If the centre shifts consistently, update the carry or bias. If the spread narrows, you can test slightly more demanding targets. If it widens, add margin before the scorecard forces the lesson.
Keep old summaries. They show whether a change is real and help explain why a former target rule no longer fits. Date each version and note the conditions.
You can also review decisions after a round without judging them only by results. For each costly approach, ask:
- Was the yardage correct?
- Did the club’s normal pattern fit the landing area?
- Was the target moved far enough from the severe miss?
- Did the lie or wind widen uncertainty?
- Was the final swing the stock shot used in the plan?
This review separates strategy errors from execution errors. The response differs. A strategy error needs a better target or club decision. An execution pattern may need coaching or practice. A single poor strike needs neither a dramatic technical change nor a new course-management rule.
Build the pattern honestly, then trust the target
Better targets begin with an honest description of your golf. Measure typical carry, preserve ordinary width and depth, and note where the centre actually sits. Map the landing area by consequence, not by appearance. Place the whole pattern over the hole, move it away from the worst outcomes, and choose the club whose normal distribution fits the available space.
The result will not always point at the middle of the green. It will not always point away from every bunker. It may sometimes sit close to the flag because the pattern and surrounding space support that choice. The important change is that the target has a reason.
If you have not yet built reliable carry numbers, start with the wedge-matrix guide. The same recording discipline — representative shots, honest ranges and clear confidence labels — provides the foundation for better target decisions throughout the bag.
Related guide — Build Your Personal Wedge Carry Matrix ↗
If your patterns are wide, split into different clusters or change sharply with the lie, a coaching session can help separate strike, start direction, curve and club-selection questions. Bring one clear problem and your recent shot data if you have it.