
A wedge carry matrix is a simple chart that answers two questions: which wedge will you use, and which repeatable swing will you make, to carry the ball a chosen distance? Instead of describing a shot as “a soft sand wedge” or “nearly a full gap wedge”, you give that shot a clear label and attach a measured carry to it.
For many beginner and club golfers, this is more useful than trying to create a different feel for every yardage. You do not need a huge chart. You need a small number of shots that you can recognise, reproduce and trust. A practical starting point is the wedges you already carry, combined with three swing sizes: full, three-quarter and half. Those names are only labels; the important part is that each one means the same thing to you each time.
The finished matrix might contain eight or twelve usable shots. It may also contain blank cells where a swing is not yet reliable. That is not a failed test. An honest blank is more helpful than a precise-looking number built from poor contact or a swing you cannot reproduce on the course.
This guide takes you through the full process: choosing the matrix, setting up the test, recording shots, handling mishits, calculating practical numbers and using the chart under real playing conditions. The worked numbers later in the article are clearly hypothetical. They demonstrate the method; they are not distance targets and should not be copied into your own card.
The direct answer: build a chart of stock carries
Your matrix should be based on stock shots rather than maximum effort. A stock shot is one you would be content to choose during a normal round: balanced, committed and familiar enough that you are not hoping for a perfect strike. The aim is not to discover the furthest you can hit each wedge. It is to identify the carry you can plan around.
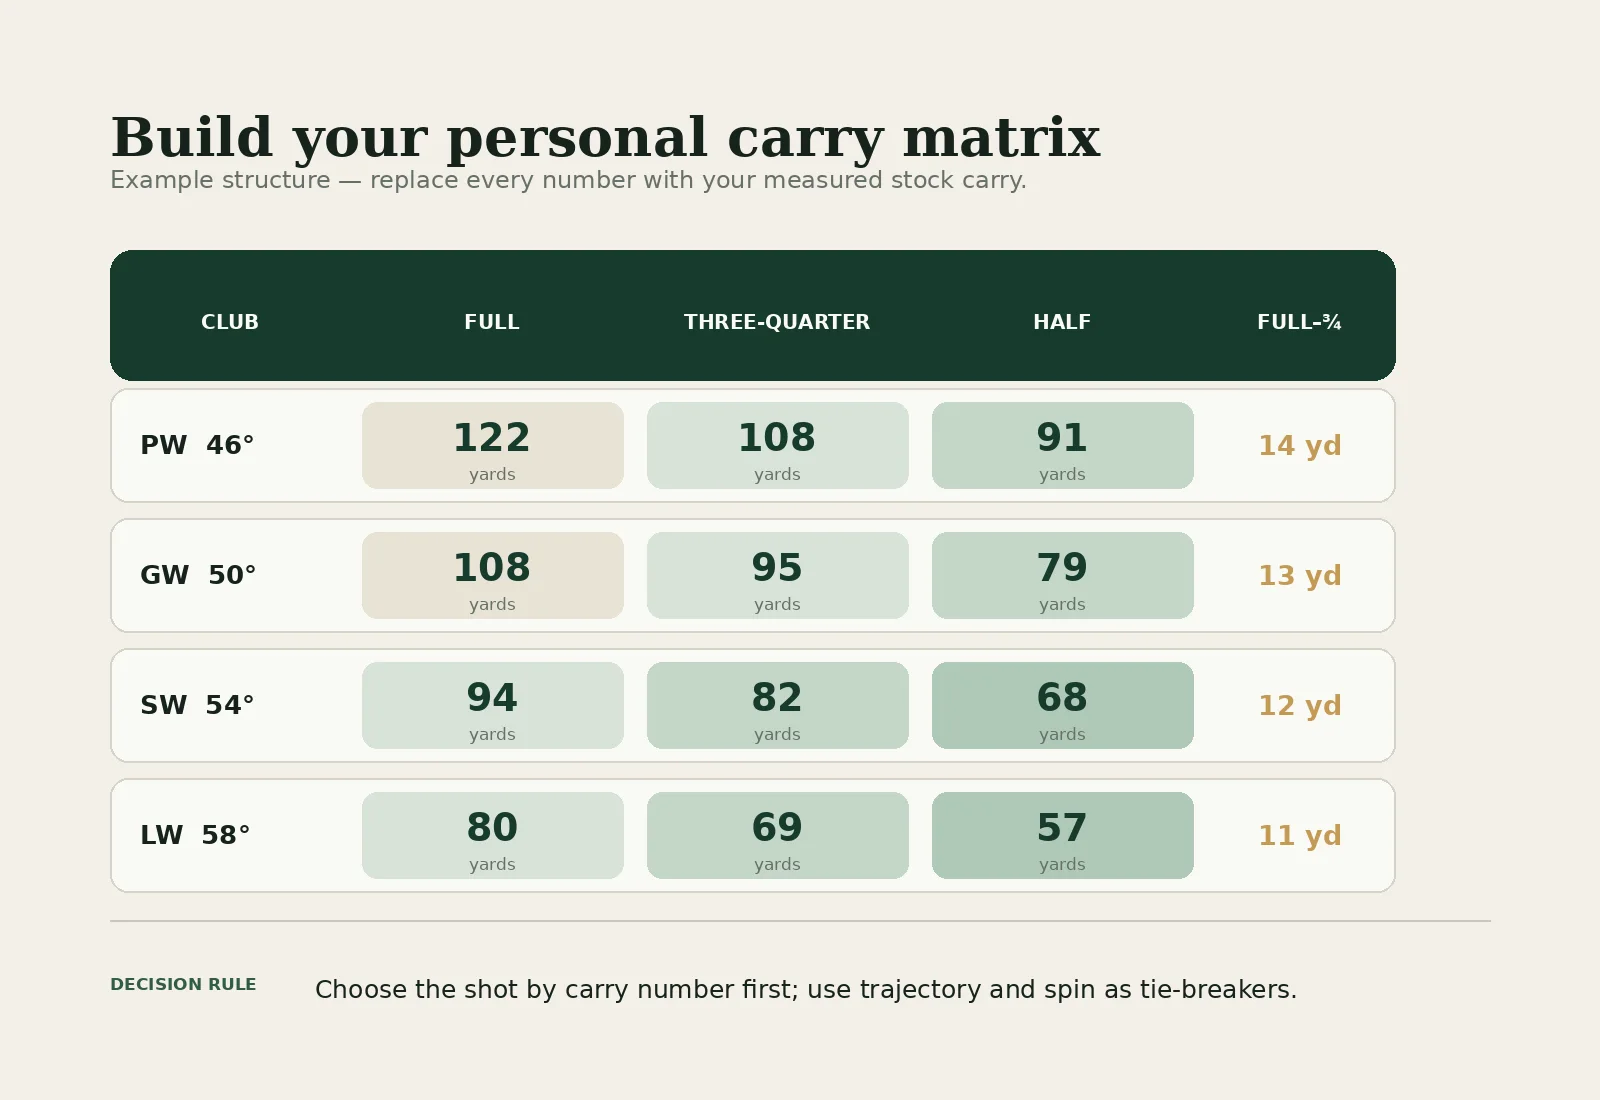
The simplest version has clubs down one side and swing labels across the top:
- Pitching wedge: full, three-quarter, half
- Gap wedge: full, three-quarter, half
- Sand wedge: full, three-quarter, half
- Lob wedge, if you carry and use one: full, three-quarter, half
You may use different labels. Some golfers prefer hand positions, such as waist high and chest high. Others use a clock-face image. Some respond better to effort labels such as smooth, medium and full. None of these systems is automatically superior. Choose the cue that remains clear when you have one chance to play the shot.
Do not begin with five or six swing lengths per club. Start with three. If two repeatedly produce the same carry, keep the clearer one. Add another stock shot later only if a useful distance remains uncovered.
Why the matrix records carry, not total distance
Carry is the distance the ball travels through the air before it reaches the landing level. TrackMan’s technical definition is the straight-line distance from the starting point to where the trajectory crosses a point at the same height as the strike. That definition provides a stable baseline before you deal with the slope and firmness of a particular green.
Total distance includes what happens after landing. With a wedge, that can change greatly. A ball landing on a soft, receptive green may stop quickly. The same flight landing on a firm downslope may bounce forward. A wet practice field, a dry summer range and an indoor simulator can therefore show very different total outcomes even when the airborne shot is similar.
On the course, hazards and green edges also make carry the immediate question. If a front bunker protects the landing area, you need to know whether the chosen shot will fly over it. A remembered total distance is not enough if some of that distance came after the first bounce.
Carry is influenced by the launch conditions you create, including ball speed, launch angle and spin. That is why two swings that look similar can finish with different carries, and why strike quality matters. You do not need to chase ideal technical values while mapping. You do need to recognise that a number is useful only when the underlying shot is repeatable enough to produce it.
Decide which wedges belong in the test
Write down every wedge you actually carry, including its stated loft if you know it. Do not assume that a name such as pitching wedge or sand wedge tells you the exact loft. Recording the name and stated loft is clearer than using the name alone.
If you do not know the lofts, check the manufacturer’s specification for your exact model or ask a professional to measure them. Do not guess from another set. The loft printed on a specialist wedge is useful, but measured performance still matters more than a theoretical loft gap.
Your wedge setup also has to fit inside the whole bag. The Rules of Golf limit a player to no more than 14 clubs. That does not tell you how many wedges to carry; it simply means every extra wedge uses a place that might otherwise hold a longer club. Build the matrix with the clubs you realistically intend to take onto the course.
A beginner does not automatically need a lob wedge. If your highest-lofted club is difficult to strike from ordinary lies, build the matrix without it. The matrix describes your available shots; it is not a shopping list.
Before testing, inspect the clubs. Make sure you can identify them quickly and that the grooves and faces are reasonably clean. Use the same club labels in the launch-monitor software, recording sheet and final card. Selecting the wrong wedge in the software can spoil otherwise good data.
The R&A — Rule 4, The Player’s Equipment ↗
Choose three swing labels you can repeat
The labels “full”, “three-quarter” and “half” are convenient, but they are not measurements of exact angles or exact percentages of speed. A golfer’s half swing may create more than half the carry of a full swing. The downswing can also accelerate differently. Treat the labels as cues, then measure the result.
Define each cue in plain language before you hit:
- Full: your normal controlled wedge swing, not a forced maximum.
- Three-quarter: a clearly shorter backswing with the same balanced finish and normal rhythm.
- Half: a compact motion that feels distinct from the three-quarter swing and can be repeated without steering the club.
If positions work better for you, write them instead: “hands to waist”, “lead arm about parallel”, and “stock full”. If you use a clock system, remember that the apparent hand position is personal. It is not a guarantee that every golfer’s nine-o’clock swing produces the same fraction of full distance.
If you cannot tell which swing you just made, the categories are too close. Widen the difference or use only two partial sizes. Keep the overall intention consistent: each label must represent one recognisable pattern.
Prepare conditions that make the numbers worth keeping
A launch monitor can provide precise-looking output while the session itself is poorly controlled. Before saving numbers, make the conditions as consistent and relevant as reasonably possible.
Use the golf ball you normally play when practical. If a venue requires its own balls, record that fact. Do not quietly combine indoor premium-ball data with outdoor range-ball data and call it one average.
Check the unit setting. This article uses yards, but metres are equally valid. Pick one and label it. Confirm that the launch monitor is aligned to the intended target and that the software has the correct club selected. If you are indoors, follow the venue’s setup requirements rather than moving the unit yourself.
Record the basic context:
- Date and location
- Indoor or outdoor
- Ball used
- Mat or turf
- Actual or normalised carry
- Temperature and altitude setting, if relevant
- Any notable wind if you are using actual outdoor carry
TrackMan’s normalization feature is designed to provide standardised carry, side and total information under calm conditions at a selected altitude and temperature. For a baseline matrix, normalised numbers can help reduce the effect of the day’s weather. The key is consistency: do not mix normalised and actual carries in the same column without marking them.
If your home golf is usually played near sea level, set the baseline accordingly rather than choosing a high altitude because it produces longer numbers. The matrix is a decision tool, not a distance badge.
TrackMan — The Normalization feature explained ↗
Warm up before any shot enters the matrix
Do not make the first wedge swings of the day part of the test. Your early speed, strike and movement may change as you loosen up, which means the saved sample would describe the warm-up as much as the stock shot.
Begin with gentle motion and short shots. Progress towards normal wedge speed. Hit enough balls to feel physically ready and to establish ordinary contact, but do not exhaust yourself by turning the warm-up into another session. The exact number depends on the golfer and the day.
Then rehearse the three swing labels with one middle wedge. You are checking whether the movements feel distinct, not collecting distances. If the half and three-quarter swings are merging, adjust the cues now. If your full wedge feels forced, redefine it as the longest balanced swing you would actually use.
TrackMan’s Map My Bag workflow separates warm-up from saved mapping, which is a useful principle even when you are creating a wedge-specific chart manually. Saved data should begin when you are ready to perform the shot you want to measure.
Calibrate one cell at a time
A cell is one club-and-swing combination: for example, gap wedge with the three-quarter swing. Work on one cell until you have a usable sample, then move on.
Start with a comfortable combination rather than the shortest, most delicate shot. A three-quarter gap wedge or full sand wedge often gives a golfer a clear motion without demanding maximum effort. Once you understand the recording process, continue through the matrix.
For each cell:
- Select and announce the club and swing label.
- Make one rehearsal if it helps you recognise the length.
- Aim at a clear target line.
- Hit the shot with normal routine and rhythm.
- Record carry and a brief strike note.
- Step away for a moment before repeating.
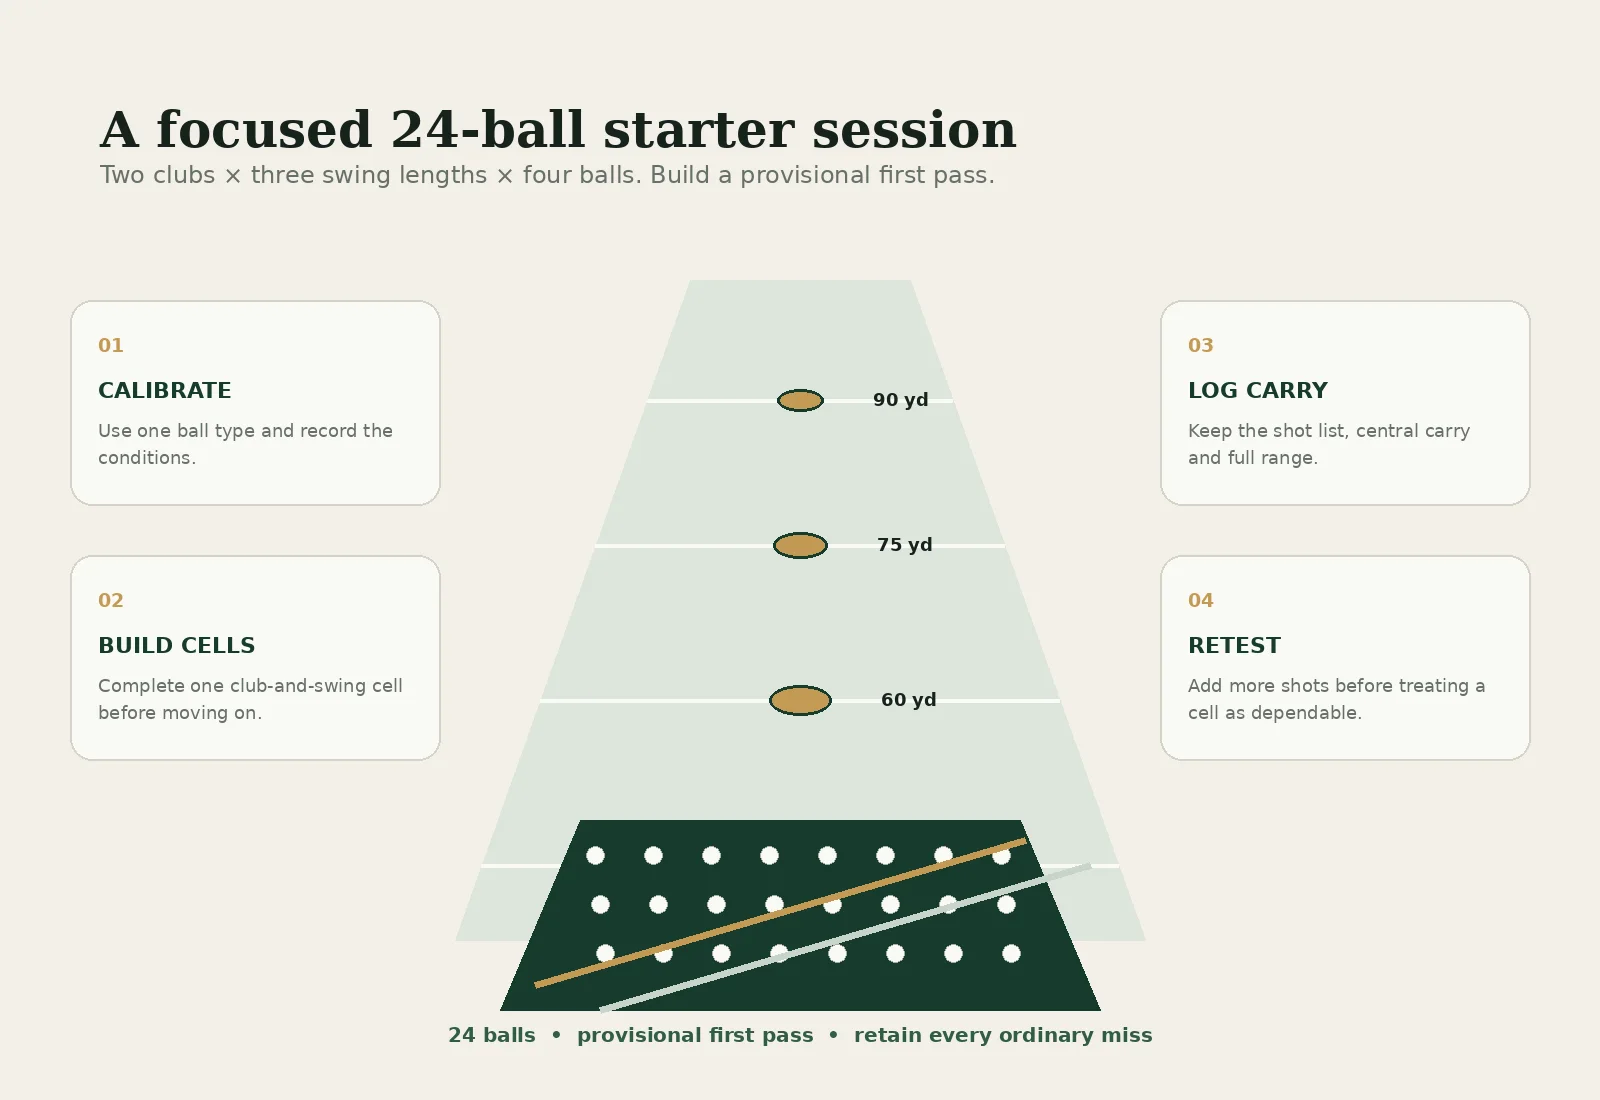
Aim to collect six representative shots for each cell. TrackMan describes six shots as the “sweet spot” in its general Map My Bag process and allows a larger rolling sample over time. Six is not a law of statistics and it does not make an unstable shot trustworthy. It is a practical first sample. If the pattern is unclear, add shots or leave that cell provisional.
Do not race through all twelve cells because the booking clock is running. Four wedges multiplied by three swing sizes requires 72 recorded shots for six per cell, before warm-up and any obvious non-shots. That may be too much for one useful session. Split the work across two or three visits. Keep the ball, settings and labelling method consistent, and note the separate dates.
Record enough information, but not every possible number
TrackMan systems can provide ball data including carry, total, ball speed, launch angle, spin rate, landing angle and side. Depending on the system and package, club data can include club speed, dynamic loft and attack angle. Those measurements can help a coach investigate why distance changes, but the first version of your matrix does not need every field.
Record four items for each shot:
- Carry distance
- Finish direction or side, if available
- Contact note: solid, thin, heavy, toe or heel
- Whether the intended swing label was completed
The contact note matters because identical carry numbers can come from different shots. A heavy strike and a thin strike might finish at the same distance, yet neither represents the intended flight. Direction matters because a shot that carries the right number but finishes far from the target is not automatically a dependable stock option.
Use neutral descriptions. “Heavy contact, finished short” is useful. “Terrible swing” is not. The purpose of the note is to explain the sample, not judge the golfer.
TrackMan — TrackMan 4 and TrackMan iO technical specifications ↗
Which mishits should count?
This is where a matrix can become misleading. If you delete every short or crooked shot, the final number describes your best strikes rather than your normal pattern. If you include a ball that was barely moved because you slipped, used the wrong club or stopped halfway down, the summary may not describe the intended shot either.
Use a transparent rule. Keep ordinary misses that began as a genuine attempt at the named shot. A slightly heavy strike, a small toe strike or a shot that leaked right belongs in the sample if that is part of your present pattern. Those results tell you how dependable the cell is.
Exclude an obvious non-shot only when you can state the reason before looking at whether you like the distance. Examples include:
- The launch monitor did not capture the shot correctly.
- The wrong club was selected in the software.
- The ball fell from the tee or was moved accidentally.
- You stopped the swing because of a distraction.
- You made a different swing label by mistake and recognised it immediately.
Do not create a rule that says “delete anything more than ten yards short”. That removes the very evidence you need to judge reliability. Instead, retain the shot and mark the contact. If two of six attempts are heavy, the answer may not be a clever average. The answer may be that this cell is not yet ready for the course.
Keep a central carry and the full observed range including ordinary misses. Preserve the raw list so you can see how the summary was produced.
Turn the shot list into a usable number
For a beginner-friendly matrix, calculate or display three things for each cell:
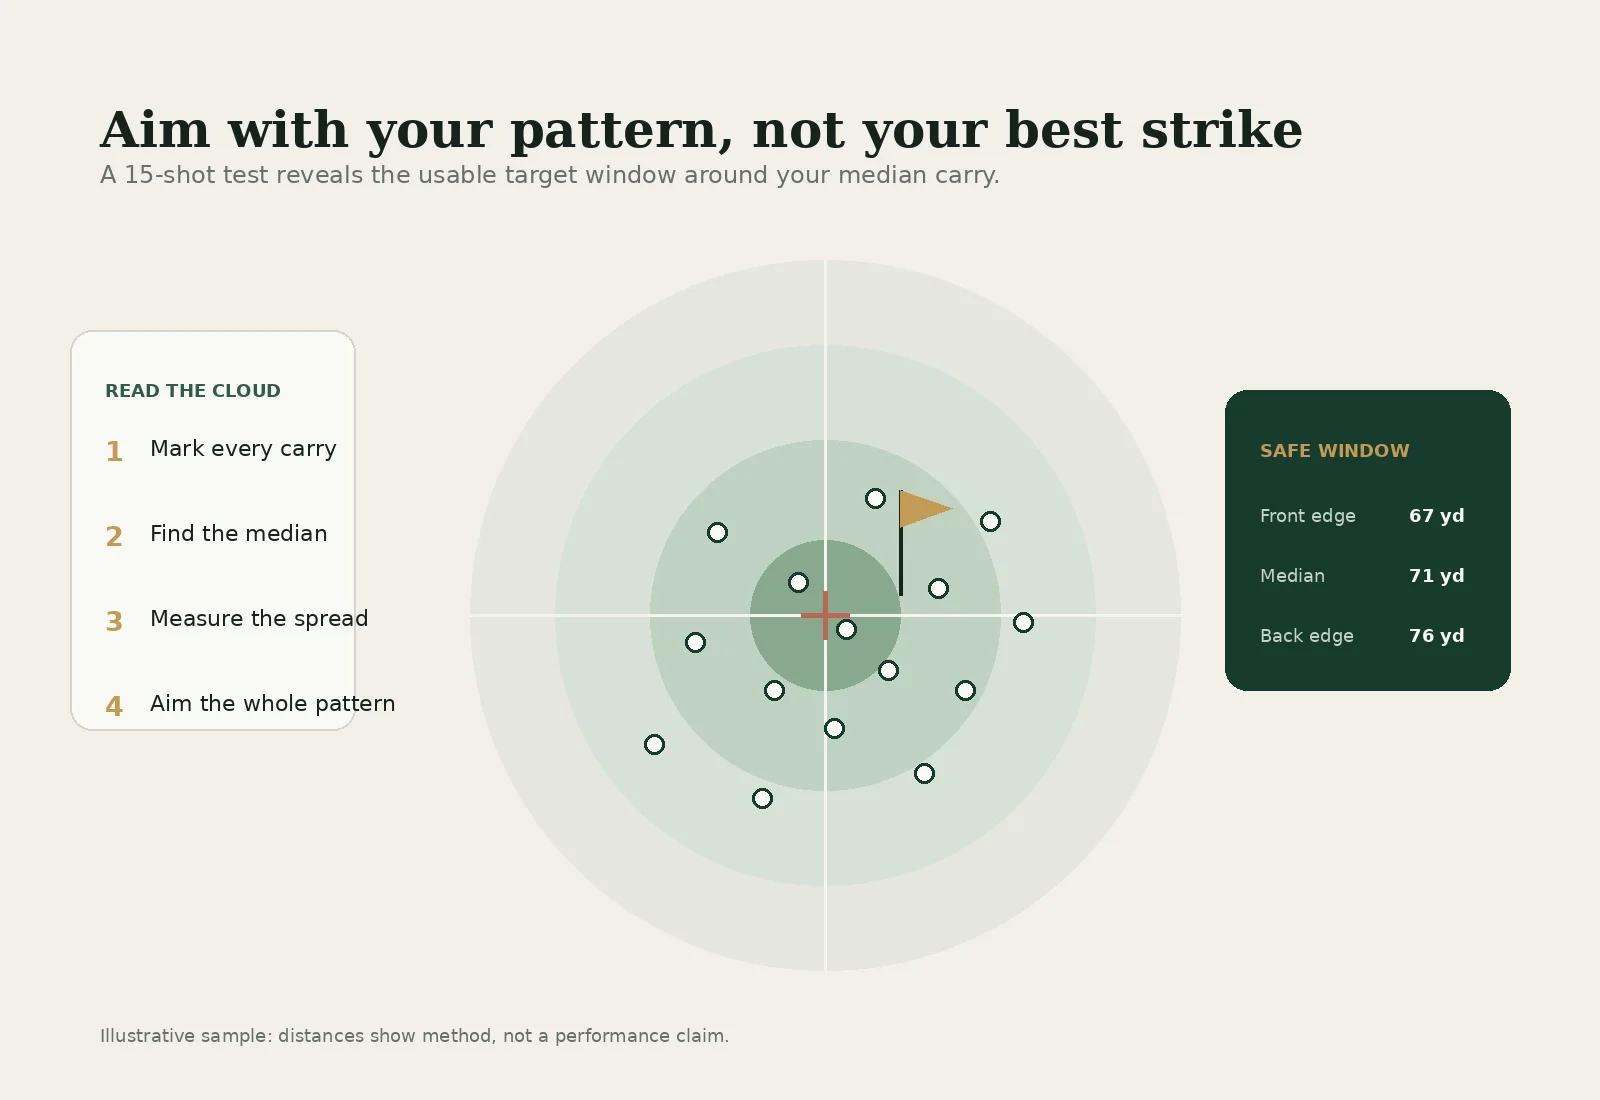
- Typical carry: the centre of the representative shots, using the launch monitor’s average or a median if one is available.
- Carry range: the shortest to longest ordinary result in the sample.
- Confidence: dependable, provisional or not yet usable.
An average is familiar, but it can be pulled by one unusually short or long shot. A median — the middle value after sorting the distances — is less affected by one extreme result. You do not need to debate the perfect statistic. Look at the actual shot list and choose a central number that honestly represents it.
Round the final card to a level you can use. A decimal suggests more certainty than a small sample and a human golf swing deserve. A whole-yard number, or “about” that number, is usually easier to remember. Keep the unrounded session data in your notes if you want to compare future tests.
Confidence can be defined simply:
- Dependable: the swing cue stayed clear, contact was generally functional and the carry pattern is narrow enough for you to plan with it.
- Provisional: the central number looks plausible, but the sample is small or the pattern is wider than you want.
- Not yet usable: the swing labels merged, contact repeatedly broke down or the carry results formed no practical cluster.
There is no universal spread that makes a shot dependable. Judge the range against the target: carrying a front bunker to a shallow green requires more caution than pitching into a large open area.
Look for coverage, not perfect mathematical gaps
Once the cells are filled, sort the usable shots by carry rather than by club. This reveals the distances you can actually cover.
You may find overlaps. A half pitching wedge and a three-quarter sand wedge might produce almost the same carry. That is not wasted information. The two shots may have different trajectories, strike demands or reactions after landing. You can choose one as the default and keep the other as an alternative for a particular lie or flight.
If you find a large gap, repeat the neighbouring cells on a fresh day before adding a club or another swing. If the gap remains and often appears on your course, explore one additional stock shot or review the setup with a qualified fitter or coach.
Do not force every gap to be identical. Loft spacing does not guarantee equal carry spacing, especially with partial swings. Your delivery changes the effective loft and speed presented at impact. The matrix exists to show the result rather than confirm a tidy theory.
Circle the smallest set that covers most of your common approach distances. A golfer might test twelve cells but choose seven primary shots. The other cells remain alternatives or development work. A compact on-course card is easier to use than a complete spreadsheet.
Hypothetical worked example: from raw shots to a matrix
Every number in this example is hypothetical and illustrative. It is not a claim about a real golfer, a recommended distance, or a result achieved by Scott Winyard or a client.
Imagine a club golfer carries a 44° pitching wedge, 50° gap wedge and 56° sand wedge. They test full, three-quarter and half swings. They use the same premium ball indoors, select normalised carry at their chosen home altitude and keep six representative attempts per cell.
Their hypothetical raw carry list for the 50° three-quarter shot is:
- 77, 80, 79, 73, 81 and 78 yards
The 73-yard shot was slightly heavy but was still a genuine attempt, so it remains in the observed sample. The average is 78 yards and the median is 78.5 yards. The player writes 78 yards on the card, notes an observed range of 73–81, and marks the shot dependable because the cue felt clear and five of the six results clustered from 77 to 81.
Now consider the hypothetical 56° half shot:
- 42, 55, 47, 38, 53 and 45 yards
The golfer reports a mixture of heavy contact and changing swing length. A central calculation would produce a number, but that number would disguise the problem. They mark the cell not yet usable and do not take a false 47-yard stock shot onto the course.
After reviewing all nine cells, the hypothetical matrix reads:
- 44° pitching wedge — full: 112 yards, provisional, observed 104–116
- 44° pitching wedge — three-quarter: 91 yards, dependable, observed 87–95
- 44° pitching wedge — half: 70 yards, provisional, observed 63–74
- 50° gap wedge — full: 97 yards, dependable, observed 93–101
- 50° gap wedge — three-quarter: 78 yards, dependable, observed 73–81
- 50° gap wedge — half: 59 yards, dependable, observed 56–62
- 56° sand wedge — full: 82 yards, provisional, observed 75–86
- 56° sand wedge — three-quarter: 64 yards, dependable, observed 61–67
- 56° sand wedge — half: not yet usable
This example immediately shows overlap. The hypothetical 50° three-quarter carries 78 and the 56° full carries 82. The player chooses the 50° three-quarter as the default because its pattern is tighter and the swing feels calmer. The full 56° remains an alternative when a higher flight or different landing behaviour is useful, but it is not the first choice merely because the target is nearer to 82.
The 59-yard gap-wedge half and 64-yard sand-wedge three-quarter also overlap. That gives the player a choice rather than a problem. If the lie is clean and there is room for a slightly lower flight, the 50° may be simpler. If the landing area requires the higher-lofted option, the 56° may suit. The matrix supplies the baseline; the lie and landing requirement complete the decision.
The chart also shows that “full wedge” is not automatically the most reliable category. In this hypothetical example, two full swings are provisional. The player can still use them with conservative targets, but the dependable partial shots form the core of the course card.
Turn the full chart into a small course card
Do not take every raw number onto the course. Create a short reference sorted by carry. Use large, readable text and include the swing cue.
The hypothetical player above might carry this list:
- 59 — 50° half
- 64 — 56° three-quarter
- 70 — 44° half, provisional
- 78 — 50° three-quarter
- 82 — 56° full, provisional
- 91 — 44° three-quarter
- 97 — 50° full
- 112 — 44° full, provisional
They highlight dependable shots, put a small “P” beside provisional ones and omit the unusable 56° half. Store the complete matrix in your notes, but keep the playing version compact.
Use the matrix with a four-step on-course decision
A carry number is only the beginning of a golf shot. Use this sequence:
- Find the required landing carry. Measure or estimate the distance to the intended landing area, not automatically the flag.
- Read the lie. Decide whether the ball is likely to launch and spin like the baseline test.
- Adjust for conditions. Consider elevation change, wind, temperature and green firmness.
- Choose the most dependable suitable cell. Prefer a stock shot with room for your normal variation.
Continue with the clearly hypothetical matrix above. Suppose its player has a landing point 76 yards away. The card has a dependable 78-yard gap-wedge three-quarter and a provisional 70-yard pitching-wedge half. In neutral conditions, the 78-yard stock shot is the clearer starting choice. The player is not required to manufacture an exact 76-yard swing.
Now suppose a bunker begins at 74 yards and the flag is only a few paces beyond it. The same 78-yard average with a 73–81 observed range deserves caution because one ordinary result in the sample finished short of the bunker line. You might choose a longer stock shot to a safer part of the green or change the landing target. The matrix improves the decision because it includes variation, not just the central number.
If the green is open at the front and the trouble is long, the shorter option may become sensible. Good course management is not always choosing the number nearest the flag. It is choosing the shot whose likely pattern fits the available space.
Adjust the baseline; do not rewrite it after every round
Your matrix is a neutral reference, not a complete weather model. Actual carry changes with conditions and with the shot you produce that day.
Wind is the obvious example, but avoid fixed adjustment rules unless you have tested them for your own flight. Start with a conservative target and learn from measured practice in varied conditions.
Temperature and altitude also affect flight. If your launch-monitor session uses normalisation, keep the baseline setting recorded. Then treat the day’s environment as an adjustment. TrackMan’s normalisation documentation specifically separates measured actual trajectory from standardised values under calm conditions at selected altitude and temperature.
Most importantly, the lie can make the launch-monitor number inappropriate. A clean fairway lie may resemble a controlled test. Wet rough, a bare lie, a downslope or a ball sitting high can change contact, launch and spin. If the lie is uncertain, choose more margin and a larger landing area rather than trying to execute the matrix to the yard.
The baseline should change only when there is evidence that your stock shot has changed: repeated practice data, a different ball, new wedges, a meaningful technique change or a sustained speed change. One flushed shot or one cold morning is not enough.
TrackMan — The Normalization feature explained ↗
What to do when the launch numbers look strange
Begin with the simple checks. Is the correct club selected? Are the units right? Is the target alignment correct? Did the system capture the shot? Are you viewing carry rather than total, and actual rather than normalised data?
Next, look at contact and the raw ball flight. A number that surprises you may be an accurate description of a strike you did not recognise. If carry varies, compare ball speed and launch. If a coach is present, they may also examine dynamic loft, attack angle, impact location or spin to identify the cause. Those measurements should answer a question; they should not become targets copied from another golfer.
If every wedge suddenly travels implausibly far or short, stop recording and check the setup rather than completing the matrix. If one cell alone is erratic, the issue may be the swing cue or contact pattern. Repeat it after a break. If the result remains scattered, mark it provisional or unusable.
Do not adjust technique in the middle of every measured set. Calibration and swing change are different tasks. If a pattern needs coaching, save the evidence, work on the cause, then remap the cell after the movement has settled.
TrackMan — TrackMan 4 and TrackMan iO technical specifications ↗
Can you build a matrix without a launch monitor?
Yes, but the measurement is less convenient and may be less controlled. Use a safe practice ground with known target distances, permission to practise and enough space to see first landing points. A laser rangefinder can measure target markers where permitted, but it does not automatically tell you exactly where each ball first landed.
One method is to place or use existing distance markers, hit groups with one club-and-swing combination, then inspect the landing area. Record the centre and spread rather than the position of the single best ball. This works best on a calm day with a level landing area and balls you can identify.
You can also collect observations during quiet practice rounds. With a clear lie and known carry requirement, note the club, cue and result. Be honest about uncertainty: write “about 70” rather than “69” if the landing point was not measured.
When you later access a launch monitor, use it to test the existing estimates rather than assume they are wrong. The purpose is to refine your personal model.
Common mistakes when building a wedge matrix
Using the longest shot as the number
The longest shot is memorable because it feels successful. It may also be a rare strike, lower launch or faster swing. A matrix built from personal bests encourages under-clubbing whenever contact is ordinary. Use a central result and keep the observed range.
Making every “full” wedge a maximum swing
A forced full wedge can add speed but lose strike and distance control. Define full as your longest balanced stock wedge swing. If you would not choose it under normal pressure, it does not belong as the baseline.
Deleting all the ugly shots
Ordinary misses are part of your present performance. Keep them unless they are genuine non-shots under a rule decided in advance. If the miss pattern makes a cell unusable, that is valuable information.
Mixing balls and settings
Changing from range balls to a premium ball, actual to normalised carry, yards to metres or one altitude setting to another can create differences unrelated to improvement. Label every session and avoid merging incompatible samples.
Building too many cells
A 20-shot catalogue is only useful if you can identify and reproduce all 20. Begin with a smaller matrix. Add a shot only when it fills a regular need and has a clear cue.
Ignoring direction and dispersion
A shot can have a neat average carry while repeatedly missing sideways. Your stock choice must fit a two-dimensional landing area. Carry is the headline number, not the entire pattern.
Treating the chart as permanent
Your swing, equipment and ball can change. A matrix is a dated snapshot. Keep it current enough to remain believable.
How and when to update the matrix
Review one or two key cells during ordinary practice instead of rebuilding the whole chart every week. If the new shots sit around the existing carry, the baseline remains useful. If a consistent shift appears across several sessions, update it.
Remap after:
- Changing wedges or altering lofts
- Changing the ball model you normally play
- A sustained technique change
- A clear change in speed or physical capacity
- Returning after a long break
- Repeated on-course evidence that a stock carry is wrong
TrackMan’s Map My Bag uses a rolling average of up to 30 shots and allows golfers to add new shots or remap a club. The useful principle is that distance information should reflect how you swing now, while still being based on more than one unusually good or bad day.
Date every version and keep the previous card for comparison. If one session shows every wedge shorter, consider fatigue, warm-up, ball and settings before declaring a permanent change.
A compact worksheet you can copy
Use this header for each session:
- Date:
- Venue:
- Indoor/outdoor:
- Ball:
- Surface:
- Units:
- Actual or normalised:
- Altitude/temperature setting:
- Wind or other notes:
Use this row for each cell:
- Club and stated loft:
- Swing label and cue:
- Carry shots:
- Contact notes:
- Direction pattern:
- Typical carry:
- Observed carry range:
- Confidence: dependable / provisional / not yet usable
- On-course note:
Then build the playing card by sorting only the usable cells from shortest to longest. Add a provisional mark where needed. Keep the raw sheet so that each rounded number remains traceable to actual shots.
The finished matrix should make decisions calmer
A good wedge matrix does not make golf automatic. It removes one avoidable uncertainty. When you face a partial approach, you can begin with a measured stock option instead of searching for a new feel over the ball.
Keep the first version small. Measure carry rather than relying on total distance. Warm up before saving data. Retain ordinary misses, label obvious non-shots and preserve the range around the central number. Leave unreliable cells blank. On the course, adjust the baseline for lie, landing area, elevation and weather, then choose the shot whose normal pattern fits the safest target.
The value is not in owning twelve numbers. It is in knowing which numbers deserve trust. Build the chart honestly, use it conservatively and update it when new evidence shows that your stock shots have changed.
If you want a broader structure around the calibration work, use the existing 60-minute practice guide to place wedge mapping inside a balanced session rather than turning every visit into a distance test.
Related guide — How to Practise Golf: A 60-Minute Plan ↗
If your carries overlap, contact varies widely or the launch data does not match the ball flight you see, a coaching assessment can help separate a measurement problem from a strike, delivery or shot-selection problem.