
A reliable tee-shot strategy starts before you choose a swing thought. Identify the space that gives you a playable next shot, identify the side of the hole where a miss becomes expensive, then choose the club, target and intended shape that fit your real pattern. The aim is not to hit every fairway or to remove all risk. It is to make one clear decision that gives an ordinary shot room to work and prevents one ambitious choice from turning a manageable hole into a recovery exercise.
That decision should be based on the shots you normally produce, not the single drive you can hit at your best. A golfer whose driver usually finishes across a broad right-sided corridor needs a different target from a golfer whose three-wood forms a narrower left-sided pattern. Distance matters, but it is only one part of the choice. Start direction, curve, strike, total spread, likely next-shot position and the severity of nearby trouble all belong in the same picture.
This guide gives you a repeatable process for the range and the course. You will build a simple tee-shot map, compare clubs without pretending that a tiny sample is permanent, choose a starting line that respects your pattern, and use a short routine that keeps the decision separate from the swing. All yardages and shot sets used below are hypothetical illustrations. Replace them with your own measured or carefully observed information.
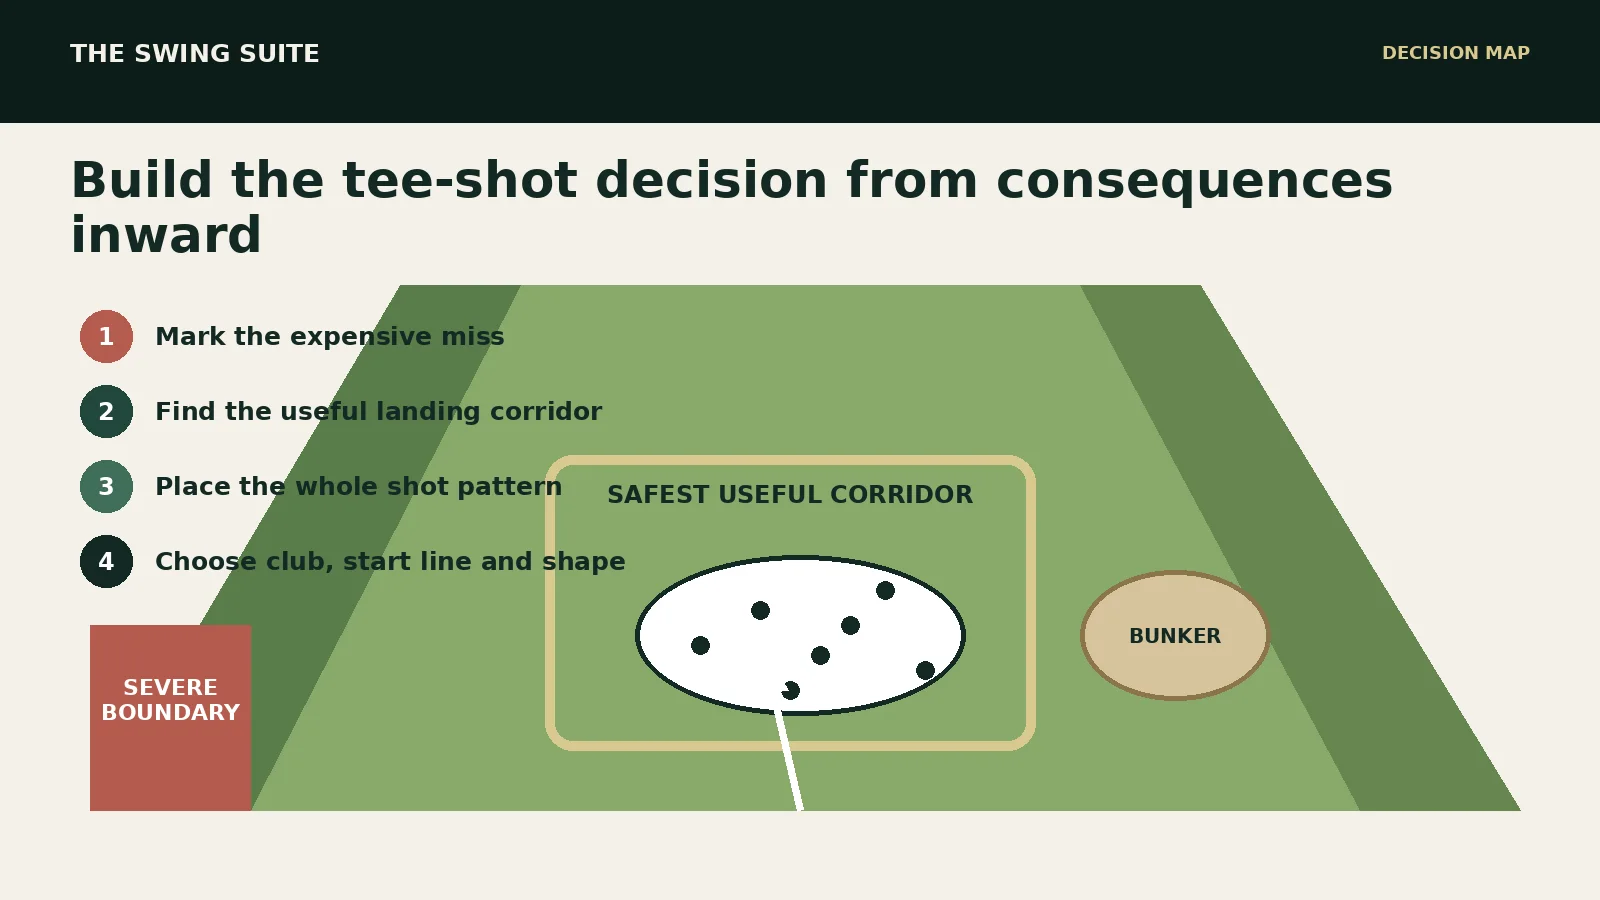
The direct answer: choose the safest useful corridor
For each tee shot, find the safest useful corridor: the part of the hole that leaves a realistic next shot while giving your normal dispersion space to breathe. Begin with the severe boundaries rather than the flag or the centre stripe. Out of bounds, water, a blocked recovery, deep rough, fairway bunkers and a forced carry do not all cost the same. Decide which outcome you most need to avoid, then work backwards to a target and club that reduce the chance of bringing it into play.
Next, choose the club whose whole pattern fits the corridor, not simply the club with the longest good shot. If driver creates enough width and the severe trouble sits outside that width, driver may be the sensible choice. If the driver pattern overlaps a penalty area while a shorter club leaves a comfortable approach from a wide section, the shorter club may be better. If laying back brings a narrow part of the fairway or an awkward distance into play, the shorter club is not automatically safer.
Finally, choose an exact start line and intended shape. “Hit the fairway” is not a complete target because it gives the eyes no specific reference and does not allow for curve. Name a distant point, a start window and the movement you expect. The plan might be “start at the left edge of the right bunker and let the normal fade finish in the centre-right corridor”. It should be simple enough to say once, accept and execute.
Strategy is a club, target and shot decision
A useful course-management sequence connects the target, intended shot and club. That order prevents club selection from becoming automatic. A target can change which shot shape is sensible, and the intended shot can change which club offers the best margin. Standing on every par four with driver already in hand removes two parts of the decision before you have read the hole.
Read how TrackMan Map My Bag records carry and dispersion ↗
Use confidence carefully. Confidence should mean that the task matches a pattern you have seen often enough to plan around, not that the last swing felt good. A demanding tee shot may still call for driver when the shorter club brings a cross bunker into the landing area or leaves a much harder second shot. Equally, a wide fairway does not make driver compulsory when the only damaging miss sits exactly where your driver pattern tends to finish. Strategy is specific to the hole and the golfer.
Separate the quality of the decision from the quality of the strike. You can make a sensible plan and hit a poor shot. You can also make a poor plan and escape because you struck your best drive. Review both layers. Ask whether the target and club gave the normal pattern enough room, then ask how the execution compared with the intention. If you judge only the result, a lucky bounce can teach the wrong lesson.
Start with the consequence map, not the centre of the fairway
From the tee, scan the hole in layers. First identify boundaries that can add a penalty or remove a normal next shot. Second identify trouble that still permits recovery but changes the expected difficulty of the hole. Third identify the broad useful area from which you can play the next shot without needing something exceptional. The fairway is valuable, but a strip of light rough with a clear angle may be more useful than the narrowest part of the fairway beside a bunker.
Give every hazard a consequence rather than treating all trouble as one colour on a course map. Out of bounds and water may demand the largest margin. Trees may range from a clear punch-out to a lost ball. A fairway bunker may be harmless with a wedge but costly when it leaves a long carry. Rough may be playable in dry conditions and far less predictable when wet. Your strategy should reflect what the miss actually means on that day.
Then find the width that matters at your likely landing distance. A fairway may look wide from the tee yet pinch where driver finishes. A bunker may appear central but sit short of your normal carry. A dogleg can make the visible centre a poor target because the best angle is on one side. Use a course guide, markers, a rangefinder where permitted, and visual references, but keep uncertainty in the plan. If you cannot establish an exact carry, choose a margin rather than inventing precision.
Wind, firmness and slope can move the effective landing corridor. A following wind can extend the ball into a narrowing section. A headwind can make a forced carry more demanding. A crosswind can widen the downrange result even when the start and curve are familiar. Firm ground adds roll and can feed a ball towards trouble. Adjust the target or club for the conditions, but avoid a last-second technical rebuild. The strategic response should normally be simpler than the weather.
Build a tee-shot pattern you can actually use
A strategy becomes more reliable when it is based on a representative pattern. That pattern needs more than average distance. Record carry or landing distance when available, total finish, lateral spread, common start direction, curve, strike and the share of shots that create a playable next position. Averages can hide important shapes. Two groups may share the same centre while one is compact and the other contains large misses on both sides.
Use the same target and a normal pre-shot routine. Keep first attempts rather than deleting uncomfortable shots until the pattern looks tidy. Exclude a ball only for a clear reason such as an interruption, a failed launch-monitor capture or unsafe contact, and record the exclusion. The objective is not to produce an attractive screenshot. It is to estimate the space your tee shot needs when you receive one attempt on the course.
The existing Swing Suite guide to choosing targets from a shot pattern explains how to use the distribution rather than the highlight. For tee shots, add the likely landing distance and consequence map. The question becomes: where can this whole pattern sit so that ordinary shots retain a route forward and the most severe miss has more space?
Read how to choose golf targets from your shot pattern ↗
Do not turn a short test into a permanent identity. Ten or twelve shots can reveal an obvious practice pattern, but they do not prove what will happen in every weather condition, emotional state or lie. Repeat the test on another day and compare. If the pattern changes sharply, that uncertainty itself belongs in the strategy. A club with occasional great distance but unstable start, strike and curve may need a larger on-course margin.
Compare clubs by the whole outcome
Driver, fairway wood, hybrid and long iron should not be compared only by their best carry. For each realistic tee club, examine four questions: how far does the typical shot travel, how wide is the useful pattern, where does the severe miss occur, and what second shot remains? The club that produces the shortest approach is not automatically the club that produces the easiest hole. The club that finds the most fairways is not automatically best if it leaves a demanding shot from a poor angle.
TrackMan’s discussion with Michael Brennan describes using dispersion visuals to compare his driver and three-wood, then aligning targets with the actual downrange corridor rather than the fairway as it appears from the tee. The useful principle is not to copy a tour player’s numbers. It is to compare your measured patterns and use the club only when it creates a real strategic advantage rather than relying on a generic rule such as always take less club for safety.
Read the TrackMan discussion of patterns and course management ↗
A shorter club can reduce one risk while increasing another. It may remove a distant bunker but finish beside a closer bunker. It may find a wide section but leave a long approach over water. It may demand a near-perfect lay-up distance to gain any advantage. Draw the likely pattern at the club’s actual finish distance. Do not slide the driver pattern backwards and assume the shorter club has identical width, start and curve.
A driver can also be the conservative club when the landing area is wide, the severe trouble is short, and distance opens the hole. Conservative does not mean short; it means the choice with the best relationship between useful reward and damaging consequence for your pattern. This is why strategy must be built hole by hole. A fixed rule cannot see the shape, the wind, your strike pattern or the next shot.
Use a simple club baseline, not false precision
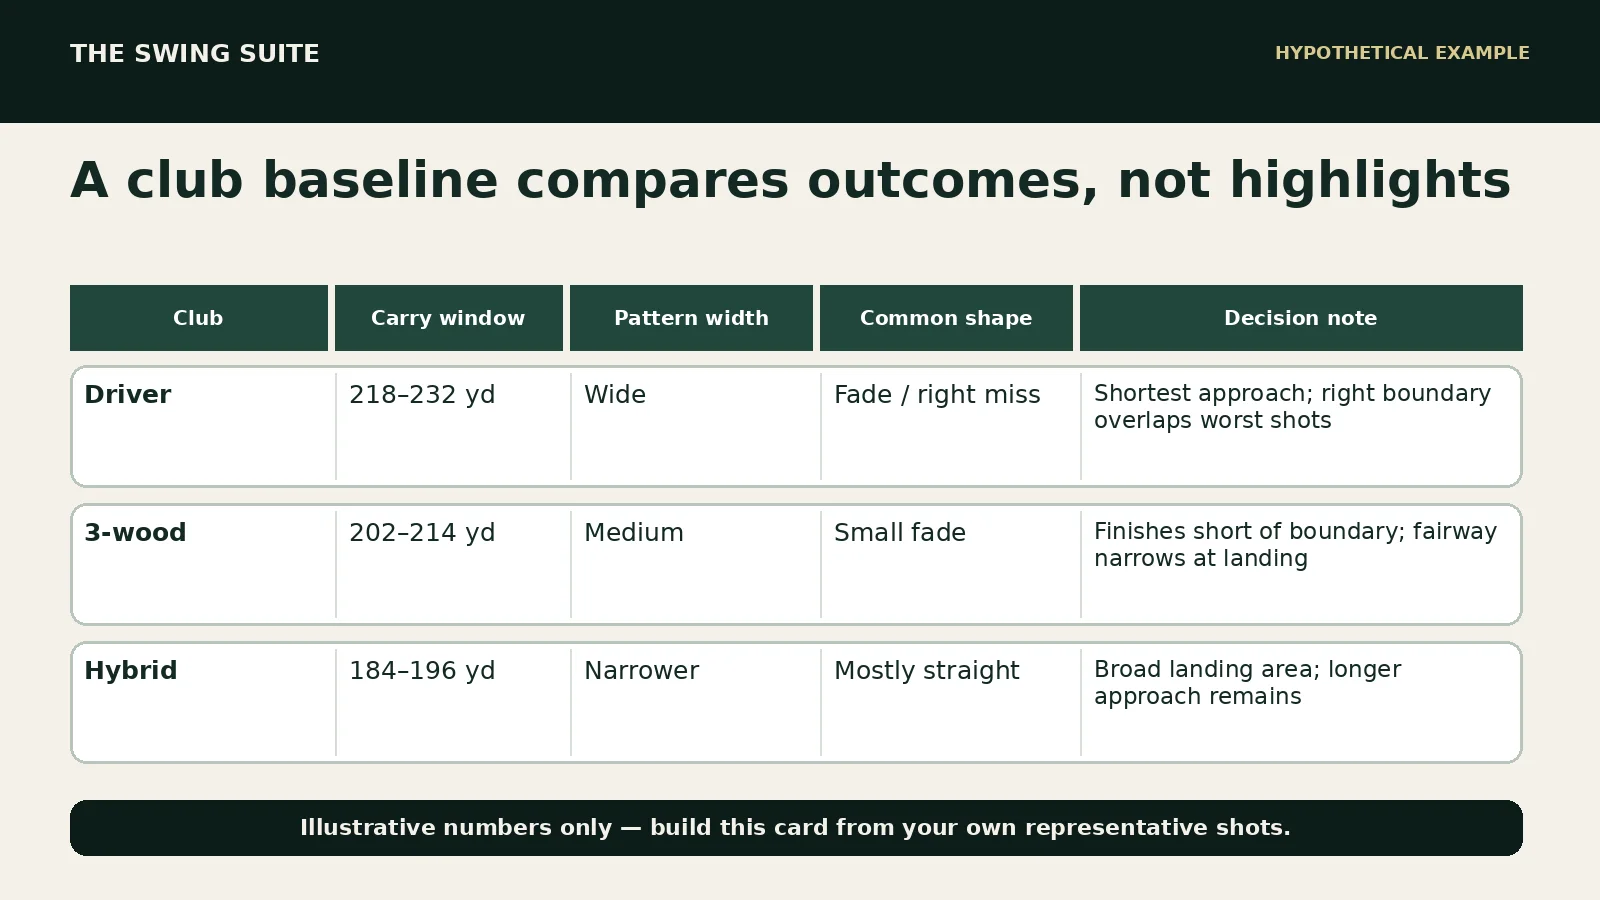
Create one baseline card for the clubs you genuinely use from the tee. Record a typical carry window rather than a single exact number when measurement quality is limited. Record total finish only when the surface and conditions make it meaningful. Add the lateral pattern, common curve and damaging miss. Finally, write the next-shot trade-off: for example, driver leaves a short iron but overlaps the right boundary; hybrid finishes short of the boundary but leaves a longer approach.
The sample in the diagram is hypothetical. Its numbers are not recommended targets and must not be copied into your planning. It shows how one golfer might compare three clubs using the same criteria. The most important fields are often the ones that do not look impressive on social media: two-sided miss, low strike under pressure, blocked angle, carry uncertainty and whether a shorter club actually reaches a wider part of the hole.
Update the card when evidence changes. A lesson, equipment change, injury, different ball, seasonal ground or a sustained technical change can alter the pattern. Do not update it after one extraordinary drive. Look for a repeated shift under comparable conditions. Retain old notes long enough to see whether the improvement is stable or whether the range task has not yet transferred to the course.
If you lack a launch monitor, use broad categories. Mark finish relative to a chosen corridor, estimate carry only where landmarks make it credible, and prioritise start, curve and playable outcome. A carefully observed left-centre-right pattern is more useful than a guessed carry number presented to the nearest yard. Coaching and measured feedback can later improve the map without invalidating the habit of recording honest outcomes.
Choose the correct side of the tee
Where the rules and teeing area permit, the side of the tee can help you create a clearer start window rather than placing the ball in the middle by default. Moving to one side changes the visual angle and can create more room for an intended curve. It does not physically widen the hole, and it should not be used to aim across severe trouble without enough margin.
A golfer who intends to fade the ball may sometimes prefer the right side of the tee to look diagonally across the fairway, while another golfer may see the shot more clearly from the opposite side. There is no universal side for every fade or draw. Test the view, the start reference and the severe miss. Choose the position that makes the intended corridor easiest to see and keeps the starting line away from the most expensive boundary.
Do not confuse a better view with permission to squeeze the target. If moving to the edge makes a bunker look less intrusive, confirm that the true line has changed in the way you think. Perspective can make distant objects appear separated when their downrange relationship is unchanged. Stand behind the ball, trace the start line, identify an intermediate mark and then settle into the shot.
Aim for your pattern, not against it
If your normal tee shot curves, the starting line needs to allow for that movement. A fade that begins at the centre of the fairway may finish near the right edge. A draw that starts at the centre may finish left. Aiming farther against the curve can be sensible only when the full pattern, including the occasional straight shot or double-cross, still fits the available space. The target must accommodate more than the expected curve.
The damaging miss deserves explicit attention. If the common shape is a fade but the rare left miss brings out of bounds into play, aiming at the left boundary may make the straight or left-starting ball too costly. If the fairway offers generous space right and a mild penalty left, a more central start may produce a better balance. Strategy weighs frequency and consequence together rather than pretending that either one can decide alone.
Avoid trying to manufacture an unfamiliar shape solely because the hole bends in that direction. A dogleg left does not require a draw if your reliable fade can be aimed into a useful corridor. Changing shape may add start-line, strike and curvature uncertainty at once. Use the shot you can predict unless the hole genuinely removes it and you have another shot that has been practised rather than imagined.
When the pattern is strongly two-sided, use more margin and simplify the task. Aiming at one edge while both misses remain possible can place one whole side outside the hole. Choose a wider corridor, a club with a more stable pattern or a target that keeps both ordinary misses playable. Two-sided dispersion is also a useful coaching question because shifting the average alone may not make the tee shot easier to plan.
Carry hazards need a separate decision
A forced carry changes the order of the calculation. Establish the required carry to a safe landing point, then compare it with a conservative version of your carry pattern in the day’s conditions. Do not use total distance to clear an obstacle. Do not use the longest shot you remember. If the required carry sits near the uncertain edge of the pattern, choose another route, another club or a different target where one exists.
Elevation, temperature, wind and strike can all affect carry. You do not need a complicated formula on every tee, but you do need humility about uncertainty. Into a headwind or when contact is inconsistent, add margin rather than promising yourself a perfect strike. If no route offers a comfortable margin, the hole may require accepting a lay-up or choosing the option with the least severe failure rather than pretending risk has disappeared.
Fairway bunkers require both carry and run-out awareness. A club may carry short of the bunker and roll into it on firm ground, or carry over it and reach rough beyond. Map the whole finish corridor. The same applies to slopes that feed the ball towards water or trees. Landing location and final location are different, and strategy should use whichever one controls the consequence.
Plan the second shot without over-planning the hole
A tee shot has a job: leave a useful next decision. Consider the likely distance, lie and angle after an ordinary result. A shorter tee club may leave a longer shot but a cleaner angle. Driver may leave a wedge yet bring a blocked side into play. The second shot matters, but do not demand one perfect yardage or one exact side. Build a corridor of acceptable positions rather than a tiny preferred dot.
Think in terms of your next comfortable task. If a lay-up leaves a club you rarely strike well, its apparent safety may be misleading. If driver leaves a partial wedge you dislike, that is a practice opportunity as well as a strategic factor; it does not automatically justify hitting into a narrower landing area. Strategy should acknowledge skill without preserving every weakness forever.
On a par five, the tee shot can be planned around the next two decisions. The longest drive may open a chance to advance aggressively, but a ball in trees can remove that option completely. A shorter, playable tee shot may preserve a straightforward lay-up. Again, compare the whole sequence using realistic shots. Do not build a three-shot plan in which every strike is your best and every miss conveniently stays clear of trouble.
A 20-second decision routine on the tee
Keep the on-course process short enough to repeat. Detailed mapping belongs before the round or during a practice session. On the tee, confirm conditions, locate the severe boundary, choose the useful corridor, choose club, name the start line and shape, then switch from decision to execution. If new information appears, such as a wind change or the group ahead reaching your landing area, step away and restart rather than blending uncertainty into the swing.
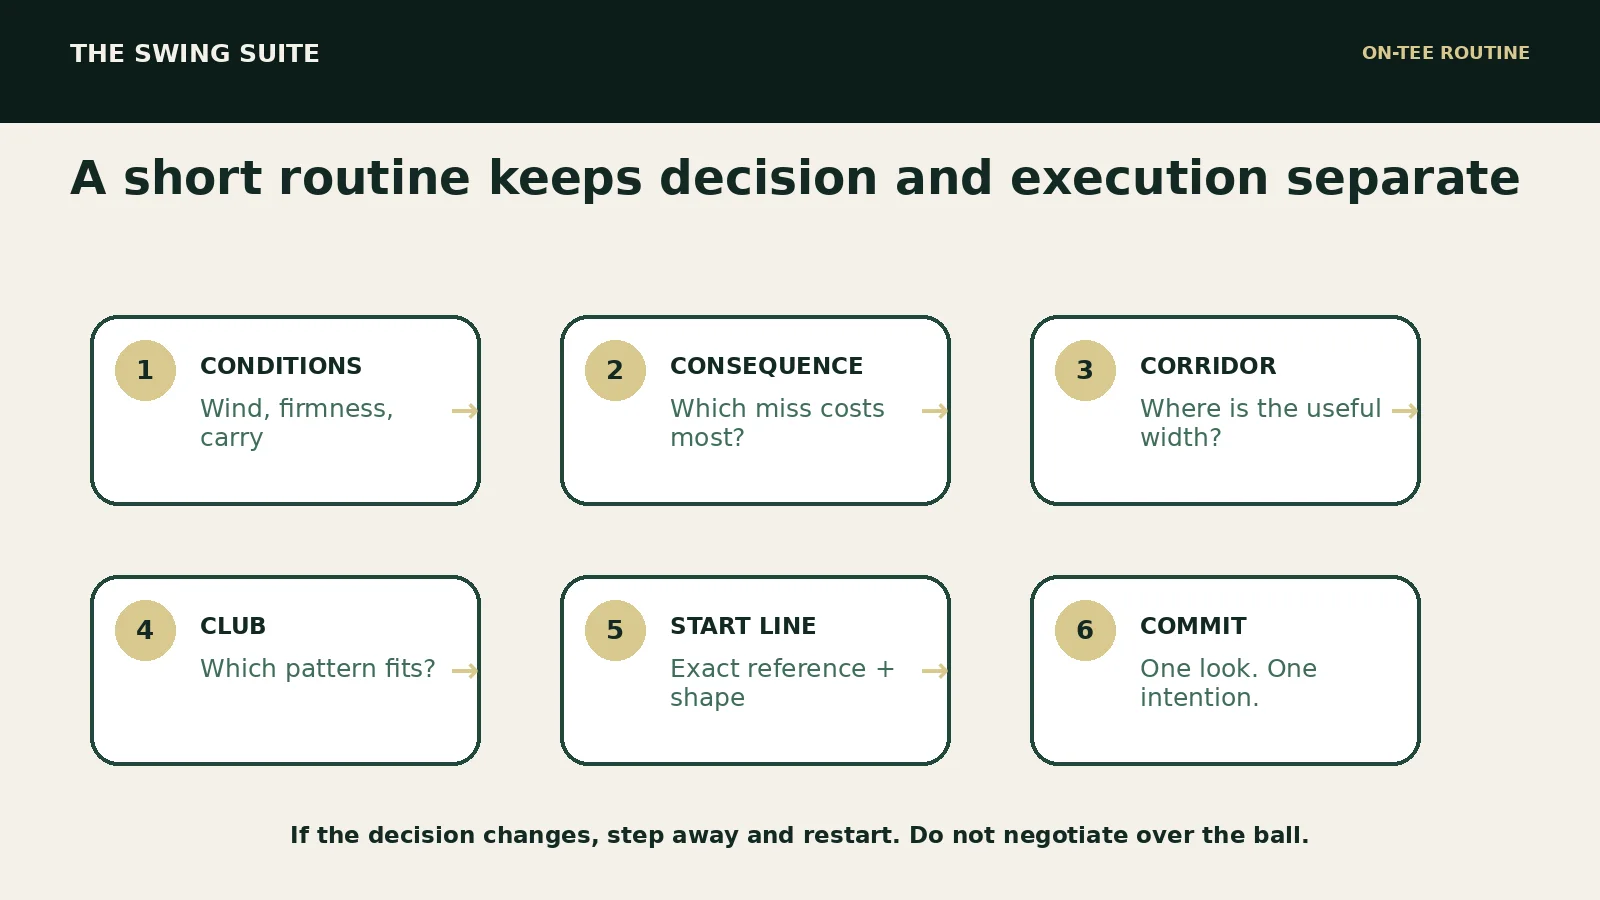
The routine in the diagram is deliberately decision-first. Once you have accepted the club and target, stop reopening the strategic argument during the address. Repeatedly changing between driver and fairway wood can leave you committed to neither. If the choice remains unclear, use a preset tie-breaker: select the option whose ordinary miss avoids the more severe consequence, provided it still leaves a reasonable next shot.
Use one external cue for the start line and one simple intention for the shot. Technical cues should be limited to something already practised and understood. The tee is not the place to combine three new movement instructions with a new shape and an aggressive target. If you need to manage a familiar miss, do so primarily with club and target. Let coaching and practice address the movement in a setting where you can learn from more than one attempt.
Practise strategy, not only technique
A range session can include tee-shot decisions without copying a specific course perfectly. Create fairway corridors with flags or launch-monitor targets. Give one side a severe consequence and the other a playable miss. Alternate holes so that the preferred club and start line change. Count the first ball after each decision. This introduces variability and consequence while preserving a clear, measurable task.
Use a three-club test. For each simulated hole, choose among driver, fairway wood and hybrid or long iron. Before hitting, state the club, target, shape and reason. After the shot, record whether the decision gave the observed result enough room. A poor strike does not automatically make the decision wrong, but repeated overlap between the normal pattern and severe trouble should change the plan.
Practise uncomfortable but realistic conditions. Include a hole where driver is clearly best, one where a shorter club creates a genuine advantage, and one where the choice is close. If every practice hole rewards the same conservative club, you are rehearsing a rule rather than decision-making. If every hole rewards maximum distance, you are practising speed or driving, not complete tee strategy.
Finish with transfer. Play nine simulated tee shots using a different target each time and no immediate repeat. Keep score as playable position, recovery required or severe outcome rather than as perfect fairway versus failure. That scoring reflects the actual job more closely. Review which decisions remained clear under change and which targets became vague when you had only one attempt.
A hypothetical nine-hole strategy test
Imagine a practice set with nine different corridors. On the first, right-side out of bounds makes the right miss severe. On the second, a fairway bunker sits at driver distance but short of the fairway-wood finish. On the third, a forced carry makes total distance irrelevant. On the fourth, the fairway widens beyond the bunkers. Each hole asks a different question, so the correct club should not be predetermined.
Before every ball, write a one-line plan. For example: “Hybrid, start at the left flag, hold the centre corridor; right rough is playable, boundary right is not.” Then hit once. Mark the observed start, curve, strike and finish. Score the decision separately from execution. If the target allowed the normal pattern but the strike was exceptional, retain the plan. If a normal shot crossed the severe boundary, revise the plan.
After nine holes, count how often you chose a precise start line, how often the chosen club’s pattern fit the corridor, and how often you reopened the decision while standing over the ball. These process measures are more useful than claiming a simulated score from a small range set. Repeat the same test later with different conditions or reversed hazard sides to see whether the decision process transfers.
Common tee-shot strategy mistakes
- Choosing driver automatically before reading the landing area, conditions and next-shot trade-off.
- Aiming at the visual centre without allowing for the intended start direction, curve and full lateral pattern.
- Using the longest remembered drive instead of a representative carry and finish corridor.
- Calling every shorter club safer without checking whether it reaches a narrower section or leaves an unsuitable next shot.
- Treating fairway, light rough, bunker, trees, water and out of bounds as consequences of equal severity.
- Aiming against the common curve so aggressively that the straight shot or opposite miss starts over severe trouble.
- Changing to an unfamiliar draw or fade because the dogleg appears to request it.
- Using total distance to judge a forced carry, or ignoring run-out into bunkers and boundaries.
- Deleting poor first attempts from practice until the pattern no longer represents one-ball golf.
- Changing club, target, shape and swing cue together, then being unable to identify what improved or failed.
- Reopening the decision during the address rather than stepping away and restarting.
- Judging the plan only by the result, so a lucky bounce rewards a poor decision and a mishit condemns a good one.
Another common mistake is trying to remove every possibility of a bad result. Golf does not offer a risk-free target. A sound plan chooses which risk is acceptable, which consequence deserves the largest margin and what reward is useful enough to pursue. The standard is not certainty. It is a clear, evidence-based choice that you can commit to and review honestly afterwards.
When the aggressive option is sensible
Aggressive and reckless are not synonyms. Driver can be the sensible option when its normal pattern fits, the reward materially simplifies the next shot and the severe miss has adequate margin. A wider landing area at driver distance may make it both longer and safer than laying back. The choice becomes aggressive only relative to another option; the actual risk comes from how the pattern overlaps the hole.
Define the reward precisely. “Closer to the green” is not always enough. Does the extra distance turn a long approach into a comfortable iron, carry a corner to open the green, or remove a forced lay-up? If the advantage is small while the severe boundary overlap is large, the risk may not be justified. If the advantage changes the hole and the normal pattern remains inside the corridor, commitment is reasonable.
Be suspicious of emotional aggression. Trying to recover a previous bogey, impress a playing partner or prove that a recent range gain is real does not change the hole geometry. Return to the same target-club-shot process. A strategy that changes with frustration but not with wind, position or pattern is unlikely to be strategy at all.
When the conservative option is sensible
A shorter club is useful when it meaningfully changes the consequence map. It may finish short of a penalty area, avoid a pinch point, remove a forced curve, or leave a broad angle to the next target. The benefit should be visible in the actual landing corridor. Merely reducing distance without reducing meaningful risk can leave you farther away with the same problem.
Conservative play also includes a more central target with the same club, accepting a longer next shot, or choosing the side that keeps recovery simple. You do not always need to change clubs. Sometimes the best adjustment is to stop chasing the ideal angle and aim where both ordinary misses remain in play. The label matters less than the relationship between pattern, consequence and next task.
Commit to the conservative choice fully. A golfer who selects hybrid but then swings as though trying to produce driver distance can lose the expected control. Use the normal shot for that club and accept the position it is designed to create. If the shorter club does not leave an acceptable next shot with a normal swing, reconsider the plan before addressing the ball.
Review your decisions after the round
A useful post-round review takes a few minutes. For each tee shot, record club, intended target and shape, actual start and curve, strike quality, finish category and whether the next shot was playable. Mark whether the decision or execution was the main issue. Do not rewrite the intention after seeing the result. If you did not choose a clear target, record that honestly rather than inventing one in retrospect.
Look for repeated decision errors. Did you aim too close to one boundary? Did the same club repeatedly reach a bunker you thought was out of range? Did the shorter club leave a second shot that created more trouble than expected? Did wind adjustment become exaggerated? One round is context, not a final verdict, but repeated mismatches between the planned corridor and observed pattern deserve a change.
Also retain good decisions that produced poor results. If the target gave the normal pattern room and one unusual strike found trouble, the plan may still be sound. This prevents strategy from becoming a list of superstitions based on the latest outcome. Conversely, note poor decisions that escaped. The ball finishing in the fairway does not prove that aiming across a penalty boundary was sensible.
Questions golfers often ask
Should I always hit driver on a wide hole?
No. Width at the relevant landing distance matters more than the view from the tee. Check where driver actually finishes, what trouble sits there, how wind and firmness affect run-out, and what next shot remains. Driver may still be best because distance is valuable, but the decision should come from the corridor and your pattern rather than the label “wide”.
Is hitting the fairway the main goal?
A fairway is usually valuable, but the strategic goal is a playable next shot with severe outcomes controlled. Light rough with a clear angle may be acceptable; a fairway position blocked by trees or beside a bunker may be less useful. Define the useful corridor for that hole and condition. Avoid using fairways hit as the only measure of whether the tee strategy worked.
How much dispersion data do I need?
Use enough honest shots to reveal an initial pattern, then repeat the test. A small set can support a practice decision but should not be treated as a permanent statistical truth. Include first attempts, normal routine and clear exclusions. Broad, repeatable categories are better than false precision. Coaching and launch-monitor data can improve the map when the decision deserves finer detail.
Should I aim down the opposite side from my curve?
Sometimes, but only when the full pattern fits. The common curve needs space, while the straight shot and opposite miss also need acceptable outcomes. Aiming at a boundary because you expect the ball to curve away can make one uncommon result extremely expensive. Place the whole distribution against the consequence map rather than aiming from the average shape alone.
When should I change club on the tee?
Change when another club materially improves the relationship between pattern, consequence and next shot. Examples include removing a forced carry that is too close to your reliable distance, finishing short of a severe pinch point, reaching a wider section, or preserving a better angle. Do not change merely because the previous drive was poor. Review the plan first, then execution.
Can strategy compensate for a two-sided miss?
It can create more margin, but it cannot make a wide two-sided pattern disappear. Choose wider corridors, avoid targets that place one whole side over severe trouble, and consider a club with a more stable pattern. Treat the two-sided result as useful coaching evidence. Moving the target without improving predictability has limits, especially on holes with boundaries on both sides.
Turn the strategy into one clear plan
Before your next round, choose three tee clubs and create a simple baseline for each. Note the carry or finish window you can support, common start and curve, total lateral spread, damaging miss and the second-shot trade-off. On the course, identify the severe boundary, select the safest useful corridor, choose the club whose pattern fits, and name one exact start line with one intended shape.
During the round, keep the routine short: conditions, consequence, corridor, club, start line, commit. Afterwards, review the decision separately from the strike. The process will not make every ball finish in the fairway, but it will make your choices clearer and your practice more relevant. Reliability begins when the target is built for the golfer who is actually playing, not the perfect swing imagined on the tee.
Book focused help with your tee-shot pattern
If you are unsure which club, target or shape best fits your tee-shot pattern, bring a representative set to a lesson. Measured feedback can help separate carry, start direction, curve, strike and dispersion so that practice and course decisions address the same evidence. Use the live booking page for current Swing Suite availability rather than relying on copied times or venues.