
Pitch distance control becomes easier to practise when you stop judging every shot only by where it finishes. Build three landing zones at clearly different carries, choose one zone before each shot and record where the ball first lands. Then note the rollout separately. This gives you two useful pieces of information: whether you produced the intended carry and what the surface did after the first bounce.
Begin with a stock pitch that feels comfortable rather than three different technical swings. Use one club, one ball type and one safe lie for the baseline. Choose a short, medium and long carry that fit your available space. The exact numbers are illustrative and should reflect the player, surface and safe practice area. The purpose is to create three distinguishable flights, not to copy somebody else’s yardages.
Run a small set, read the pattern and change only one input. That input might be the length of motion, the speed of the motion, the club or the set-up, but not all of them together. Finish with a matched retest using the same three zones and scoring. A single close finish is encouraging; a repeatable landing pattern is more useful evidence.
The direct answer: calibrate the first bounce
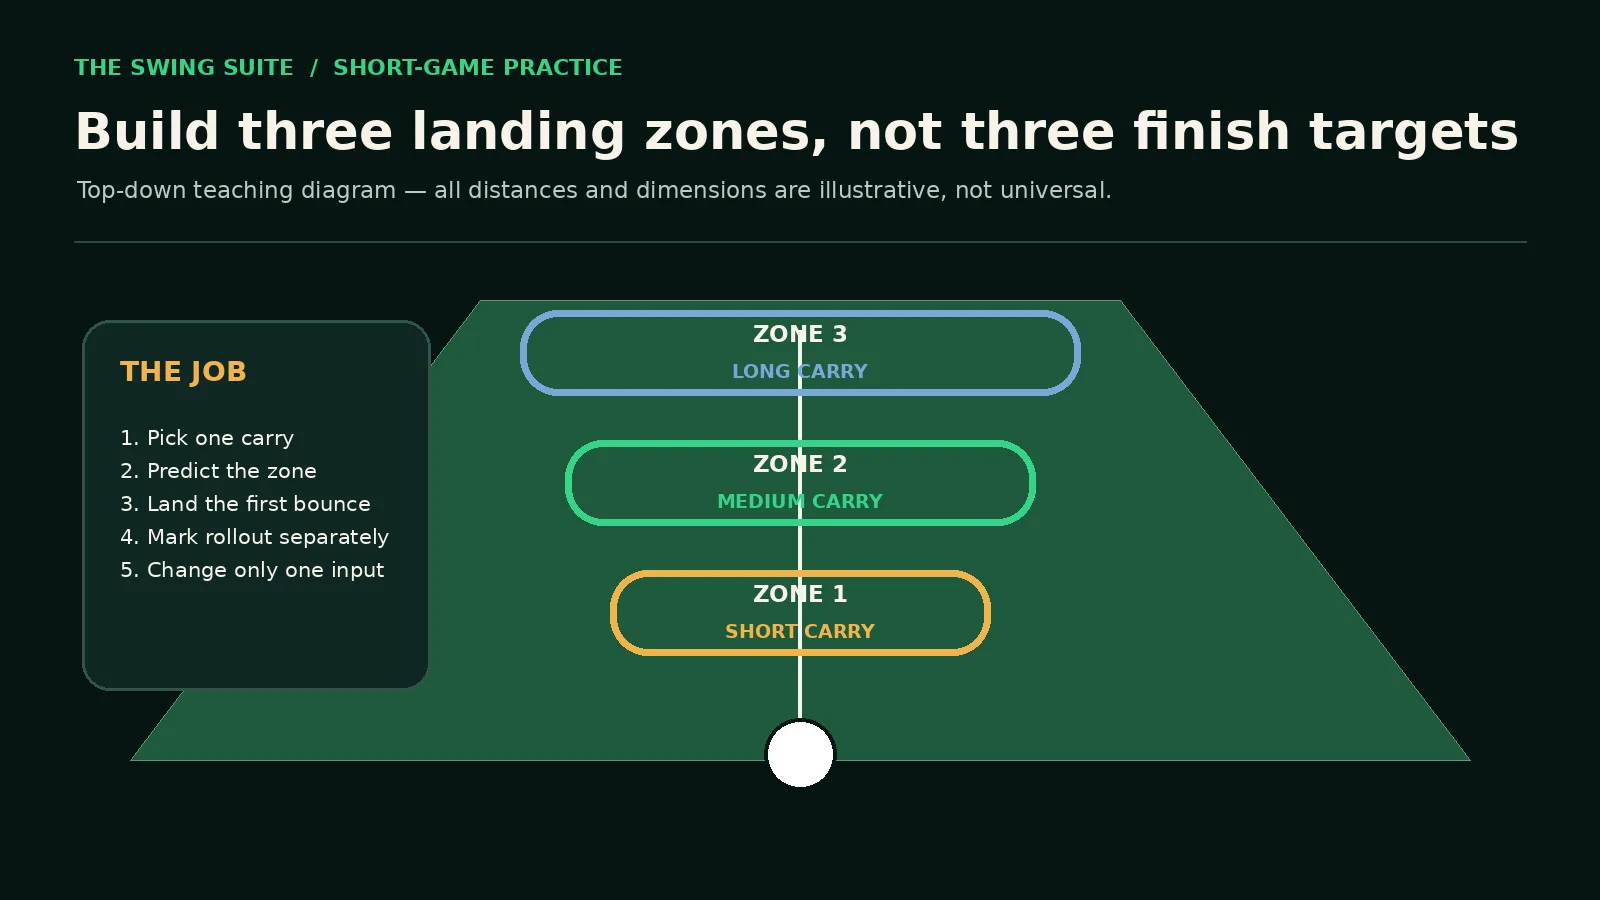
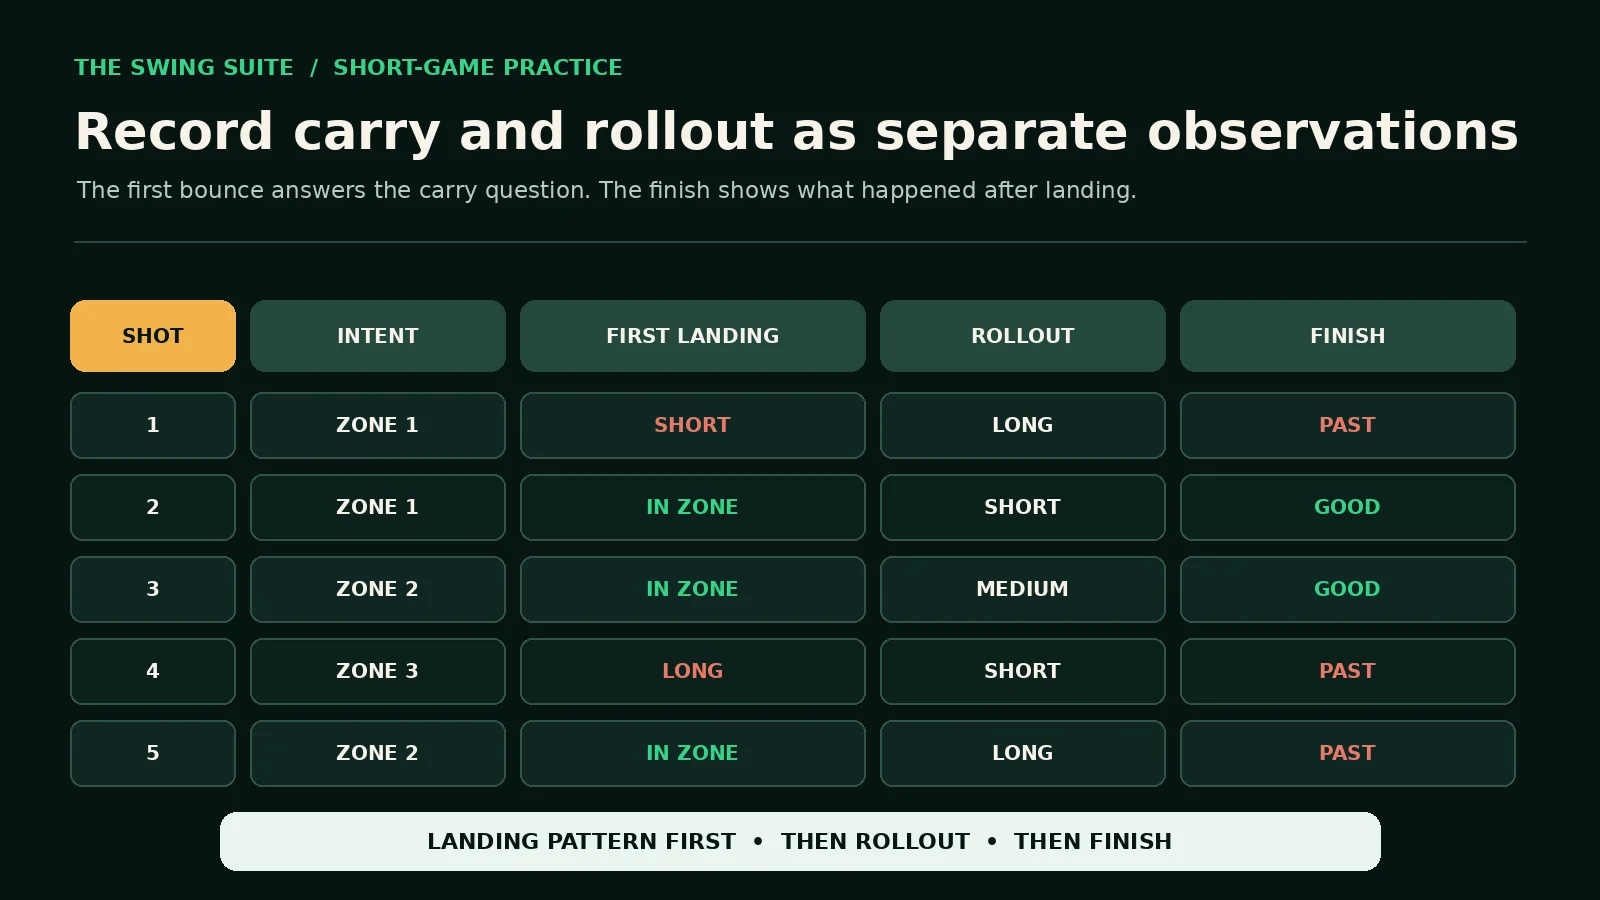
Place three visible landing zones along the same safe target line. Call them zone one, zone two and zone three, or label them with your own measured carries. Hit three or four shots to each zone using the same ball, lie and club. Before every shot, state the intended zone. Record short, in-zone or long according to the first bounce, then write a separate rollout note.
After the baseline, identify the earliest pattern. If every first landing is short, the carry input needs attention. If first landings are clustered but the finishes vary, the surface, landing angle, spin, strike or ball reaction may be changing the rollout. If both carry and rollout vary, simplify the task before looking for a complicated technique answer.
Practise one clear change for a brief block, then repeat the same called sequence. Compare the distribution of first landings rather than the best shot. The test has worked when you can make a clearer carry decision, produce a more stable landing pattern and explain the rollout without letting it rewrite the carry result.
Why the landing point deserves its own score
TrackMan defines carry as the distance from the starting position to where the ball lands. Its total-distance parameter includes the distance after landing as well. Those are connected outcomes, but they are not interchangeable. A pitch can carry the intended number and release too far, or carry short and finish close because the ground is firm and the ball runs.
If you record only the final distance, both shots may receive the same score. That hides the decision you were actually trying to train. Separating the first bounce from the finish lets you ask a cleaner question: did I send the ball to the intended landing area? Only after answering that should you assess how the ball reacted on this surface.
This distinction is especially valuable when moving between an indoor bay, a range and a short-game area. A measured carry can be compared more directly than a finish that depends on turf, slope, moisture and the shape of the landing. The full shot still matters, but the carry provides a stable starting point for calibration.
Review TrackMan’s definition of carry ↗
Carry, rollout and finish are three different observations
Carry: where the first bounce occurs
Carry is the primary score in this test. Watch or measure the first point at which the ball meets the ground. If the ball lands before the zone, record short. If it lands inside, record in-zone. If it lands beyond, record long. Do this before emotion about the final result changes your memory of the flight.
The first bounce can be difficult to see from a poor angle. Use a partner standing safely to the side, a launch-monitor display where appropriate, or a clear line of flat markers that makes the landing easier to judge. Do not place people or equipment in the target corridor. If the landing cannot be seen reliably, widen the zone rather than pretending the observation is precise.
Rollout: what happens after landing
Rollout begins after the first contact with the ground. For a simple scorecard, use short, medium or long rollout relative to the shot you intended. You do not need a perfect measurement during the first session. You need language that is stable enough to distinguish a ball that checks, a ball that releases normally and a ball that runs well beyond expectation.
Rollout can change even when carry is similar. The landing surface, slope, moisture, grass length, ball, strike and flight can all affect the reaction. Landing angle is one measured description of how the ball approaches the ground, but a basic zone test should not assign one cause from the finish alone. Record what happened, then investigate with measured feedback if the pattern matters.
Finish: the complete result
The finish combines carry and rollout. It is the practical result you care about on the course, but it is the noisiest score for learning because a fortunate bounce can rescue a poor carry and a firm patch can spoil a good one. Keep it as a third field rather than deleting it. The point is separation, not ignoring the whole shot.
A useful review sentence might be: “The first landing was in zone two, the ball released longer than expected and the finish ran past.” That is more actionable than “I hit it too far.” It preserves the successful carry and directs the next decision towards trajectory, landing area, club choice or expected release.
See TrackMan’s official total-distance definition ↗
Choose three zones that create distinct decisions
The zones should be far enough apart that each one requires a deliberate carry choice. If they overlap visually or differ by only a tiny amount, normal observation error can make the scoring arbitrary. If they are so far apart that one requires a completely different shot type, the test becomes a comparison of techniques rather than a calibration of one stock pitch.
For an illustrative example, a player with enough safe space might choose carries around 30, 50 and 70 yards. Another player might use 15, 25 and 35 yards. Those numbers are examples, not prescriptions. Choose distances that allow representative motion, safe landing space and clear observation. Indoors, the available measured range and launch-monitor mode may shape the choices.
Make every zone wide enough to create honest successes and failures. A landing strip several paces deep may be more useful than a small towel. Narrow zones can come later. The first session should reveal whether the player can produce three recognisably different carries without turning every ball into a precision examination.
Keep the zones on one line for the baseline. This reduces target-direction noise while you calibrate distance. Once the carry pattern becomes clearer, move the zones left and right or use different targets. Progression should add a fresh decision, not quietly change five conditions at once.
Build the practice area safely
Confirm that the full flight, landing and possible rollout are clear. Use a recognised short-game area, range target system or indoor bay whose rules permit the drill. Flat discs, towels or existing target bands are easier to see without creating a hazard. Never walk into an active landing area to adjust a marker while another player can hit.
Choose a lie that can be repeated without damaging the turf. On grass, move the hitting position within a small area when divots begin to collect, while keeping the intended carry measured from the new start. On a mat, note that the strike and launch may not represent grass exactly. The test remains useful if the environment is recorded honestly.
Stand where you can see the first bounce but not where a ball, club or ricochet can reach you. A phone on a stable support can record from a safe side angle, but recording is optional and must follow the venue’s rules. The scorecard should never require unsafe retrieval, blocked bays or loose objects in another player’s line.
Set a clean baseline before changing technique
Warm up with enough shots to understand the immediate surface and your body, but do not rehearse each target until it becomes familiar. Then choose the club, ball, lie, zone order and score categories. A baseline is useful only when those conditions are stated before the scored balls begin.
A simple order is zone one, zone two, zone three, repeated three times. Nine balls provide a small practical sample without pretending to be a scientific threshold. A shorter set can suit a beginner or limited range time. A longer set can suit an experienced player if attention and turf quality remain good. Stop when fatigue changes the motion.
Use your normal routine. Look at the zone, make one clear carry decision and hit. Do not rescue the shot during the motion. Record the first landing immediately, then rollout and finish. Avoid technical commentary until the full set is complete. Ball-by-ball diagnosis encourages a correction cycle and destroys the baseline you are trying to observe.
Use a scorecard that keeps the evidence separate
Create columns for shot number, called zone, first landing, rollout and finish. Add strike or contact only if you can record it consistently. Keep each label short. The purpose is to maintain attention on the shot, not to turn the session into paperwork. A tick, arrow or one-word code is enough.
Define the boundaries before the first scored shot. Decide what counts as in-zone when the first bounce touches an edge. Decide how you will label a ball that lands in the zone but takes an unusual kick. Decide which interruptions make a shot invalid. Rules chosen after a poor result usually make the data flattering rather than useful.
Preserve sequence. Three short landings followed by three long landings may show an overcorrection that a final average hides. A good final shot does not erase the earlier pattern. Review groups and transitions as well as totals. The goal is to learn how the player responds when the requested carry changes.
Read the landing pattern before choosing a fix
All three zones finish short
Check the first landings. If they are also short, the carry is under the intention across the set. Confirm that the zone distances were measured from the current ball position and that the chosen club can reach the longest target comfortably. Then choose one input to test rather than simply telling yourself to hit harder.
The change might be a longer motion with the same rhythm, a slightly faster motion with the same structure or a different club with a familiar motion. Pick one. Use a small discovery block and retest. If the carry reaches the zones but strike quality collapses, the new input has not created reliable control.
The short zone is accurate but the long zone spreads
This often means the player has a comfortable stock pitch but has not calibrated the larger version. Do not rebuild the short shot. Give more practice time to the long zone, then alternate it with the medium zone. The comparison helps the player feel what actually changes without turning the session into isolated repetition.
Check whether the long attempt brings several new variables: wider stance, different ball position, faster transition and a new follow-through. If so, simplify. A longer carry should have one clear organising change. Measured coaching can help identify whether the extra distance comes from a repeatable delivery or from a collection of compensations.
First landings cluster but finishes vary
This is the clearest reason to separate carry from rollout. The carry task may already be working. Review where each ball landed within the zone, the quality of strike, the shape of flight and the part of the surface it reached. A landing zone that crosses a slope or changes turf can produce different finishes from similar carries.
Rather than changing the stock motion, adjust the decision. You may need a different landing area, club or trajectory for the same final target. On the course, that is useful strategy. In practice, keep the carry score and add a rollout map so the surface becomes part of the lesson rather than random noise.
The pattern alternates short and long
Alternation can come from reacting to the previous shot. A short landing produces a forced longer motion; the next ball flies long; the player then decelerates. Stop reviewing after every ball. Hit a three-ball mini-set to the same zone with one intention, then look at the group. Delayed feedback can reduce the correction cycle.
If alternation remains, widen the zone or return to the medium carry. Check strike and contact before adding more technical thoughts. A two-sided pattern is usually not solved by chasing one direction. The first aim is a more stable motion and a clearer decision, then precision can be rebuilt.
Choose one distance-control input
Pitch distance can be organised in several ways. Some players use different motion lengths with a stable rhythm. Some use one motion with several clubs. Some combine a small set of motion lengths and clubs. The best system is the one a player can understand, repeat and test under changing targets. This drill does not require one universal method.
For the baseline, hold most variables still. If you choose motion length as the primary input, keep the club, lie and intended flight stable. If you choose club, keep the motion and landing decision stable. If you choose trajectory, recognise that the task has changed and create a separate test. Clarity matters more than having a large menu of shots.
Write the selected input on the scorecard. “Zone one = compact motion, zone two = medium motion, zone three = long motion” is a usable hypothesis. It is not a promise that the motion will produce exact carries forever. The session tests the mapping and gives you a starting point for future calibration.
Do not let tempo become a vague instruction
“Keep the tempo” can be useful only if the player knows what remains consistent. The motion may become longer while the overall pace feels organised. Alternatively, a player may use a similar length and vary speed deliberately. Both can work, but switching between them accidentally makes distance control difficult to read.
Choose a cue that can be observed: complete the backswing before changing direction, finish the motion without a sudden hit, or keep the same counting rhythm. Avoid claiming a universal ratio or speed. The objective is a repeatable relationship between intention and carry, not a cosmetic swing that looks identical at every distance.
If a player slows into impact to protect the landing zone, widen the target and restore a committed motion. Precision gained through deceleration often disappears when the target changes. A fair zone should invite the player to swing through the ball and learn from the landing, not steer the club towards a patch of grass.
Keep strike quality visible without making it the only score
A pitch struck thin, heavy or from a very different part of the face may produce an unusual flight. Add a simple contact note if the player can recognise it reliably. Do not delete every poor strike. It is part of the performance pattern. Exclude only a shot disrupted by an external event or a clearly invalid set-up under rules defined before the set.
Strike and carry should be reviewed together. A group of centred contacts that all land short suggests a calibration issue. A group with mixed contact and mixed carry suggests the player needs a simpler strike task before the yardage map can be trusted. The landing-zone test should reveal that distinction rather than force every problem into distance control.
When measured data is available, carry, launch, landing angle and other parameters can add detail. Use them to clarify the pattern, not to overwhelm the player with every number. Select the measures that answer the current question and preserve the called zone as the organising intention.
Review TrackMan Practice data parameter definitions ↗
Understand landing angle without overclaiming it
TrackMan describes landing angle as the angle at which the ball approaches the ground. A steeper or shallower approach can be part of why two shots react differently, but it is not the only factor. Surface, slope, ball, strike and spin also matter. A simple visual observation cannot assign a precise landing-angle value.
Use cautious language in the scorecard: higher flight, lower flight, softer reaction or longer release. If measured landing-angle data is available, compare it with carry and rollout over several shots. Do not treat one reading or one dramatic stop as proof of a complete technique. The relationship becomes useful when it repeats under matched conditions.
The practical decision remains straightforward. If the first landing is reliable but the rollout does not suit the target, change the landing area, club or intended flight and test again. Do not corrupt the carry map by pretending the original first landing was wrong merely because the ball released.
See TrackMan’s landing-angle parameter definition ↗
Progress from blocked calibration to changing targets
Blocked practice is useful for learning the three carries because the player can compare similar attempts. It becomes less useful when the same target and rhythm are repeated without a fresh decision. Once each zone has a recognisable pattern, move to a called sequence that changes every ball.
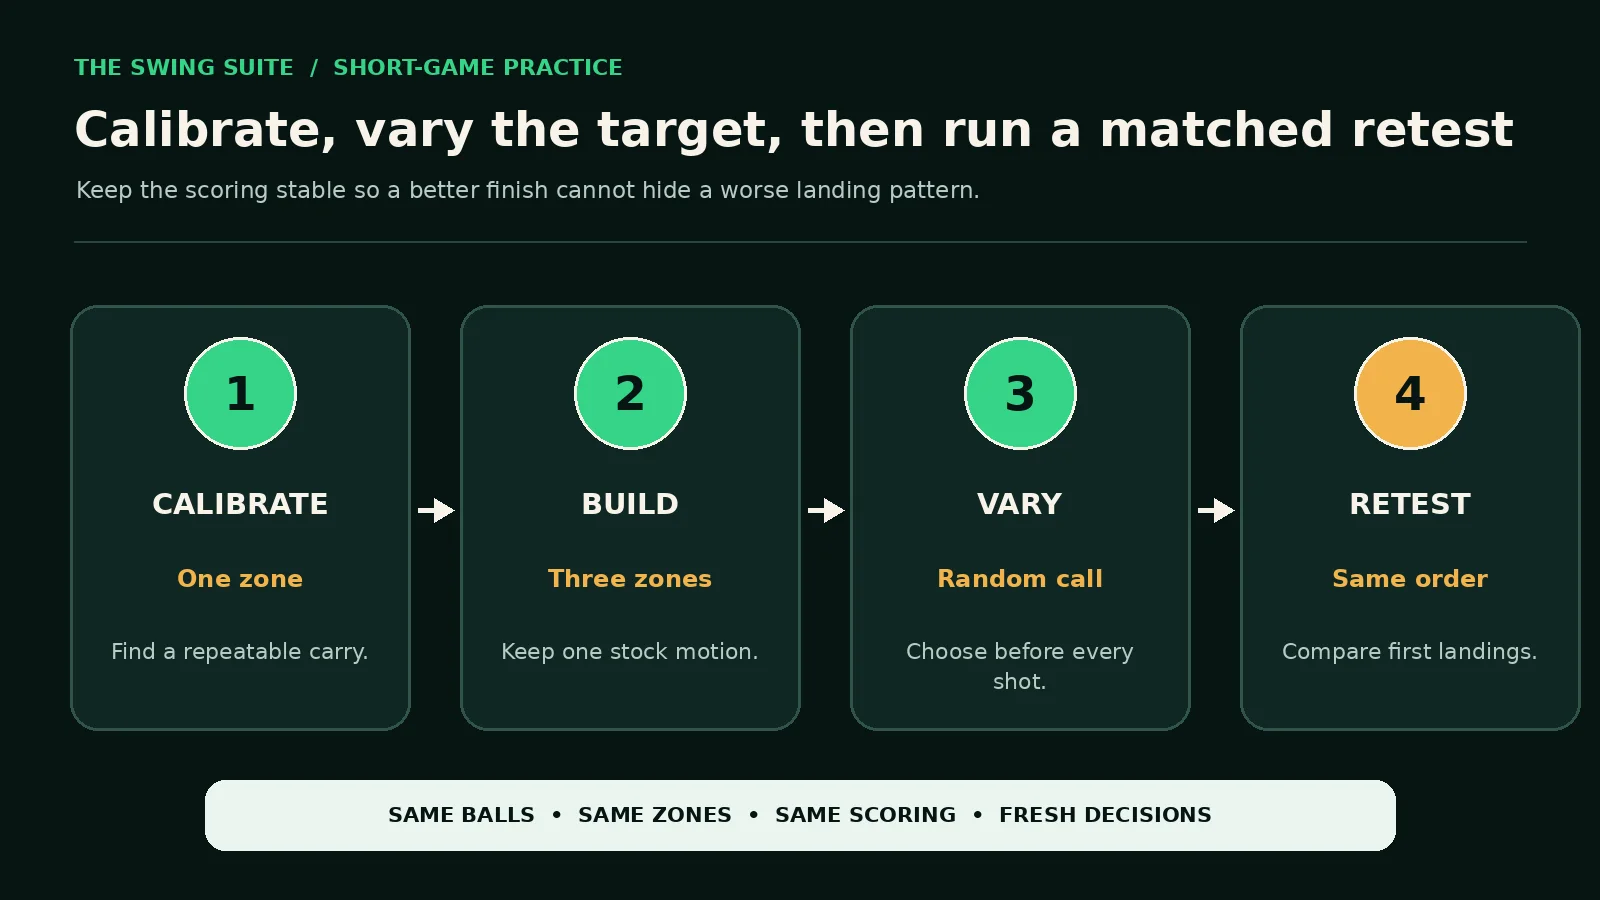
Write nine zone calls in advance or use a shuffled set of cards. The player must look, choose the matching carry input and commit. Keep the club, balls, lie and zone boundaries unchanged. This progression tests whether the map can be retrieved, not merely repeated after the previous shot.
Record the same fields. If performance drops when the zone changes, that is valuable evidence. The player may know how to repeat a pitch but not how to switch. Return briefly to paired contrasts such as zone one then zone three, or zone two then zone one, before restoring the random sequence.
Finish with a transfer set to new landing areas. Remove the original markers if safe and choose three realistic targets with different rollout requirements. Predict the first bounce and finish before each shot. The goal is to carry the calibrated decision into a new picture, not to become dependent on coloured zones.
Run a matched retest
A retest should use the same club, ball, lie, zone positions, order and scoring as the baseline. If the hitting area moves to protect turf, remeasure the carries. Remove any temporary training aid that was not present in the baseline. The purpose is to compare the player’s normal execution after the practice block.
Judge the distribution. Count first landings short, in-zone and long for each called target. Review whether the pattern moved in one direction, tightened or became two-sided. Then inspect rollout and finish. A better final average with more missed landing zones is not automatically an improvement. A clearer carry pattern may be progress even if the surface still creates varied finishes.
Record one conclusion and one next step. For example: “Zone one and two became stable; zone three remained short without forcing the motion.” That leads to a focused next session. “My wedges were better” is too broad. The retest should reduce the next question, not create a long list of swing thoughts.
A 40-minute three-zone session
Minutes 0–7: warm up and measure the zones
Use a few unscored pitches to understand the lie and surface. Select one club and a comfortable medium flight. Mark three safe landing bands at distinct carries. Confirm that every target and possible rollout stays within the practice area. State the zone boundaries and score labels before the baseline begins.
Minutes 7–17: nine-ball baseline
Hit zone one, two and three three times in a fixed sequence. Call the zone, complete the routine and record first landing, rollout and finish. Make no technical changes inside the set. If an external interruption invalidates a shot, record the reason and replace it once under the pre-agreed rule.
Minutes 17–27: one focused practice block
Read the first-landing pattern and choose one input. Use six to nine discovery shots, mostly at the weakest zone. Keep the other variables stable. Review in groups rather than after every ball. Stop the block if contact or commitment deteriorates; more repetitions are not useful when the task no longer represents the shot.
Minutes 27–35: matched retest
Repeat the original nine calls with the original scoring. Use the stock motion rather than a temporary rehearsal. Compare the full pattern. Look for a stable direction of change, not one highlight. Preserve rollout notes so a surface reaction cannot disguise the carry result.
Minutes 35–40: transfer
Choose three fresh targets with different landing pictures. Predict the landing zone and likely rollout, then hit one ball to each. Use no rescue shot. Finish by writing what transferred and what did not. The next practice session should begin from that observation, not from the best finish of the day.
Adapt the test for indoor measured practice
An indoor bay can make carry easier to measure because the display can report the shot independently of outdoor rollout. Use the facility’s supported practice mode and select three carries that fit the player. Keep the screen target and alignment consistent for the baseline. Record the measured carry and the called zone before reviewing any extra data.
Treat simulated total distance cautiously. It reflects the software environment and settings rather than the exact turf you will face outdoors. Use carry to build the distance map, then test rollout decisions on a real short-game surface when possible. Indoor calibration and outdoor transfer answer related but different questions.
TrackMan Performance Studio includes practice and analysis tools that can support structured sessions. The value comes from choosing the right task and parameters, not from collecting every available number. A measured lesson can help identify which carry map, strike pattern or flight variable deserves attention and which information can be ignored for now.
Explore TrackMan Performance Studio practice tools ↗
Adapt the drill when space is limited
If the practice area cannot hold three full carries, use three shorter zones with a compact pitch or run two zones at a time. Do not squeeze the markers so closely that observation becomes arbitrary. The structure matters more than the absolute distance: called intention, first-landing score, separate rollout and matched retest.
You can also calibrate one zone with three clubs. Keep the landing area stable and test how the different clubs change flight and rollout. This is a different experiment, so label it clearly. It can be useful when the course demands one carry over a hazard but several possible release patterns after landing.
At home, do not hit real pitches unless the environment is designed and protected for them. A small foam-ball motion can rehearse decision and routine, but it does not establish a real carry map. Preserve the distinction between a movement rehearsal and validated ball-flight practice.
Common three-zone mistakes
- Judging every shot by the finish and forgetting where the first bounce occurred.
- Choosing zone distances that overlap or require completely different shot types.
- Changing club, ball position, motion length and speed after one poor result.
- Using a tiny target before a fair baseline has been established.
- Removing poor strikes from the scorecard until the pattern looks tidy.
- Comparing pitches from different lies or slopes without labelling the change.
- Treating indoor simulated rollout as a promise about outdoor turf.
- Reacting to every shot and creating a short-long correction cycle.
- Practising one zone for too long without testing a fresh target decision.
- Claiming that one close finish proves a reliable distance-control system.
The correction is to protect the question. Choose the carry, observe the first bounce, preserve rollout and finish separately, then change one thing. A simple test gives better feedback than a complicated session whose conditions move after every ball.
Troubleshoot the drill
I cannot see the first bounce clearly
Widen and brighten the landing zones, move to a safe side-on viewing position or use measured carry. Ask a partner only if they can stand outside the target corridor. If observation remains uncertain, score a larger band. False precision is worse than a broad but honest category.
The ball lands in the zone but always runs too far
Keep the successful carry score. Review the landing surface, flight, club and strike. Choose a shorter landing area, a different club or a different intended trajectory, then test it as a new condition. Do not rewrite the original carry as a failure simply because the release did not suit the final target.
I hit the long zone by swinging harder and lose contact
Return to the medium zone and choose one organising input. A longer motion, different club or clearer finish may produce the required carry without a sudden hit. Use measured feedback or coaching if the extra distance consistently destroys strike. The longest zone should still look like a representative pitch.
The retest is worse than the baseline
Keep the result. The practice intervention may not transfer, or the baseline may have included a fortunate cluster. Check that conditions matched and that fatigue did not change the motion. If the test was fair, discard or revise the intervention rather than changing the score or adding another fix immediately.
My indoor carry map does not match the course
Confirm the ball, club, lie and measurement conditions. Outdoor strike from grass, temperature, wind and elevation can alter the result, and rollout will differ by surface. Treat the indoor map as a calibrated starting point. Validate it outdoors with safe landing zones before using exact course decisions.
Questions golfers often ask
How wide should each landing zone be?
Wide enough to distinguish the carry pattern without making normal observation error decide every score. Begin with a generous band, establish some in-zone shots and narrow only when the current task no longer separates the pattern. Record the boundaries so the retest uses the same test.
How many balls should I hit?
Nine baseline balls—three calls to each zone—can be a useful practical starting point, but it is not a scientific threshold. Use fewer if attention or turf quality declines. Use more only when each shot still includes a clear decision and normal routine. Quality of observation matters more than volume.
Should I use one wedge or several?
Use one club when the question is how one stock pitch produces three carries. Use several clubs when the question is how club choice changes flight and rollout for one landing area. Do not combine both experiments in the same score without labels. A clear session may explore one system at a time.
Should I measure in yards or use visual zones?
Either can work. Measured yards help build a carry map and compare sessions. Visual zones may transfer more naturally to the course. A strong progression uses both: calibrate measured carries, then select a visual landing area and retrieve the corresponding shot without staring at a number.
Does the closest finish win?
Not in the carry test. The primary result is the first landing relative to the called zone. The finish remains important and should be recorded, but it cannot overwrite the carry. For a transfer game, you can score both landing and finish with separate points so the complete shot matters without hiding the learning question.
When should I change trajectory?
Change trajectory when the landing-and-rollout requirement calls for it, not merely because one stock pitch missed. First build a baseline flight. Then create a separately labelled lower or higher-flight test with matched conditions. Measured data can help confirm that the new shot is genuinely different and repeatable.
A simple three-zone test to use this week
- Choose one club, one ball type, one repeatable lie and a safe target line.
- Mark three distinct and generously sized landing zones.
- Call the intended zone before every shot.
- Record the first landing as short, in-zone or long.
- Record rollout and final position in separate fields.
- Review the sequence before selecting one practice input.
- Use a short discovery block without changing several variables.
- Repeat the original zone order as a matched retest.
- Finish with three new targets and predict both landing and rollout.
Keep the first session plain. The zones should answer one question: can you produce three distinguishable carries with a representative pitch? The rollout notes then explain how those carries became complete shots. If the answer is unclear, simplify the distances, widen the bands and preserve one stock motion.
Reliable pitching is not a collection of lucky finishes. It is the ability to choose a landing area, produce a suitable carry and anticipate the release well enough to make a sensible course decision. Calibrate the first bounce, keep the rollout honest and let the matched retest decide whether the change helped.
Build your pitch-distance map with measured coaching
If your landing pattern is consistently short, alternates between distances or changes sharply with strike and flight, measured coaching can separate the carry decision from contact, launch and landing behaviour. A Swing Suite lesson can turn the three-zone result into one practical priority. Current options, venues and availability remain on the live booking page rather than being hard-coded here.